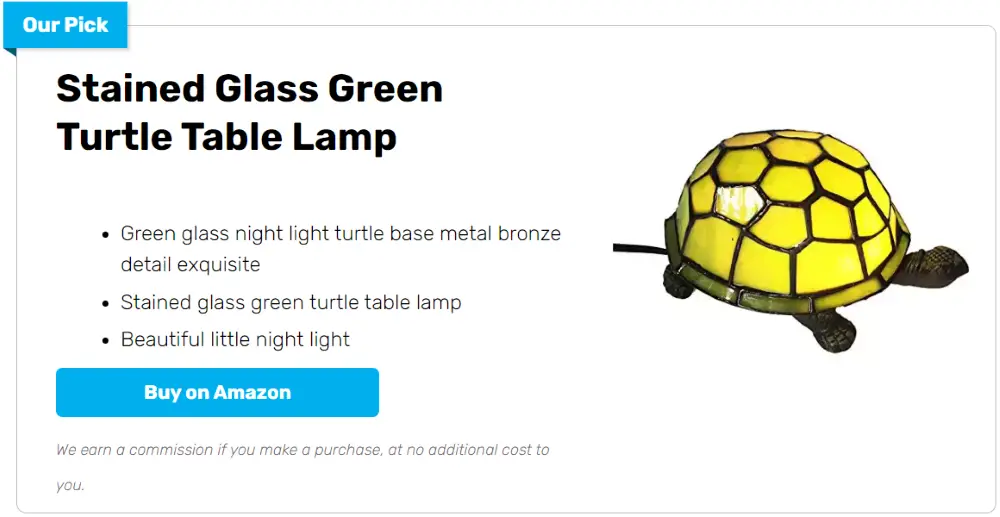
Creative minds are very good at finding treasure in what others consider to be trash. This project is a very good example.
Imagine turning discarded cardboard paper into a fabulous light source. You can use this to add a whimsical touch to your kids’ bedrooms. They’ll surely love it!

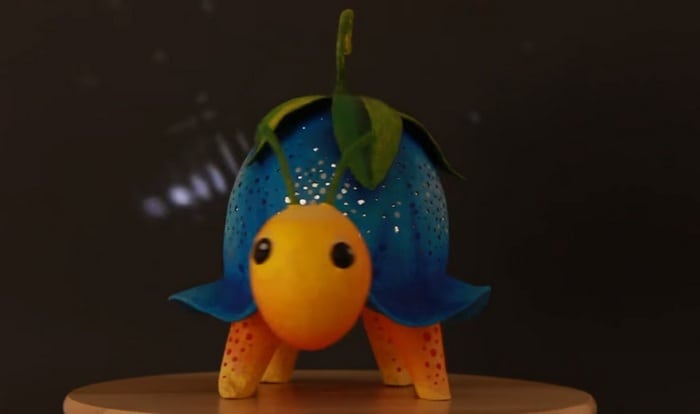
This do-it-yourself turtle lamp is made using very simple – and inexpensive – materials.
With a little imagination, you can upcycle old cardboard paper into a one-of-a-kind light source. Not only is this a great way to add some personality to your home, but it’s also a great way to save money.
If you have old cardboard paper lying around, you just need to add PVA glue and put in the work. Your kids will be enjoying this adorable turtle lamp anytime soon.
So next time you’re about to throw away that old cardboard box, think twice and see if you can’t turn it into something beautiful.
Plus, this is a great bonding activity for the whole family. Just be extra careful with the hot glue and other sharp tools used here. You can have your kids paint the turtle!

Here’s how you can turn cardboard paper into a fabulous light source.
You will need the following tools and materials to make a turtle lamp using a balloon.
- Recycled cardboard paper
- P.V.A. glue
- Hot water
- Balloon
- Hot glue
- Acrylic paint
- Small battery-operated light source
- Blender
- Strainer/sieve
- Knife
- Glue gun
- Scissors
- Sharpie/pencil
- Paper cutter
- Paintbrush
Click on any image to start the lightbox display. Use your Esc key to close the lightbox.
Contents
- 1 How to make a turtle lamp using a balloon
- 1.1 1. Create the mixture
- 1.2 2. Make your turtle’s shell
- 1.3 3. Make your turtle’s body
- 1.4 4. Make your turtle’s legs
- 1.5 5. Make your turtle’s head and neck
- 1.6 6. Add a plant on top of the turtle’s shell
- 1.7 7. Add your turtle’s small tail
- 1.8 8. Add your turtle’s little horns
- 1.9 9. Paint your cute turtle lamp
- 1.10 10. Add the LED light
How to make a turtle lamp using a balloon
Making a turtle lamp is a great way to show your creativity and add a personal touch to your home decor. Once you have your supplies, it’s time to get started!
1. Create the mixture
Cut the recycled cardboard papers into small pieces and place them in a blender with hot water.
Remove the recycled cardboard papers from the blender using a strainer and squeeze to remove the water.
Place the recycled cardboard papers in a bowl and add PVA glue. Mix well.
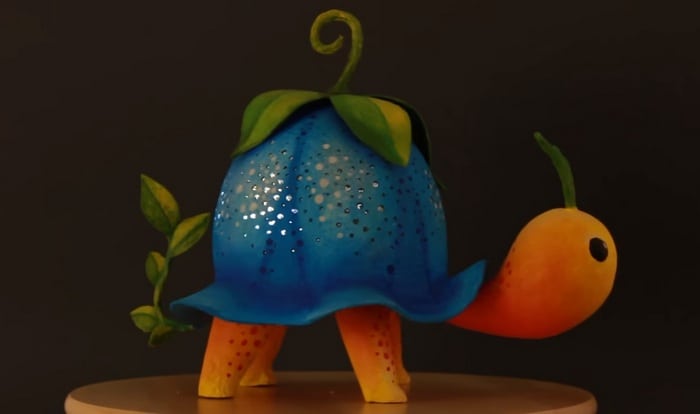
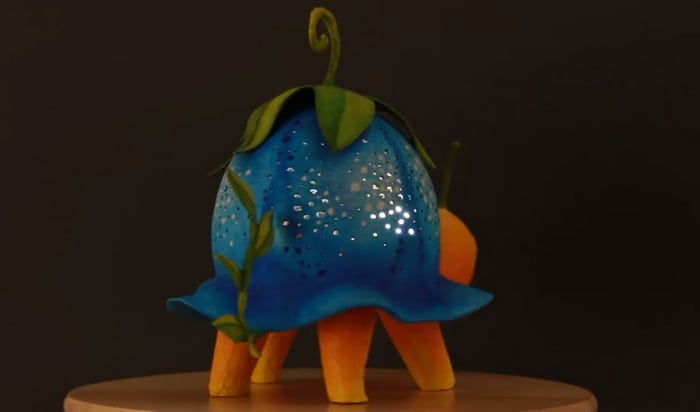
2. Make your turtle’s shell
By using the balloon to shape the turtle’s shell (vertebral shell), carefully apply the mixture, starting from the top, down to the sides. Let it dry.
Once the applied mixture is dry, carefully poke the balloon with a needle. Then remove.
For the sides of your turtle’s shell (coastal shell). Cut a piece of recycled cardboard paper (cut recycled toilet paper is an example of this) into small pieces. Using hot glue, attach them all over the sides of the vertebral shell of your turtle.
This will serve as your turtle lamp’s cover.
3. Make your turtle’s body
Using recycled cardboard paper, cut it round, or better yet trace your turtle’s shell (bottom part). To make this thicker, use two or three of these, and attach them all together.
4. Make your turtle’s legs
Using recycled cardboard toilet paper, cut each into half lengthwise. Fold it like a turtle’s legs, close it with hot glue, and attach them to the turtle’s body.
Carefully apply the mixture. Let it Dry.
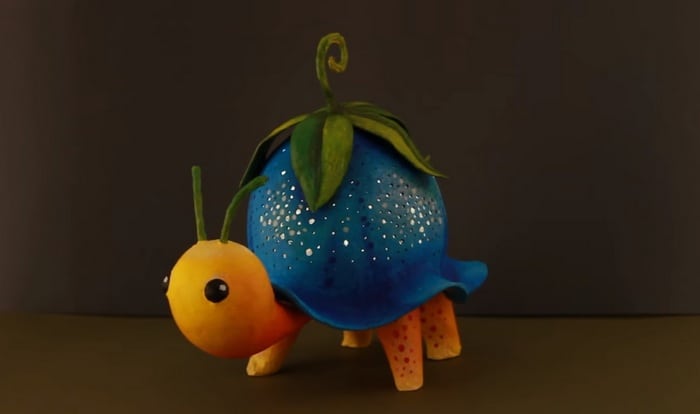
5. Make your turtle’s head and neck
Once the legs are attached to the turtle’s body, you can now add a neck and head. The neck should be similar in shape to the legs. We can make the head using the same process as making the turtle’s back. Just use a smaller balloon, attach it to the neck, apply the mixture, and let it dry.
To make it all sturdy, apply the mixture to the neck, legs, and body too. Let it dry.
Once your paint is dry, you can smooth out the surface of your turtle with a sheet of paper or very thin sandpaper. Just be careful not to damage your work! This will give your turtle a nice, smooth look.
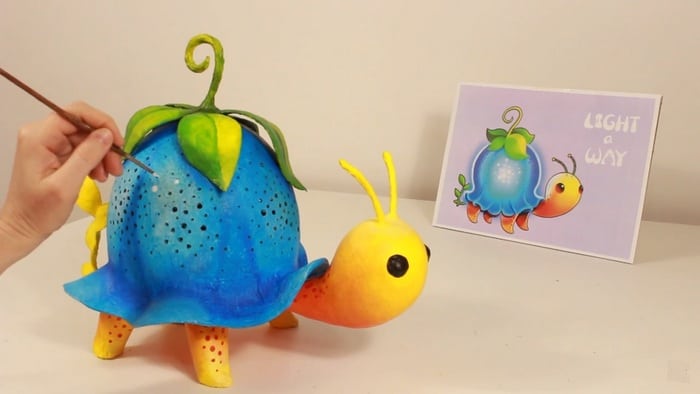
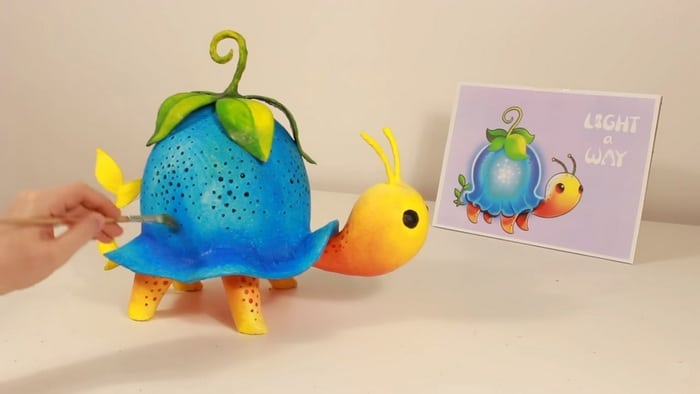
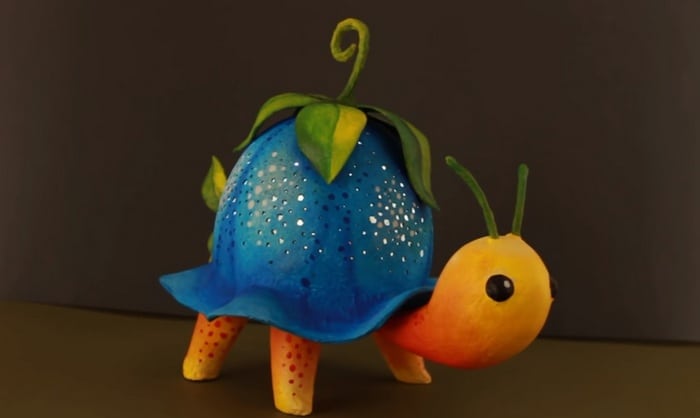
6. Add a plant on top of the turtle’s shell
Using the cutter, puncture a hole at the center of the turtle’s shell. Using the wire as a stem, Insert it into the hole and bend it to make a hook-like image. Fix it with hot glue. Add a small amount of mixture and let it dry. Remove excess wire.
Add some leaves to the turtle’s shell using hot glue. Use the remaining recycled cardboard paper & mixture to make some small leaves.
7. Add your turtle’s small tail
Attach a small wire to the bottom part of the turtle’s shell using hot glue. Use your pliers to shape it to make a tail look. Add a small amount of mixture and let it dry.
8. Add your turtle’s little horns
Poke two holes in the turtle’s head and add a small wire and shape it into two little horns. Add a small amount of mixture and let it dry.
9. Paint your cute turtle lamp
Once all is dry, you can paint your turtle white. let it dry.
Put some tiny holes in the shell, then paint it blue.
Paint the turtle yellow, then a shade of orange or brown.
Add the details. Paint the eyes black, the dots white or red and the leaves green. Let it dry.
You can use your own favorite colors, just be creative! 😉
10. Add the LED light
Finally, add your LED light inside your turtle lamp’s cover.
And that’s it! You now have a super cute and unique lamp that will add some extra personality to your room.
Now that you’ve added your LED light inside your turtle lamp’s cover, it’s time to enjoy the relaxing, warm light it provides. You should see the light shining through the cover, creating a beautiful effect.
Just sit back and enjoy your new turtle lamp! 😎
Thanks to Creative Mom and Learning Resources Blog for this great project. You can watch the full tutorial here:


