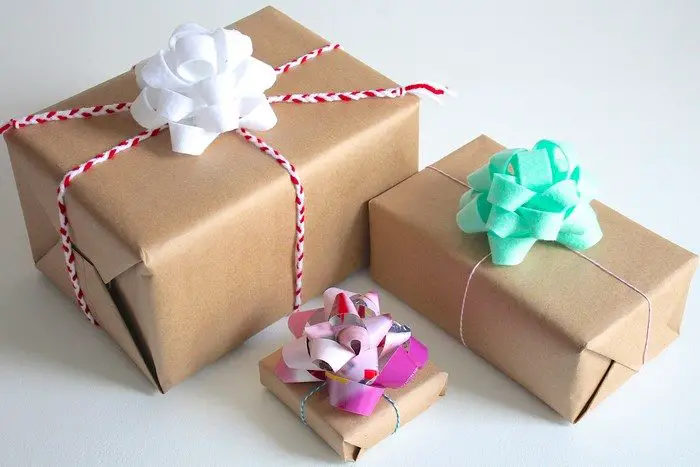
Need some really pretty gift bows for your Christmas presents? No need to add those to your Christmas gift shopping list or take a last-minute trip to the store! You can easily make them yourself using any nice-looking paper you already have at home!
Most DIY projects usually require more time and preparation to accomplish. But this little DIY project is one that you can do even when you are crunching time to get all your presents ready!
These DIY gift bows look like those we usually purchase from the store. But you don’t need to buy beautiful art paper to make them. You can just search your home for any colorful paper you can recycle — scratch papers or pages from a book or magazine.
The nice thing about making your gift bows is that you have more freedom to choose what color your gift bows would be. Plus, you can make them any size you want! Just take note that the bigger the gift bow, the thicker or stiffer your paper should be.
Creating several gift bows probably takes about the same time as going to the store. But what’s better is that you don’t need to go out of your house, you get to save some money, you get to have the exact size and color that you want and you are recycling!
Do you know someone who needs this gift-wrapping idea?
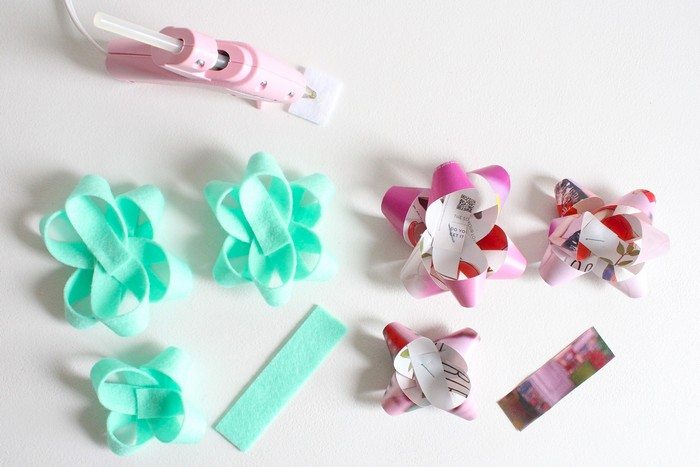
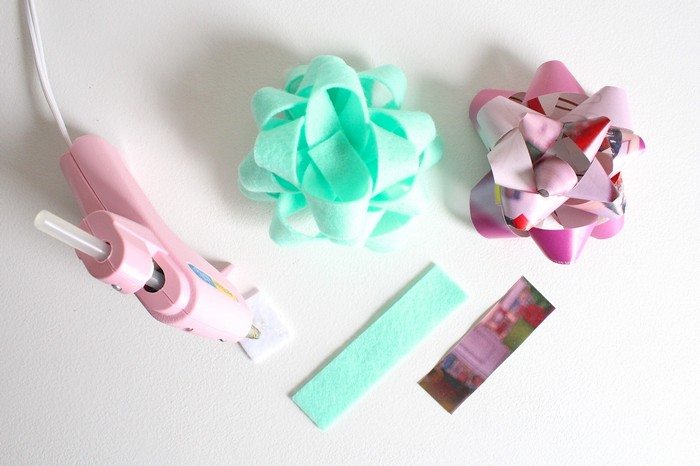
You’ll need the following tools and tools and materials to create this project.
- Paper or Craft Felt
- Scissors or Cutter
- Ruler
- Hot Glue Gun
- Stapler (optional but a time-saver)
Contents
Lovely gift bow designs
Below are images you can choose from to make a lovely gift bow.
Click on any image to start the lightbox display. Use your Esc key to close the lightbox.![]()

How to make a gift bow
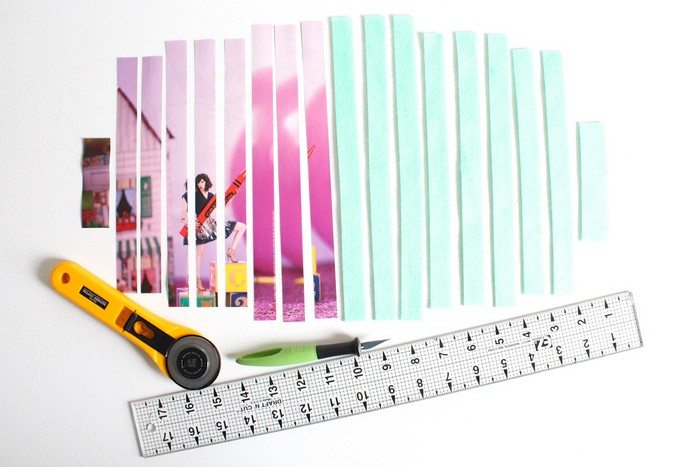
1. Cut strips out of your chosen material.
The sizes of these strips can vary greatly – skinnier and shorter strips give tiny bows, and longer and thicker strips give bigger bows!
These are the strips you’ll need:
- 3 long strips – mine was 3/4 x 11″
- 3 medium strips- mine was 3/4 x 10 “
- 2 short strips – mine was 3/4 x 9″
- 3/4 – 1″ wide strip for the middle of the bow – length will vary
The measurements above will give you the typical-sized bow you’d buy in a store – 4-5 inches across.
Once you’ve made a few of these, you should be able to size them up and down pretty easily! The process makes much more sense once you’ve made one or two.
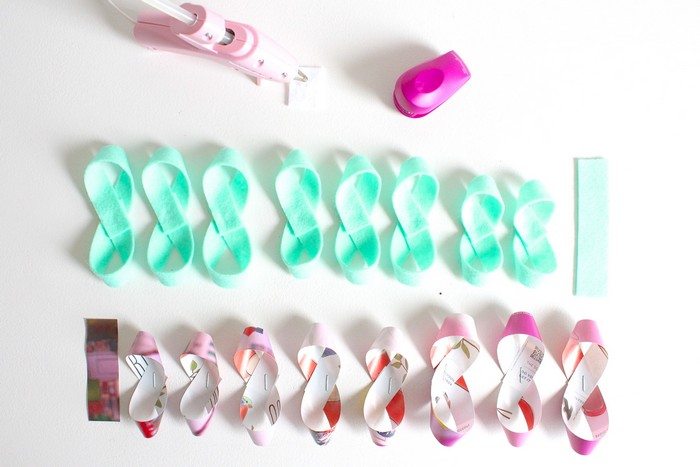
2. Loop the strips
Now you’ll want to loop the ends of each strip and have them meet in the middle. Just play around with one of the longest ones until it looks right, and then make the other long strips match that one. Do the same for the medium and short strips – each group of strips should look similar!
For paper, it’s super easy to staple them! It’s a nice shortcut. For felt, you’ll want to stick them together using a glue gun.
3. Glue them together.
Now you’ll want to glue each group together so you have three separate tiers.
4. Stagger the layers
Once that’s done, glue the three tiers together! Try to stagger the layers so they look nice and full.
The size of the strip you use to fill in the middle depends entirely on the space that’s left!
On felt bows, it’s best to use a wider strip – maybe 1 inch wide by 3-4 inches long. That will fill in the space better.
On paper bows, you’ll probably have a smaller space to fill in, so a strip 3/4 inch wide by 2-3 inches wide should do the trick.
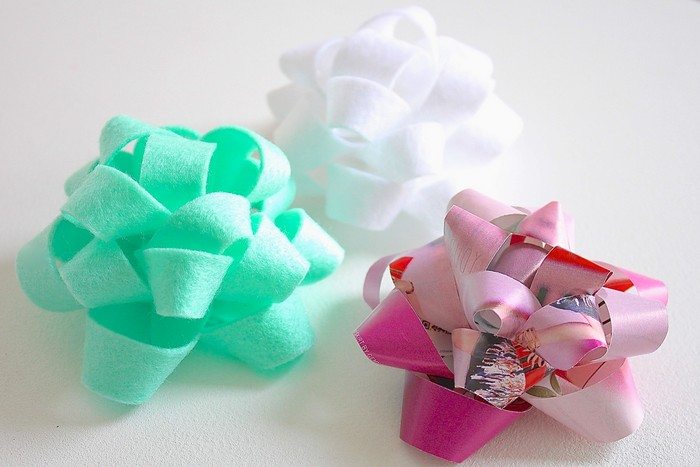
And there you go – custom gift bows out of any paper or felt you have around!
Thanks to jessyratfink for this great project!
Variations on Traditional Gift Bow Designs
Here are some fresh takes on traditional gift bow designs, allowing anyone to add a unique touch to their presents. From floral patterns to playful pom-poms, these variations cater to all tastes and occasions, ensuring your gifts stand out with a personal touch.
Floral Gift Bows
Floral gift bows mimic the delicate petals of flowers and add a soft, elegant flair to your wrapping. To create a floral gift bow, start by cutting long, petal-shaped strips. Curl the ends slightly to give a more natural look. Arrange these strips layer by layer, securing each one at the center with a dot of glue. Choose pastel-colored papers or thin fabric like silk to enhance the floral effect.
Pom-Pom Bows
Pom-pom bows bring a fun and festive vibe, perfect for children’s gifts or holiday presents. Cut strips of tissue paper or tulle about one inch wide. Gather these strips in the middle and tie them tightly with a twist tie, creating a full, round pom-pom. Fluff out the strips to form the pom-pom shape, and attach it to your gift with a ribbon.
Double-Layered Bows
For a more luxurious look, double-layered bows combine two different materials or colors for a dynamic effect. Start with a base layer of a wider ribbon or a contrasting material. Then, create a traditional bow on top using a narrower ribbon or a complementary color. This method not only adds depth to the bow but also enhances the aesthetic appeal of the gift.
Tulle Circle Bows
Tulle circle bows offer an airy, graceful appearance ideal for elegant occasions like weddings or baby showers. Cut several circles from tulle fabric, each progressively smaller than the last. Layer them from largest to smallest, securing each layer at the center. Pinch the center and tie it tightly with a thin ribbon or string, then fluff out the tulle to create a voluminous, cloud-like effect.
Chevron Bows
Chevron bows introduce a geometric twist to traditional gift wrapping. Use strips of paper or ribbon and cut the ends into a chevron pattern. Layer these strips in a starburst pattern, fixing each layer at the center until you achieve the desired fullness. This design is particularly striking with metallic or boldly colored materials.
Accordion Bows
Accordion bows are simple yet stylish and involve folding a ribbon or paper back and forth in an accordion style. Secure the center with a twist tie or a small piece of wire. Fan out the folds to create a full-bodied look that adds texture and depth to your gift wrapping.
Layered Loops Bows
Layered loops bows are an upscale take on the classic bow, featuring several loops of varying sizes stacked and secured together. Start with the largest loops at the bottom and work your way up to the smallest at the top. Mix and match different textures and colors for a visually interesting and festive result.
Knot Bows
Knot bows are minimalist and modern, perfect for sleek, contemporary gift wrapping. Take a single length of fabric ribbon, tie a simple knot in the center, and leave the ends long and flowing. This style works particularly well with silk or satin ribbons for a sophisticated look.
Each of these designs allows for customization in color, size, and material, letting you match the bow perfectly with the gift and occasion. Experiment with different combinations to discover your signature style.
Techniques for Attaching Gift Bows
Effectively attaching gift bows is key to ensuring your beautifully crafted bows remain secure and enhance the overall presentation of your gifts. Here are several techniques that cater to different types of materials and packaging styles, ensuring your bows are as functional as they are decorative.
Using Double-Sided Tape
Double-sided tape is an excellent choice for attaching paper and lightweight fabric bows to your gifts. It provides a clean, secure bond without the visibility of adhesive. Place a small piece of tape on the back center of the bow and press firmly onto the gift wrap. This method works well for flat bows or smaller, lighter bows where minimal support is needed.
Hot Glue Application
Hot glue offers a strong hold for heavier or more elaborate bows, such as those made from thick ribbons or fabric. Apply a small dab of hot glue to the back of the bow and quickly place it on the desired spot on the gift. Be cautious with the amount of glue used to avoid seepage that could mar the appearance of the bow or the wrapping.
Tying with Ribbon
If you’re using a soft material like ribbon or cloth for your bow, consider tying it directly onto the gift or a pre-existing ribbon wrapped around the package. This method not only secures the bow but also integrates it beautifully with the wrapping. Loop the ribbon around the package, tie it at the bottom, bring it up to the top, and then attach your bow by tying it in place.
Using a Stapler
A stapler can be a quick and effective tool for attaching paper bows, especially in casual settings. This method is best when speed is essential, and the back of the gift will not be visible. Simply staple the bow directly onto the top layer of the gift wrap, ensuring the staple is in the center of the bow for stability.
Sewing for Fabric Bows
For fabric bows, particularly those made from heavier materials like felt or burlap, sewing them onto a fabric-covered gift or a fabric ribbon can be incredibly secure. Use a thread that matches the bow and make a few small stitches in the back center to attach it discreetly.
Each technique provides a reliable method for attaching your gift bows, ensuring they stay in place and look great from the moment the gift is wrapped until it’s joyfully unwrapped.
Conclusion
Making a gift bow is a fun and artistic endeavor that lets you give any present a personal touch. Choosing from a range of materials and designs, you may create bows that exactly complement the event and your own style. Learning the craft of bow-making improves the unique sensation of gift-giving, enhancing every present’s significance.
If you liked this project, you might also like to view 10 Gift Ideas…


