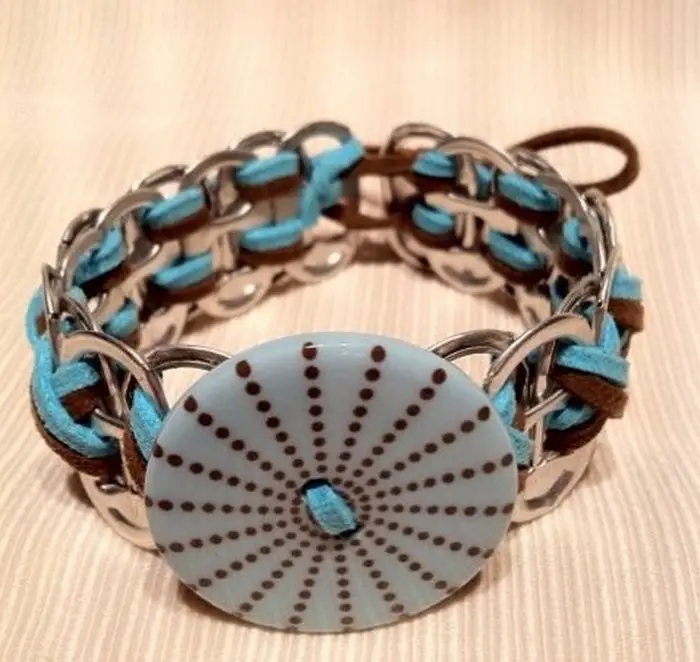
With just a little resourcefulness and creativity, you can make some pretty accessories for yourself and your daughter. This soda pop tab bracelet is a very easy DIY project!
You can make these for your family and friends, and it’s a great way to recycle old soda cans. All you need to do is collect some soda pop tabs and connect them together with a ribbon. You can then add some charms or beads to personalize the bracelet. This is a quick and easy project that anyone can do, so give it a try today!

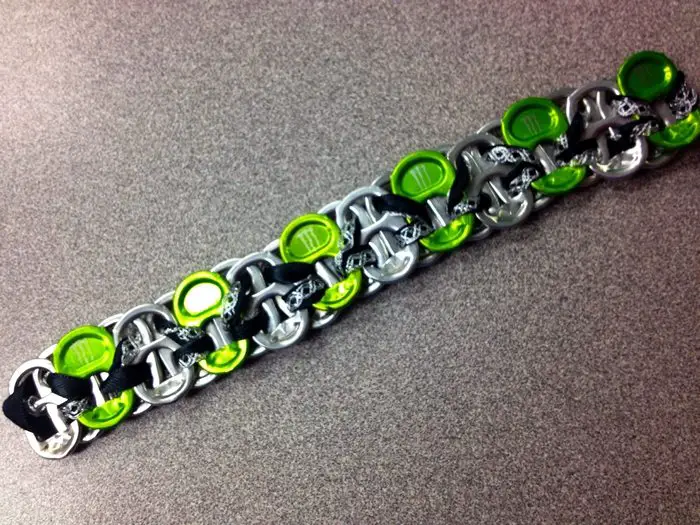
You can also use different colors of ribbons and tabs to create some for the boys! Your imagination is the only limit. :)
Contents
- 1 Adorable soda pop tab bracelet designs
- 2 Making a Soda Pop Tab Bracelet
- 3 DIY Accessory Customization
- 4 Soda Pop Tab Collecting Tips
- 5 Advanced Techniques for Soda Pop Tab Bracelets
- 6 FAQ on Soda Pop Tab Bracelet Crafting
- 6.1 Where can I find soda pop tabs for my bracelet projects?
- 6.2 What materials do I need to make a soda pop tab bracelet?
- 6.3 How long does it take to make a bracelet?
- 6.4 Can I make soda pop tab bracelets for men and boys?
- 6.5 Is it necessary to use special tools for the advanced techniques?
- 6.6 How can I make my soda pop tab bracelet more durable?
- 6.7 Can soda pop tab bracelets be adjusted for size?
- 6.8 Are there eco-friendly options for customizing my bracelet?
- 6.9 Can these bracelets be given as gifts?
- 7 Conclusion
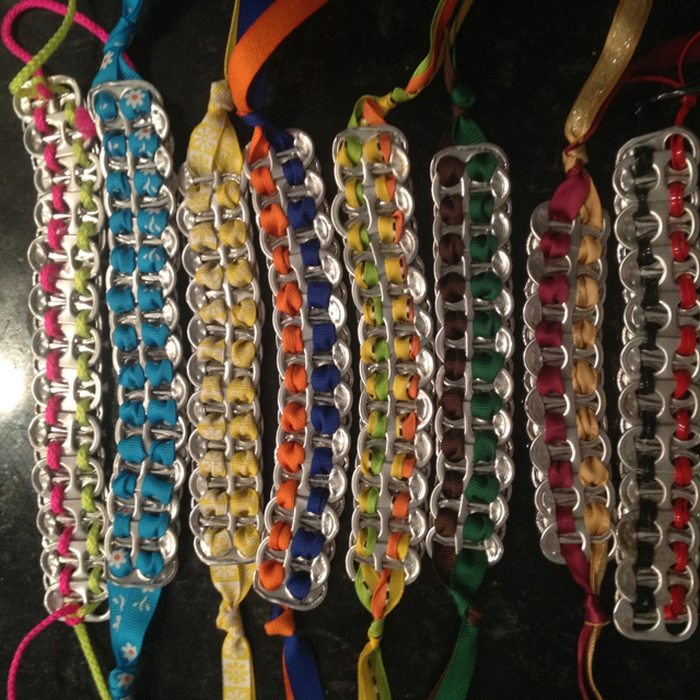
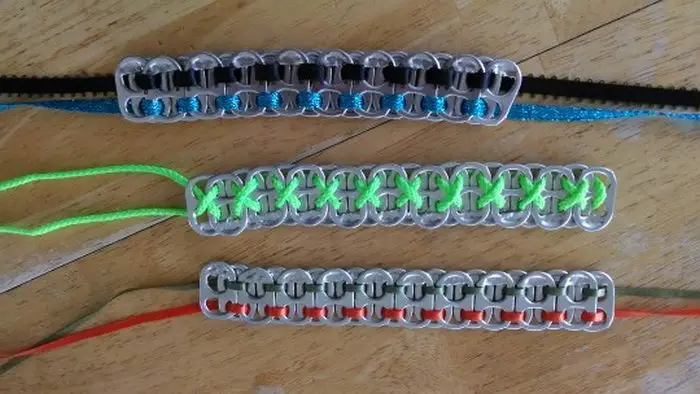
Adorable soda pop tab bracelet designs
Looking for a fun and unique way to show off your personality? Check out these adorable soda pop tab bracelets! With so many different designs to choose from, you’re sure to find the perfect one to match your style.
Click on any image to start the lightbox display. Use your Esc key to close the lightbox.![]()


So to get your creative juices flowing, let’s head on to this simple tutorial!
Making a Soda Pop Tab Bracelet
What are the materials needed to make a soda pop tab bracelet?
To make a soda pop tab bracelet, you’ll need a few supplies. First, you’ll need a supply of soda pop tabs, you can usually find these at your local recycling center. You’ll also need a length of string or ribbon, nail polish, pins, and a pair of scissors.
- Soda pop tabs
- Ribbon (color of your choice)
- Nail polish (color of your choice, to be used as paint for the tabs)
- Clear nail polish
- 2 small safety pins
- Scissors
How to make a soda pop tab bracelet?
Here’s a fun and easy project for those looking to upcycle their used soda pop tabs! With a little bit of time and effort, you can turn those tabs into a beautiful and unique bracelet. Here are the steps:
1. Paint the soda pop
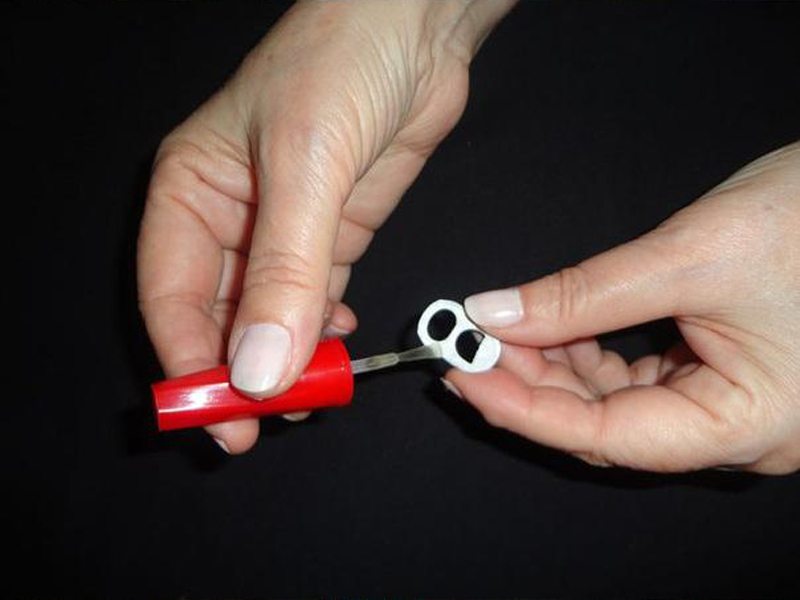
Paint the soda pop tabs with the nail polish of your choice.
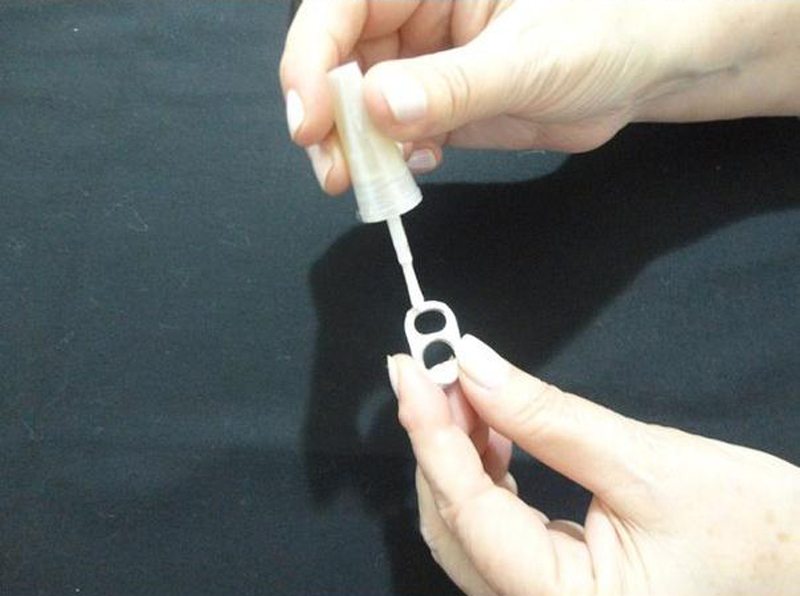
Coat them with clear nail polish.
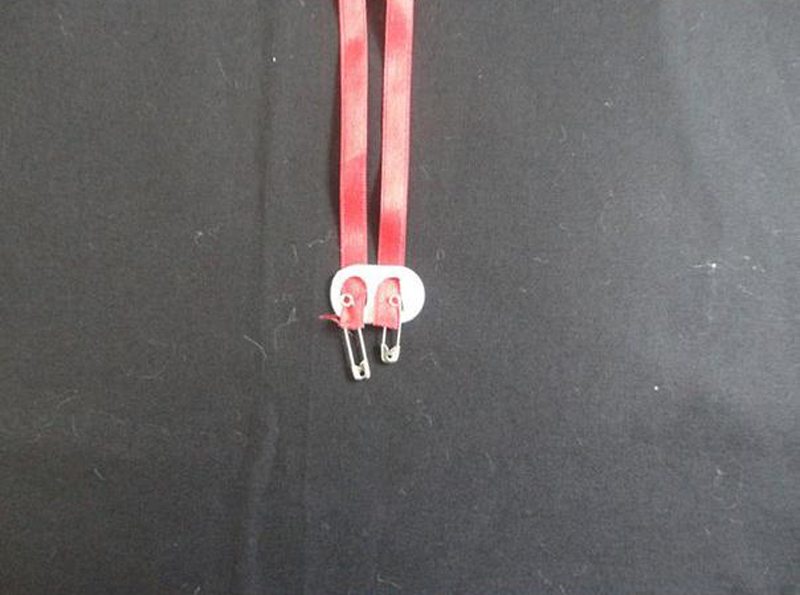
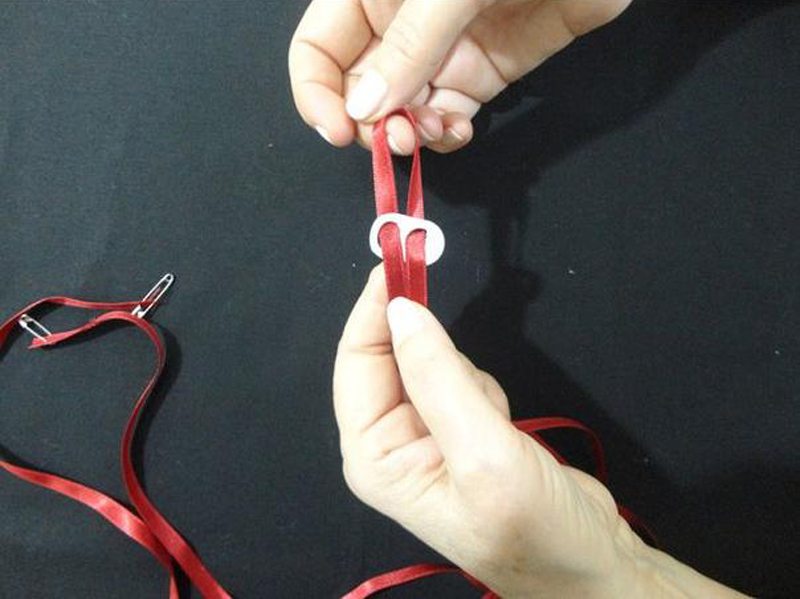
2. Attach the safety pins
Attach the safety pins on both ends of the ribbon. This will make it easier for you to insert the ribbon through the holes.
3. Insert the ribbon into the soda pop holes
Insert the ribbon through the holes, slide the tab but leave about 1-1/2 inches on the ribbon.
Lift the ribbon, and position the next tab on top of the first.
Insert the ribbon through the hole where the first and second tab intersects, then back up through the holes of the second tab.
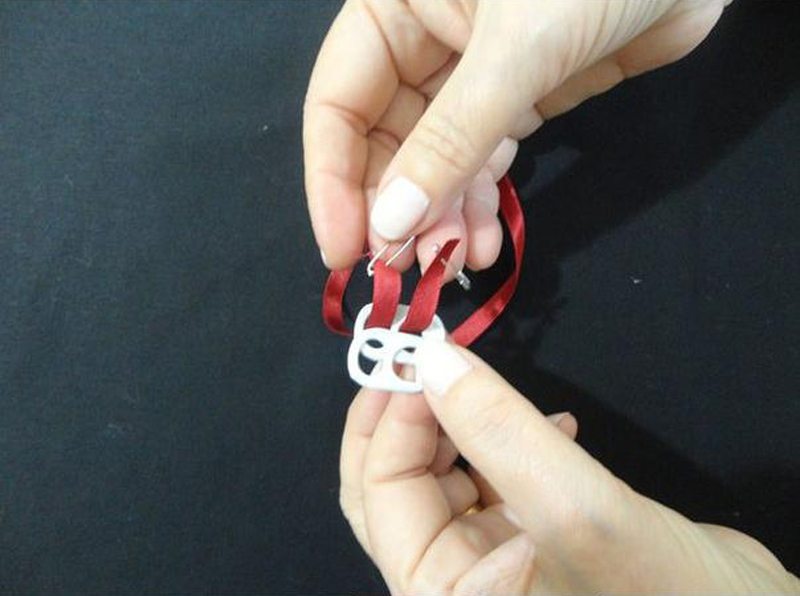
Place the third tab and insert the ribbon again where they intersect.

4. Repeat the steps
Repeat the steps until you have the desired length for your soda pop tab bracelet.
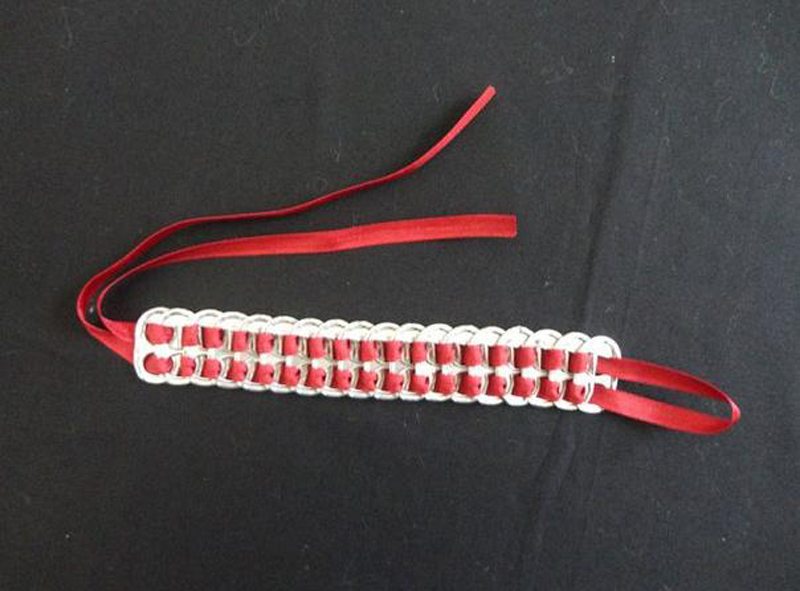
5. Make a knot
To avoid the soda pops from falling, make a knot on both ends of the ribbon. This will help keep the soda pops from falling off.
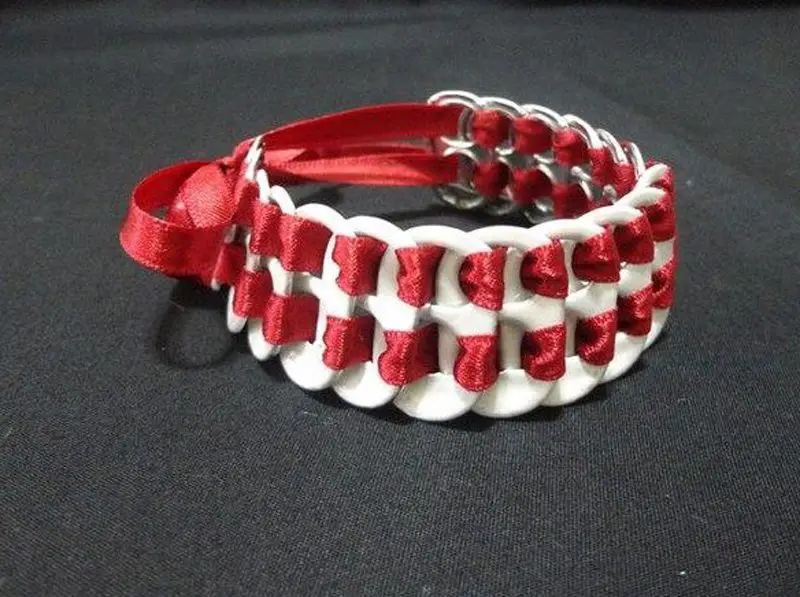
There you have it! A cute soda pop bracelet.
DIY Accessory Customization
Creating a soda pop tab bracelet is not just about recycling; it’s a fun way to express your unique style. By customizing your bracelet, you can make a piece that truly represents you. Let’s explore some creative ways to personalize your soda pop tab bracelet.
Add Color and Shine
Paint your soda pop tabs with acrylic paint or nail polish for a pop of color. For added sparkle, apply a layer of glitter or metallic paint. This simple step transforms your soda pop tab bracelet into a vibrant accessory.
Incorporate Charms
Attach charms that reflect your interests or memorable moments. You can use jump rings to secure charms to the ribbon or directly to the soda pop tabs. This addition makes your soda pop tab bracelet even more personal and meaningful.
Mix Materials
Combine soda pop tabs with other materials like beads, fabric strips, or leather cords. Weaving these materials through the tabs or adding them as fringes can give your soda pop tab bracelet a unique texture and look.
Custom Clasps
Instead of tying your soda pop tab bracelet, add a custom clasp for a polished finish. Use a toggle, lobster claw, or magnetic clasp. This makes your bracelet easier to wear and elevates its appearance.
Layering and Stacking
Create a layered look by making multiple soda pop tab bracelets in different colors and textures. Stack them on your wrist for a bold fashion statement. This approach allows you to mix and match soda pop tab bracelets for various occasions.
Personalized Engraving
Take your soda pop tab bracelet to the next level by engraving initials, dates, or short messages on the tabs. This technique adds a deeply personal touch, making your bracelet a memorable keepsake or a thoughtful gift.
Use of Fabric
Instead of ribbons, use fabric strips from old t-shirts or fabrics with interesting patterns. Braiding these fabrics or using them as the base for your soda pop tab bracelet introduces a cozy, textured element that stands out.
Innovative Weaving
Experiment with different weaving techniques using embroidery floss or thin wires through the soda pop tabs. This can create intricate patterns and designs, adding a sophisticated touch to your soda pop tab bracelet.
Adding Lights
For those who enjoy tech and crafting, incorporate tiny LED lights into your soda pop tab bracelet for a glowing, futuristic accessory. This idea is perfect for parties or nighttime events where you want to make a statement.
By customizing your soda pop tab bracelet, you can create a unique piece of jewelry that showcases your creativity and style. Whether you’re adding color, charms, or new materials, each modification makes your bracelet one-of-a-kind. Start personalizing your soda pop tab bracelet today and proudly wear your art.
Soda Pop Tab Collecting Tips
Collecting soda pop tabs can be an enjoyable part of preparing for your DIY soda pop tab bracelet projects. With the right strategies, you can gather a diverse array of tabs to fuel your creativity. Here are some effective tips to help you collect soda pop tabs efficiently.
Reach Out to Friends and Family
Informing your friends and family about your soda pop tab bracelet projects is a straightforward and effective way to gather materials. Start by sharing your project idea and its environmental benefits. You could send a message or post on your social media profiles to reach more people simultaneously.
Encourage them to collect soda pop tabs in a small container at home or work. They can then pass these on to you during gatherings, or you could arrange to pick them up. This approach helps you collect materials and spreads awareness about recycling and upcycling. It’s a cost-free method that can quickly expand your soda pop tab collection, thanks to the collective effort of your network.
Partner with Local Businesses
Establishing partnerships with local businesses, particularly those in the food and beverage industry, can be a goldmine for collecting soda pop tabs. Restaurants, cafes, and even office cafeterias frequently dispose of large quantities of cans. Reach out to the managers or owners of these establishments and explain your project. Highlight how this partnership could contribute to their sustainability efforts by reducing waste.
Offer to provide small collection containers labeled for soda pop tabs to make it easier for their staff to collect them without any extra hassle. Regularly schedule pickups based on how quickly they accumulate tabs. This not only ensures a steady supply of materials for your soda pop tab bracelet projects but also fosters community relationships centered around creative recycling initiatives.
Organize a Collection Drive
Planning a soda pop tab collection drive is a fantastic method to engage your community, school, or workplace in your crafting journey. To start, choose a location that’s accessible and visible to everyone involved. Promote your drive by creating flyers or sending out emails detailing the collection’s purpose and its positive impact on the environment. Specify the time frame for the collection to create a sense of urgency.
You could also make the drive competitive by offering a small prize or recognition for the person or group that collects the most soda pop tabs. This initiative not only aids in gathering materials for your soda pop tab bracelet projects but also educates and involves others in sustainable practices. It’s a communal effort that can significantly amplify the amount of soda pop tabs you collect, making your crafting projects more fruitful and meaningful.
Use Social Media
Leveraging social media platforms can dramatically increase your soda pop tab collection reach. Create engaging posts about your need for soda pop tabs, including photos or videos of your soda pop tab bracelet projects to inspire others. Use hashtags related to recycling, crafting, and sustainability to extend your post’s visibility beyond your immediate network. You could also join groups or forums dedicated to crafting and recycling to share your request.
Engaging with your audience by answering questions about your project or commenting on suggestions can foster a sense of community. Social media helps you find people willing to donate their soda pop tabs and connects you with fellow crafters who may have excess tabs they’re willing to share. This digital approach can significantly enhance your collection efforts and inspire others to start similar projects.
Visit Recycling Centers
Recycling centers can be invaluable resources for collecting soda pop tabs in bulk. Before visiting, call the recycling center to explain your project and inquire if they can set aside soda pop tabs for you. Some centers support educational and environmental projects and may be willing to help. When granted permission, arrange a time and date to visit the center. Be prepared with your containers or bags to collect the tabs.
This visit will provide you with a substantial amount of materials for your soda pop tab bracelet projects and establish a relationship with the recycling center for future collections. Additionally, seeing the recycling process firsthand can offer insights into the importance of recycling and might inspire new project ideas.
Advanced Techniques for Soda Pop Tab Bracelets
Crafting soda pop tab bracelets is a fun way to upcycle and express your creativity. Once you’ve mastered the basics, you might be ready to explore more advanced techniques. These methods can add complexity and beauty to your creations, making each soda pop tab bracelet a unique piece of art.
Intricate Weaving Patterns
Exploring intricate weaving patterns in your soda pop tab bracelet projects opens up a world of texture and design possibilities. The herringbone and basket weave patterns, for example, offer a rich texture that can transform a simple bracelet into a standout accessory. To begin, select a pattern that complements the size and shape of your soda pop tabs.
Planning your color scheme in advance can enhance the visual impact of the weave. Using thinner ribbons or cords is crucial for managing the finer details of these complex patterns. As you weave, maintain tension to keep the pattern consistent and the tabs aligned. Completing a bracelet with intricate weaving patterns may take time and patience, but the end result is a highly sophisticated soda pop tab bracelet that draws attention and admiration.
Incorporating Metalwork
Incorporating metalwork into your soda pop tab bracelets can significantly elevate their aesthetic and value. With basic metalworking tools and skills, you can manipulate soda pop tabs to create customized shapes, frames, or detailed designs that reflect your creative vision. Techniques such as cutting, filing, and soldering allow for precision and versatility in design.
It’s essential to prioritize safety by wearing protective gear and working in a well-ventilated area when handling metal. This advanced technique not only adds a professional touch to your soda pop tab bracelets but also allows for a unique expression of craftsmanship. Whether you’re creating a piece for a special occasion or as a personal statement, metalwork integrated into soda pop tab bracelets results in truly one-of-a-kind creations that stand out for their intricate detail and professional finish.
Beadwork Integration
Combining soda pop tabs with beadwork can transform your bracelets into stunning pieces. Use small beads to fill the gaps between tabs or larger beads as focal points. Techniques like peyote stitch, ladder stitch, or simple stringing can be adapted to work alongside soda pop tabs. This approach adds color and texture, offering endless possibilities for customization.
Embellishments and Finishing Touches
Advanced finishing touches can make your soda pop tab bracelets look more professional. Consider adding a high-quality clasp instead of tying ends. You can also polish or coat your soda pop tabs for extra shine and durability. For a personal touch, attach charms or pendants that reflect the wearer’s interests or personality.
Mixed Media Artistry
Mixing soda pop tabs with other materials like leather, fabric, or chainmail can create a mixed media masterpiece. This approach allows you to blend textures and styles for a unique look. You can stitch fabric to the tabs, weave leather through them, or link them with chainmail patterns. Mixed media artistry turns a simple soda pop tab bracelet into a statement piece.
FAQ on Soda Pop Tab Bracelet Crafting
Where can I find soda pop tabs for my bracelet projects?
Collect soda pop tabs from your own consumption, ask friends and family to save them for you, partner with local businesses like cafes and restaurants, organize a collection drive, or visit recycling centers.
What materials do I need to make a soda pop tab bracelet?
Besides soda pop tabs, you’ll need ribbon or cord, scissors, and any embellishments like paint, beads, or charms you wish to add. For more advanced techniques, metalworking tools or fabric might be required.
How long does it take to make a bracelet?
The time can vary depending on the complexity of the design and your skill level. Simple bracelets can take as little as 30 minutes, while more intricate designs or those with advanced techniques may take several hours.
Can I make soda pop tab bracelets for men and boys?
Absolutely! Customize the bracelet with colors, materials, and designs that match their style. Using leather cords or darker colors can create a more masculine appeal.
Is it necessary to use special tools for the advanced techniques?
While basic projects require minimal tools, advanced techniques like metalwork or intricate weaving may require specific tools such as pliers, metal files, or a soldering iron.
How can I make my soda pop tab bracelet more durable?
Apply a clear coat of nail polish or a sealant to protect the paint and metal. Using high-quality materials for the base and ensuring secure knots or clasps can also increase durability.
Can soda pop tab bracelets be adjusted for size?
Yes, you can adjust the length by adding or removing tabs to fit the wrist size. For designs with clasps, ensure you have enough tabs to create the desired length before finishing.
Are there eco-friendly options for customizing my bracelet?
Use non-toxic paints, recycled beads, and natural fibers like cotton or hemp for ribbon. Choosing upcycled embellishments is also a great way to keep your project eco-friendly.
Can these bracelets be given as gifts?
Soda pop tab bracelets make excellent, personalized gifts. Customize them based on the recipient’s tastes for a thoughtful present.
Conclusion
These bracelets are perfect for showing off your unique style and make great gifts for friends too! Whether you wear them all at once or mix and match them, these bracelets will surely add fun and personality to any outfit. 😉
Thanks for reading this article! We appreciate your feedback and would love to hear your thoughts in the comments below. Keep up the good work!
If you liked this project, you might also like to view Make your own beautiful safety pin bracelets! and 10 Clever Upcycled Soda Crate Projects…


