The sea glass mosaic table is a gorgeous way to give your home an artistic and unique touch. Whether it’s for your home or for a gift, this DIY mosaic table is easy to make. You’ll need a few supplies, including sea glass, a tile cutter, grout, sandpaper, sealant, and sea glass.
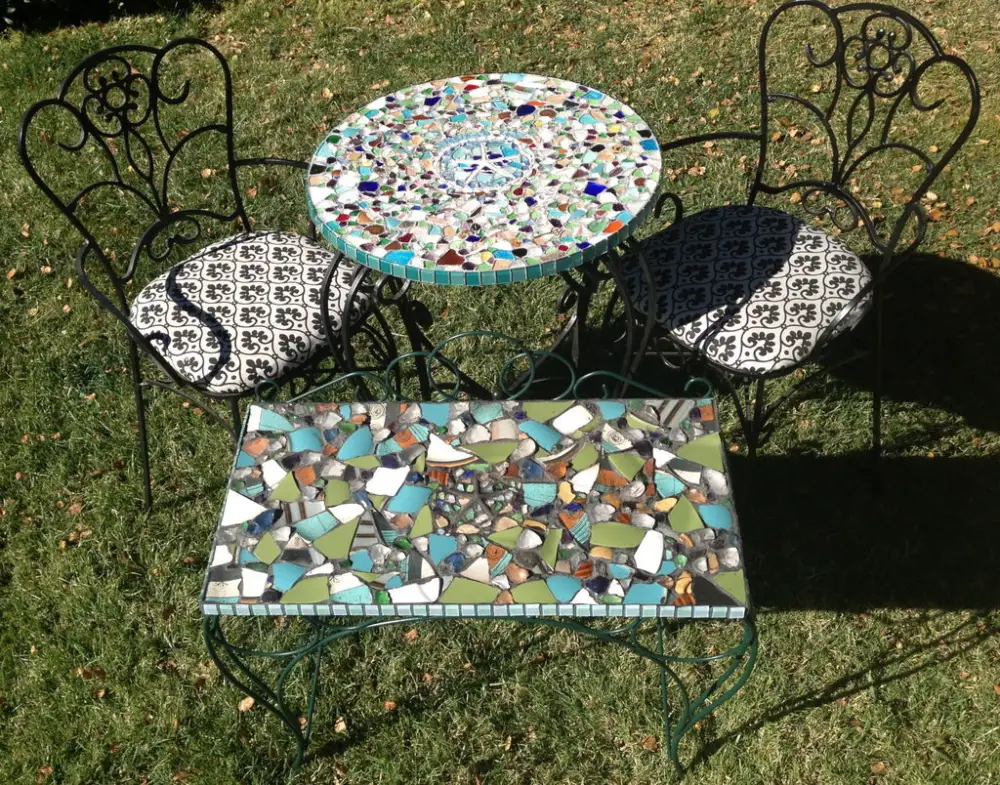
If your garden or patio table looks a little weathered or dated, you can give it a colorful makeover using sea glass!
Seaglass is beautiful by itself and using it for your projects is definitely a great idea, especially for people who live by the sea and have a lot of access to this material…
It is the perfect material for making jewelry such as necklaces, bracelets, and earrings, as it can be easily shaped into beautiful and unique items.
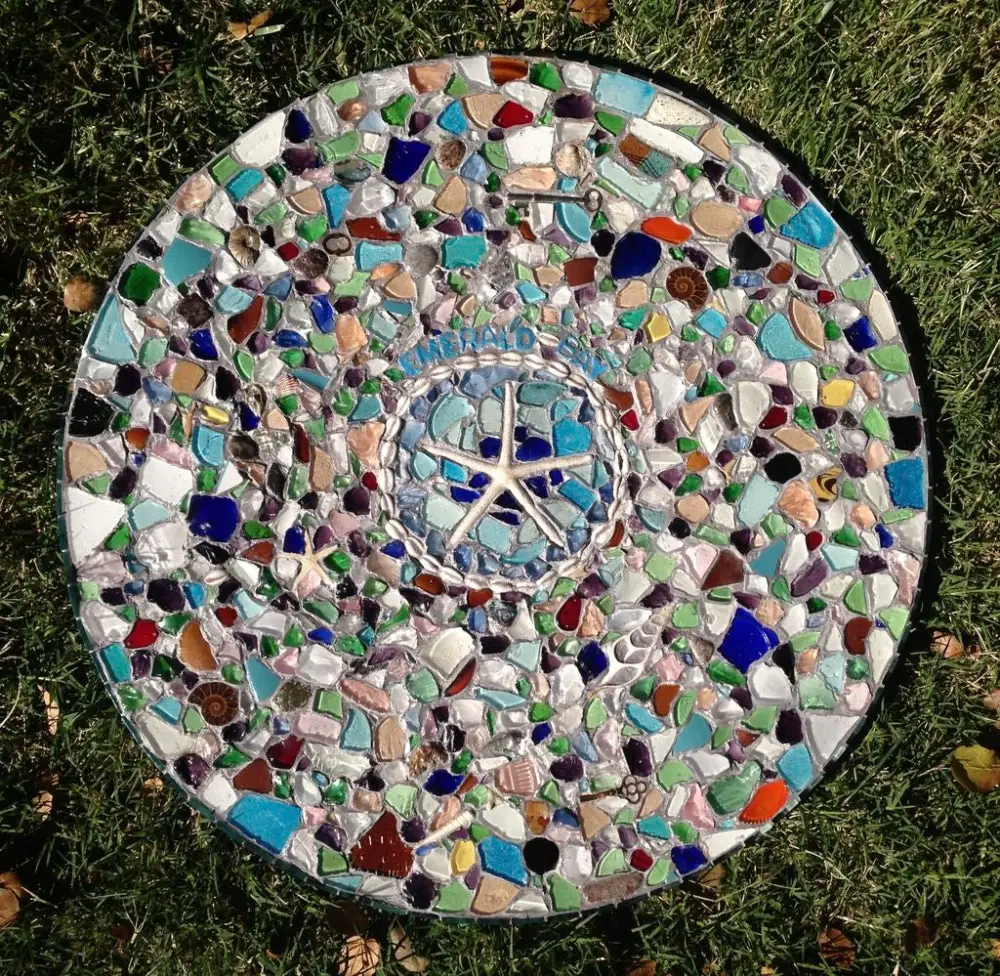
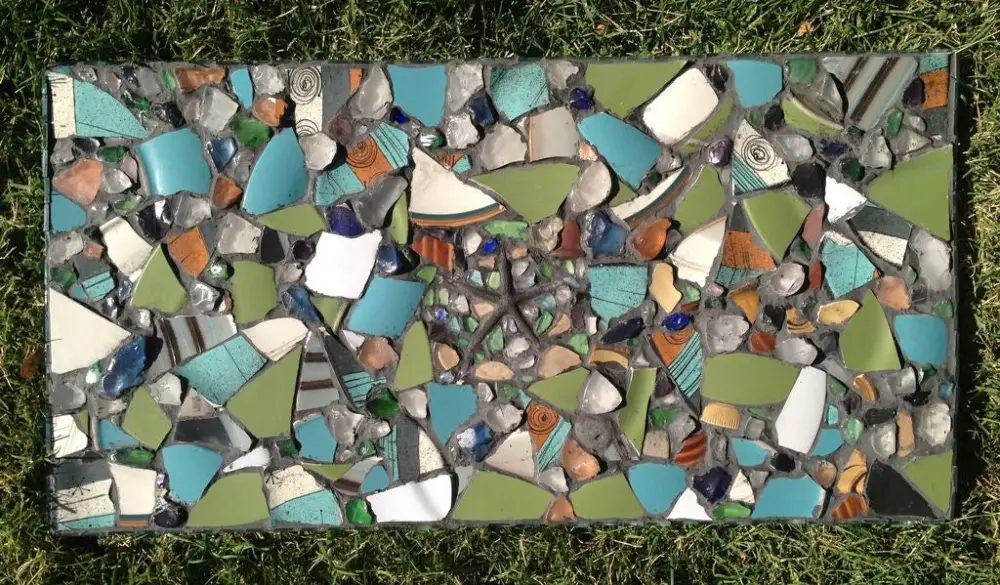
isn’t this mosaic table pretty? You can put yours in the living room, kitchen, or even in your bedroom if you don’t have a backyard or patio. It’s all up to you. ;)

Of course, not everyone is lucky enough to live by the beach and if you want to do this project but you don’t have enough sea glass to cover your table, we’ve got the perfect DIY sea glass tutorial for you!

Contents
- 1 Sea Glass Mosaic Table Building Guide
- 2 Selecting the Perfect Table for Your Sea Glass Mosaic
- 3 Sea Glass Color Schemes and Design Patterns
- 4 FAQ on Creating a Sea Glass Mosaic Table
- 4.1 What type of table can I use for a sea glass mosaic table?
- 4.2 Where can I find sea glass for my mosaic table?
- 4.3 How do I plan the design for my sea glass mosaic table?
- 4.4 How much tile adhesive and grout will I need for my sea glass mosaic table?
- 4.5 Can I use a sea glass mosaic table outdoors?
- 4.6 How do I maintain my sea glass mosaic table?
- 4.7 Can I make a sea glass mosaic table if I don’t have any experience with mosaics?
- 4.8 How long does it take to make a sea glass mosaic table?
- 5 Conclusion
Sea Glass Mosaic Table Building Guide
Materials
- Table
- Mosaic tiles
- Seaglass and other beach items
- Tile adhesive
- Grout
- Sealant
Tools
- Tiling sponge
- Tile trowel
- Grout bag
Instructions
Step 1: Gather Your Materials and Tools
Before you begin, make sure you have all the necessary materials and tools listed. This will make the process smoother and more enjoyable.
Step 2: Prepare the Table
- Start by cleaning the table surface thoroughly to ensure the adhesive will stick properly.
- If the table has a glossy finish, lightly sand the surface to create a better grip for the adhesive.
Step 3: Plan Your Design
- Lay out your sea glass, mosaic tiles, and beach items on the table to plan your design. This step allows you to visualize the final look and make any adjustments before fixing the pieces in place.
Step 4: Apply Tile Adhesive
- Using the tile trowel, spread an even layer of tile adhesive over a small section of the table. Work in sections to prevent the adhesive from drying before you can place your sea glass and tiles.
Step 5: Start Placing Your Pieces
- Press your sea glass, tiles, and beach items into the adhesive according to your design. Be sure to leave small gaps between pieces for the grout.
- Continue this process, working in sections, until the entire table surface is covered.
Step 6: Let the Adhesive Dry
- Allow the adhesive to dry completely, typically overnight, to ensure all pieces are securely attached to the table.
Step 7: Apply Grout
- Once the adhesive is dry, prepare your grout according to the package instructions.
- Using the grout bag, fill in the gaps between your sea glass and tiles. Be generous to ensure all spaces are filled.
- Use the tiling sponge to wipe away any excess grout from the surface of the sea glass and tiles. Be gentle to avoid dislodging any pieces.
Step 8: Let the Grout Set
- Allow the grout to set for the time recommended by the manufacturer, usually 24 to 48 hours.
Step 9: Apply Sealant
- Once the grout is fully set, apply a sealant over the entire mosaic to protect it from moisture and wear. This is especially important for tables that will be used outdoors.
Selecting the Perfect Table for Your Sea Glass Mosaic
Creating a sea glass mosaic table is a fantastic way to add a unique and artistic touch to your home. The first step in this creative journey is selecting the perfect table to transform. This choice is crucial because it sets the foundation for your mosaic work. Here’s how to pick the best table for your sea glass mosaic table project.
Table Size and Shape
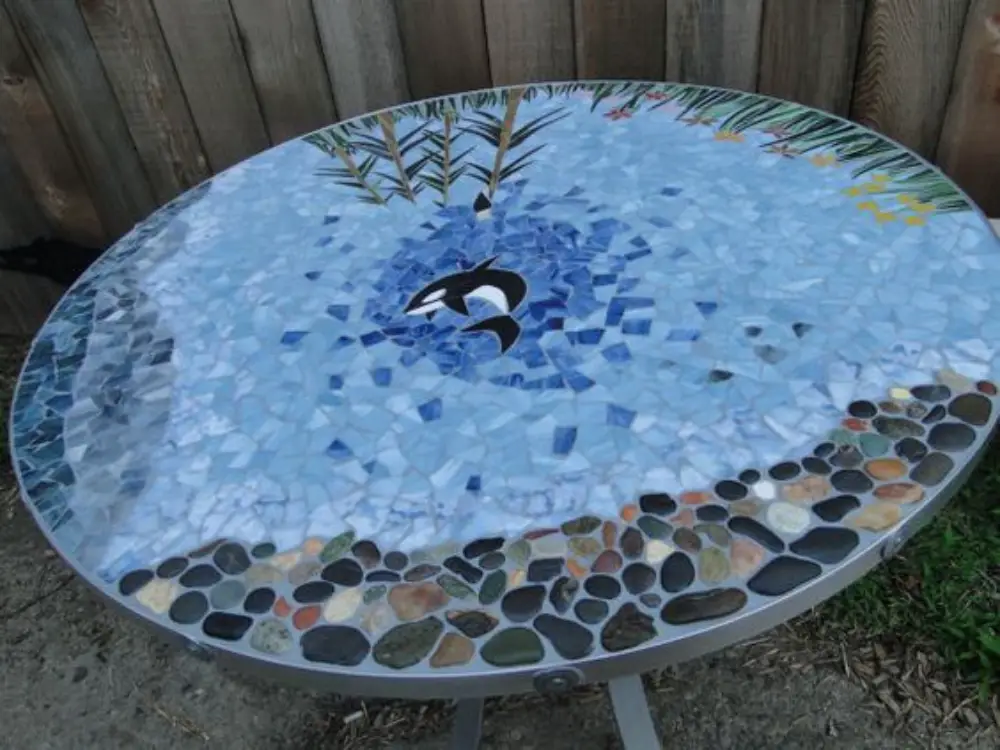
Consider the size and shape of the table you want to work on. A sea glass mosaic table can vary from a small side table to a large dining table. Think about where you plan to place the table in your home. A round table might suit a cozy corner, while a rectangular table could be ideal for a dining area or patio.
Material Matters
The material of the table is another important factor. Wood and metal are the most common choices for a sea glass mosaic table. Wood tables are easy to work with, especially when applying adhesive and sea glass. Metal tables can offer a more modern look but may require additional preparation for the mosaic to adhere properly.
Condition of the Table
The table’s condition should also be considered. A sea glass mosaic can revitalize an old or weathered table, giving it a new life. However, ensure the table is stable and repair any damages before starting your mosaic project. This will ensure your sea glass mosaic table is not only beautiful but also durable.
Click on any image to start the lightbox display. Use your Esc key to close the lightbox. 😎
Sea Glass Color Schemes and Design Patterns
Finding the right color schemes and design patterns is essential when creating a sea glass mosaic table. These elements can dramatically affect your finished project’s overall look and feel. With sea glass offering a palette of naturally muted tones, your sea glass mosaic table can become a stunning centerpiece that reflects the beauty of the sea.
Choosing Your Color Scheme
When selecting the color scheme for your sea glass mosaic table, you draw inspiration from the ocean’s vast palette. The shades of green, blue, brown, and white found in sea glass offer a unique opportunity to bring the calm and tranquility of the sea into your home. Here’s how to expand on the color schemes mentioned:
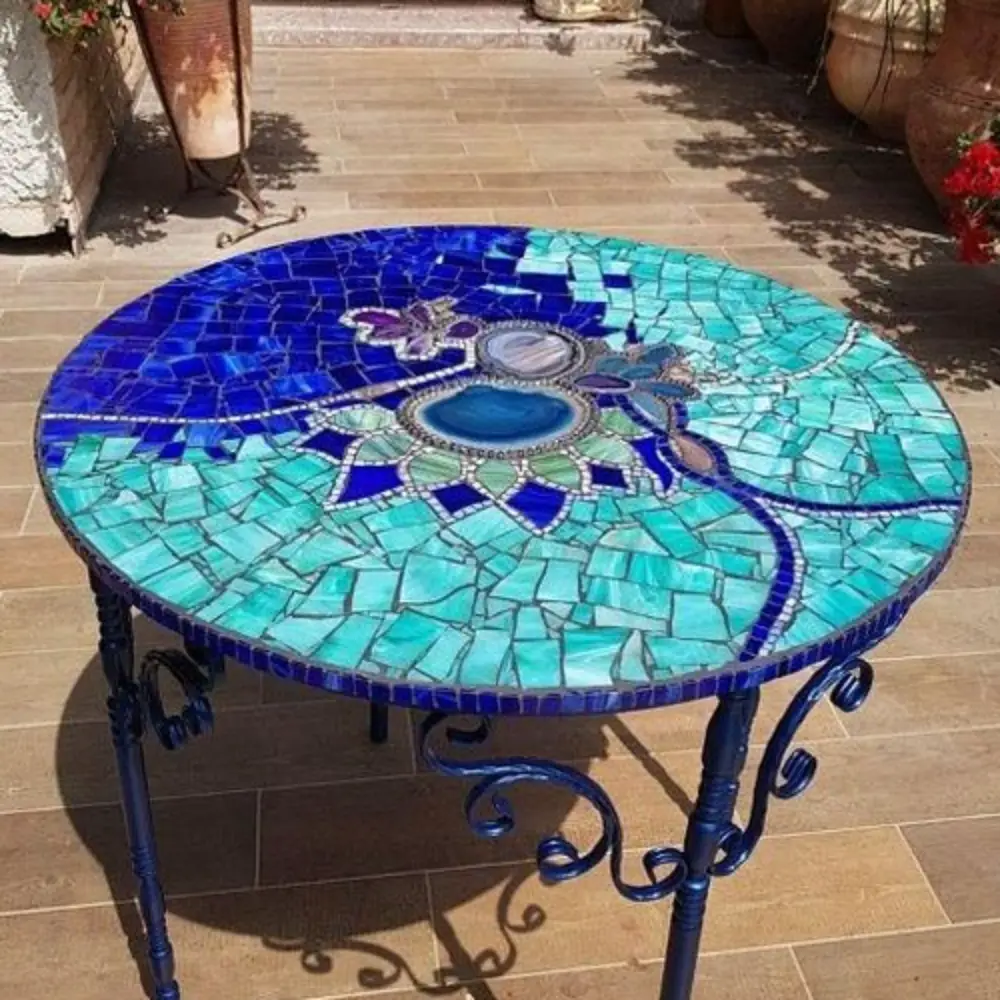
Blues and Greens for a Cool, Calm Look
Blues and greens are the quintessential colors of the sea. Light blues can remind you of the sky reflected on calm waters, while deeper blues bring to mind the ocean’s depths. Greens can range from the light, almost transparent hues that evoke images of sea foam, to the dark, rich tones of seaweed and deep water. Combining these colors can create a dynamic yet harmonious look for your sea glass mosaic table, reminiscent of the ever-changing but always beautiful sea.
Whites to Brighten and Contrast
Adding white to your sea glass mosaic can brighten the overall effect and add a sense of movement. White pieces can act as highlights, mimicking the sparkling sunlight on the water’s surface or the foam of breaking waves. They can break up the blues and greens for a more dynamic look or be used to create specific patterns or focal points on your table.
Browns and Ambers for Warmth and Depth
Incorporating browns and ambers into your sea glass mosaic table can give it a warmer, earthy vibe. These colors remind one of sandy shores, driftwood, and treasures on the beach. They work well with blues and greens, providing a beautiful contrast or stand alone for a different, more subtle effect. Browns and ambers can also evoke a sense of history or nostalgia, as if the sea has tumbled the pieces for ages.
When choosing your color scheme, think about the mood you want to create with your sea glass mosaic table. Do you want it to be a serene and calming piece, reminiscent of a clear day at the beach? Or are you aiming for something that feels more like a treasure chest, full of the deep, mysterious colors of the ocean’s depths? Your color choices will set the tone for the entire project, so take your time to select a palette that resonates with you.
Design Patterns to Consider
Picking a suitable design pattern for your sea glass mosaic table is as crucial as selecting the color scheme. The pattern sets the theme and brings your vision to life. Here’s an expanded look at the design patterns mentioned to help inspire your creativity:
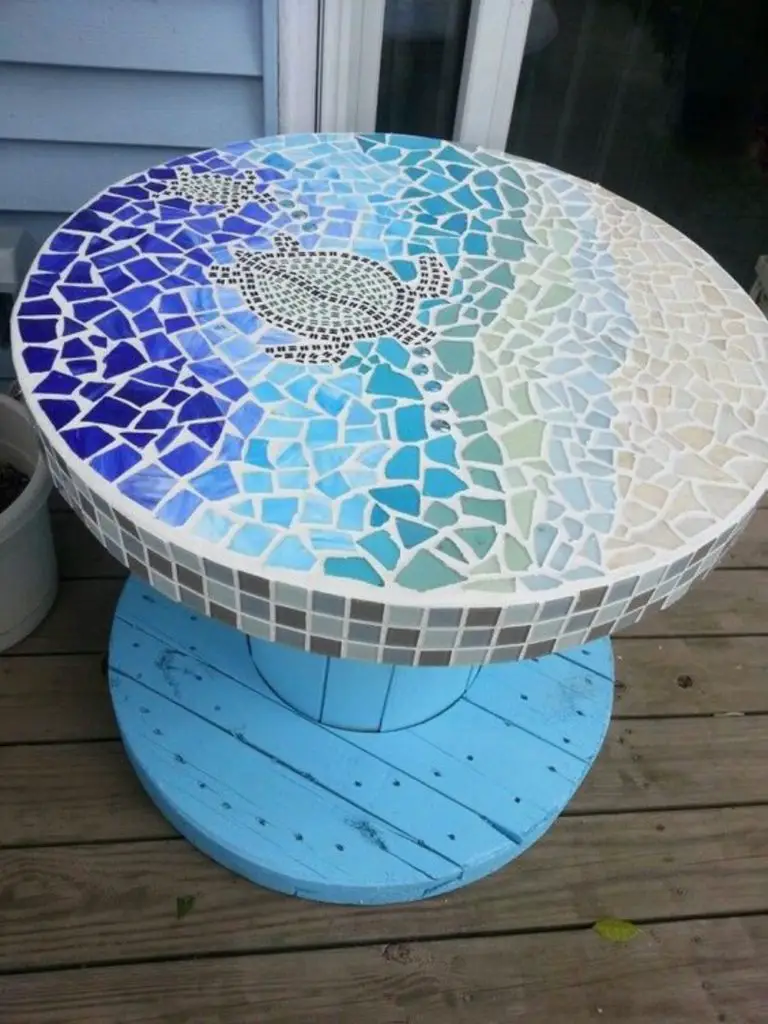
Abstract Ocean Waves
This design mimics the ebb and flow of ocean waves, using blues and greens to capture the sea’s dynamic nature. You can arrange the sea glass in gentle curves or dramatic swirls to represent waves. The beauty of this pattern lies in its versatility; you can make it as simple or as intricate as you wish. Incorporate varying shades of blue to depict the depth and movement of the water, with lighter greens to highlight the wave crests. This pattern can turn your table into a mesmerizing seascape.
Sunset at the Sea
A sunset at the sea design combines the setting sun’s warm hues with the ocean’s cool tones. Start with a base of blues and greens to represent the water, then blend in oranges, pinks, and purples to recreate the sky’s changing colors at dusk.
The element to this pattern is the smooth transition between colors, mimicking the sky’s natural gradient. This design can evoke the peaceful and reflective mood of watching a sunset over the ocean, making your sea glass mosaic table a focal point of relaxation.
Nautical Themes
Nautical patterns bring the adventure of the sea directly into your home. Choosing motifs like anchors, ships, or sea creatures adds a playful and exploratory spirit to your table.
These designs might require more planning and precision to capture the details accurately, but the result is a captivating and thematic piece that tells a story. You can use the natural shapes and colors of sea glass to fill in these figures, creating a stunning visual effect that celebrates the sea’s mystery and beauty.
Geometric Patterns
For a contemporary twist, geometric patterns utilize the shapes and colors of sea glass to create a modern aesthetic. This design approach focuses on symmetry and balance, using straight lines, triangles, squares, or circles.
The key is to choose a repeating pattern that can be easily adapted to the shape and size of your table. Geometric patterns in sea glass mosaic can range from simple, repeating designs that create a subtle texture to more complex arrangements that form specific images or illusions. This style suits a modern home decor, offering a sophisticated and chic look.
Each design pattern offers a different way to express your creativity with a sea glass mosaic table. Whether you prefer the soothing rhythm of ocean waves, the vibrant hues of a sunset, the notion of nautical adventure, or the sleek lines of modern design, your sea glass mosaic can transform an ordinary table into a masterpiece of personal expression and artistic flair.
Mixing Colors and Textures
When creating a sea glass mosaic table, the magic often lies in the mix of colors and textures you choose. Sea glass, with its naturally weathered appearance, offers a unique blend of colors and finishes that can transform a simple table into an extraordinary piece of art. Here’s a deeper look into how mixing colors and textures can elevate your mosaic project.
Experiment with Color Variations
Sea glass comes in a myriad of shades, from the deepest blues to the lightest greens and everything in between. By mixing these different shades, you create a dynamic visual effect that can mimic the natural diversity found in the sea. For example, combining light blue pieces that remind you of the sky on a clear day with dark green pieces that evoke the depth of the ocean can give your table a layered and complex appearance. This interplay of colors can make your sea glass mosaic table not just a piece of furniture, but a story of the sea itself.
Texture Tells a Story
The texture of sea glass is just as important as its color. The frosted appearance of most sea glass, a result of years tumbling in the ocean, offers a soft, matte finish that contrasts beautifully with the occasional clearer, glossier pieces.
This contrast can add visual interest and depth to your mosaic. Using frosted pieces as the majority of your mosaic can give it a cohesive, serene look, while interspersing some clear, shiny pieces can add highlights or focal points, drawing the eye and adding a touch of sparkle.
Combining Finishes for Effect
Beyond the frosted and clear finishes, sea glass can also vary in thickness and curvature, which can play a significant role in your mosaic’s overall texture. Thicker pieces can give a tactile dimension to your table, inviting touch, while flatter, thinner pieces can be used to create smoother areas or intricate details.
The way light plays off these different finishes and thicknesses can bring your sea glass mosaic table to life, making it change appearance at different times of the day or from different angles.
The Harmony of Hues and Textures
The ultimate goal in mixing colors and textures in your sea glass mosaic table is to achieve a harmonious balance that delights the senses. Think of your table as a canvas, and the sea glass as your palette. Just as a painter mixes colors and textures to create depth and emotion in their artwork, you can use sea glass to create a mosaic that tells a story and showcases the natural beauty of these treasures from the sea.
FAQ on Creating a Sea Glass Mosaic Table
What type of table can I use for a sea glass mosaic table?
You can use any type of table for a sea glass mosaic table, including wood, metal, or glass tables. The key is to ensure the surface is clean and properly prepared to adhere to the sea glass and mosaic tiles.
Where can I find sea glass for my mosaic table?
Sea glass can be found at many beaches, but if you’re not near the coast, you can also purchase sea glass from craft stores or online retailers. Some places sell colored glass specifically meant for crafting, which is a great alternative.
How do I plan the design for my sea glass mosaic table?
Start by sketching your design on paper or laying out your sea glass and tiles on the table surface to plan your mosaic. Consider color schemes and patterns that will complement the space where you’ll display the table.
How much tile adhesive and grout will I need for my sea glass mosaic table?
The amount of adhesive and grout needed depends on the size of your table and the spacing between your sea glass pieces. It’s best to refer to the product instructions for coverage estimates, and having a little extra on hand is always a good idea.
Can I use a sea glass mosaic table outdoors?
Yes, a sea glass mosaic table can be used outdoors if it’s properly sealed with a waterproof sealant. This will protect the mosaic from moisture and weather conditions.
How do I maintain my sea glass mosaic table?
To maintain your sea glass mosaic table, clean it with a soft cloth and mild soap. Avoid using harsh chemicals or abrasive cleaners that could damage the sealant or the sea glass.
Can I make a sea glass mosaic table if I don’t have any experience with mosaics?
Absolutely! Creating a sea glass mosaic table is a great project for beginners. Just follow the step-by-step instructions carefully, and don’t be afraid to get creative with your design.
How long does it take to make a sea glass mosaic table?
The time it takes to create a sea glass mosaic table can vary depending on the size of your table and the complexity of your design. Generally, expect to spend a few days on the project, allowing time for the adhesive and grout to dry.
Conclusion
Crafting a sea glass mosaic table is an engaging and creative way to add a unique piece of art to your home. Following the steps outlined and utilizing the tips provided, anyone can transform a simple table into a stunning masterpiece. This project allows you to express your artistic vision and brings a piece of the sea’s tranquility into your living space.


