
One of the things that never fails to give us feelings of awe and relaxation is the stars at night. Kids’ eyes always light up every time they see stars and they often visibly calm down.
This is why a constellation jar lamp in your kids’ bedroom would be a great idea to help them get to sleep. Kids are just so full of energy that it can be hard to settle them for bedtime!
This DIY constellation jar lamp is very easy to do and, of course, inexpensive. So try making one now with the kids. Or maybe two for your bedroom as well?
Making your own constellation lamp is a fun and easy project that you can do at home with just a few supplies. With some planning and creativity, you can create a beautiful lamp that will light up any room.
So how do we make a DIY constellation jar lamp?
Click on any image to start the lightbox display. Use your Esc key to close the lightbox.![]()

Contents
Making a Constellation Jar Lamp
Engaging in the process of crafting your very own DIY constellation jar lamp is a truly delightful and creatively fulfilling endeavour. This engaging endeavour allows you to inject your space with a captivating essence of celestial allure. To start, gather all the essential materials and tools required for the project, ensuring that you have everything readily available.
Materials
- Jar (It should be wide enough, like a pickle jar, for a small click light to fit inside.)
- Aluminium foil pan
- LED Stick-on Light
- Sharpie
Tools
- Awl
- Spoon
- Scissors
Instructions
Creating your constellation jar lamp is a delightful and effortless project you can do with the whole family. This DIY project’s simplicity and versatility allows family members of all ages to participate and contribute their unique artistic flair.
This relatively easy project can be completed in just a few simple steps.
1. Make a rectangle foil pan
Cut a long rectangle from the foil pan, which would fit into your jar. It should be wide enough to reach the cover of the jar, and long enough to fit around inside. Flatten it down with a spoon.

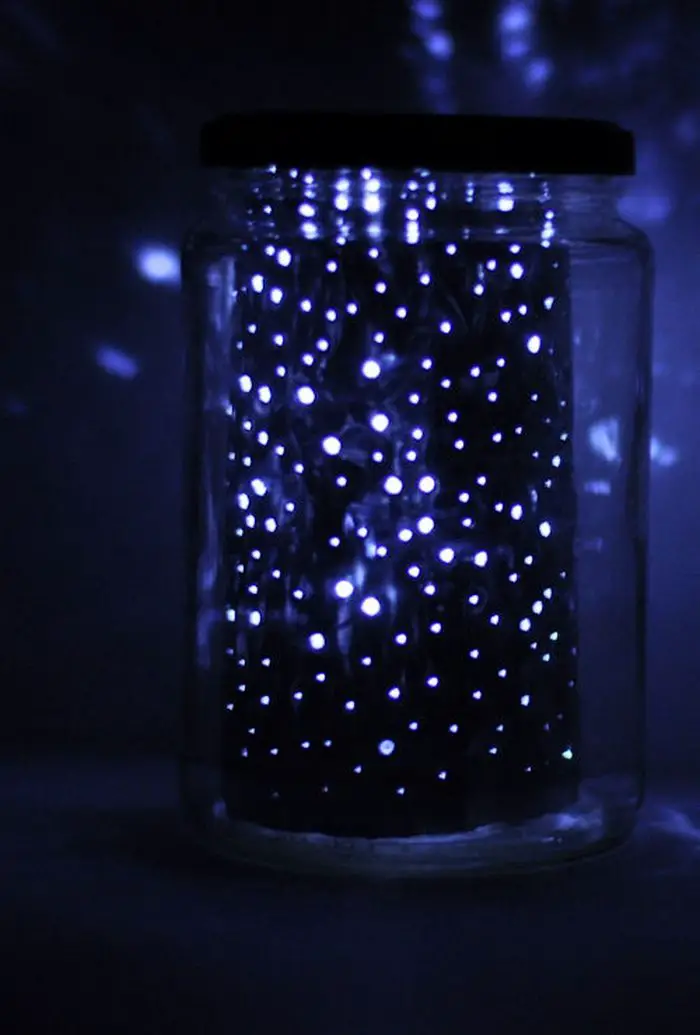
2. Drawing the constellation with holes
Draw the constellations with a sharpie on the rectangle, and poke it with an awl to make the stars. The sharpie will make it possible for the kids to see the constellations more easily.

Make more holes around the constellations. Try to make them smaller than the holes of the constellations. This will allow for the light to shine through in a more subtle and delicate way, giving your space that extra touch of magic.

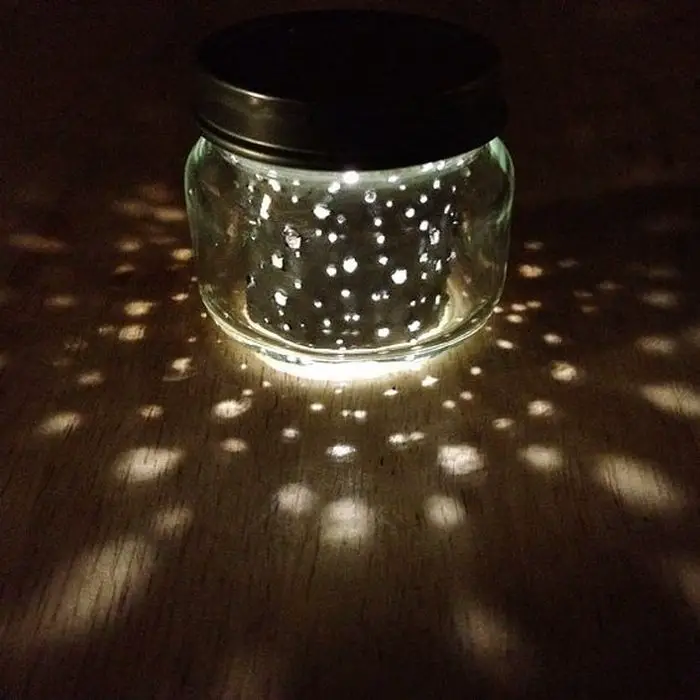
3. Rolling the foil into the jar
Roll the foil so that it fits just right inside the jar. You can hold the circle in its place by cutting two tabs at the ends and folding them in opposite directions.

4. Placing the LED in the center of the foil
Place the LED in the center of the foil. Make sure the LED is turned on before placing it at the centre of the foil. Cover the jar. Once the jar is covered, you’re all done!

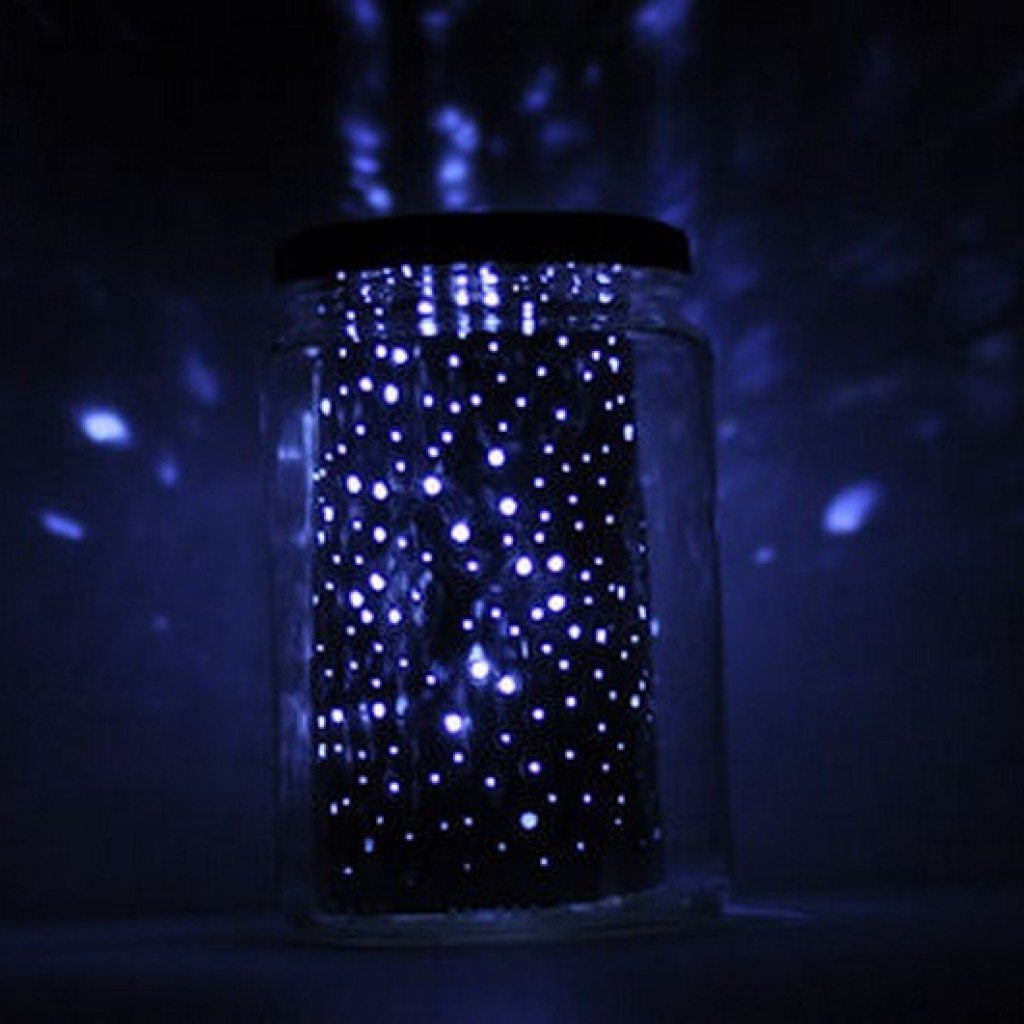
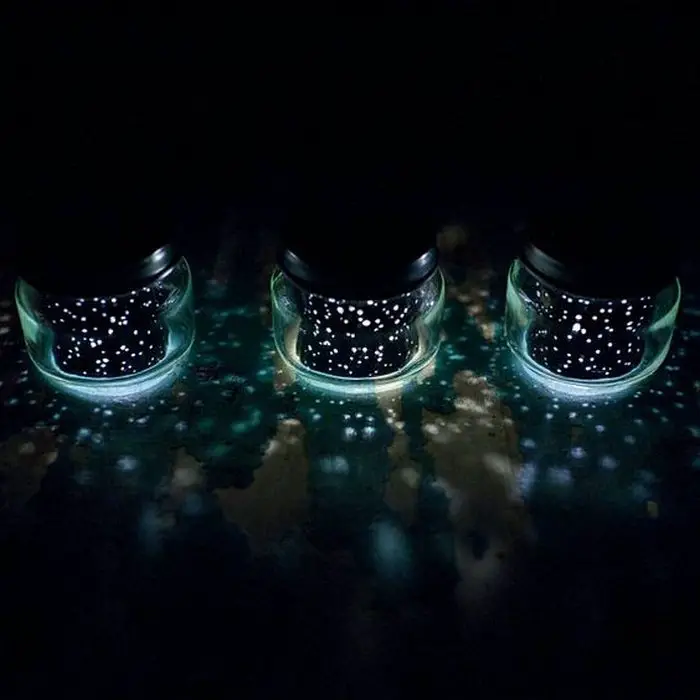
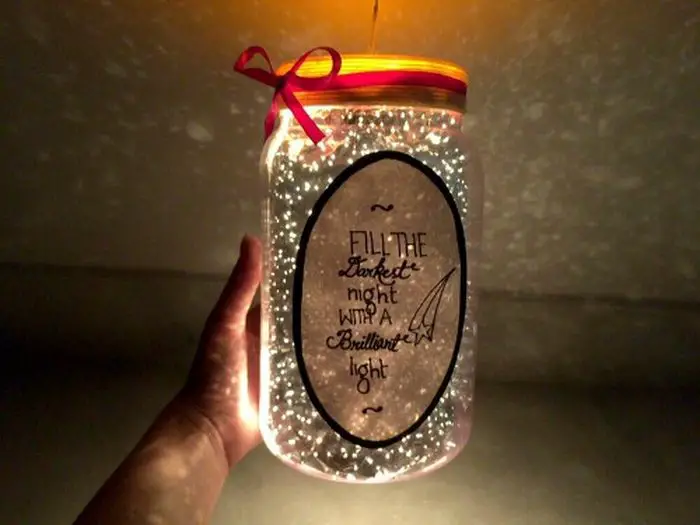
Now that the LED is in place, sit back and enjoy the calming light show.

Nice and cosy in here with just the right amount of light. Ah, relaxing!
It’s so satisfying to see a project through to completion, isn’t it? Relax and enjoy the sense of accomplishment that comes with a job well done. We can’t wait to hear how your results turned out! 😉
Source: Design Mom
If you liked this project, you might also like to view DIY Glow in the Dark Jar…
Incorporating Color into Your Constellation Jar Lamp
Adding color to your DIY Constellation Jar Lamp enhances its visual appeal and amplifies the magical ambiance it brings to any room. This creative twist allows the lamp to fit various decor styles and personal preferences, making it a versatile addition to your home.
Let’s explore how to infuse your Constellation Jar Lamp with captivating hues, transforming it into a radiant display of celestial beauty.
Choose Colored LED Lights
The easiest way to introduce color into your Constellation Jar Lamp is by opting for colored LED lights. Colored LED lets you add complementary colors to the aesthetic of your kid’s bedroom or play area.
For a dynamic effect, consider LED lights that change colors with a remote, allowing you to switch hues based on your mood or the occasion. The soft glow of these lights through the constellation patterns creates a mesmerizing celestial scene right in your room.
Apply Transparent Colored Film
For a subtle infusion of color, applying a transparent colored film to the inside of your jar can dramatically change the ambiance of the light emitted. Cut the film to size and adhere it smoothly against the inner walls of the jar. This method lets you experiment with different colors without permanently altering the lamp. The colored film gently tints the light, casting a soft, ethereal glow that accentuates the constellation patterns beautifully.
Experiment with Reflective Materials
Incorporating reflective materials like colored glass fragments or metallic confetti inside the jar can create a stunning effect when combined with your LED light. These materials catch and reflect the light in all directions, creating a captivating sparkle that mimics the twinkle of real stars. By choosing materials in colors that complement or contrast with your LED light, you can create a Constellation Jar Lamp that’s a true work of art.
Align with Themes and Occasions
Customizing the color of your Constellation Jar Lamp allows it to serve as a decorative element for various themes and occasions. The lamp can be tailored to suit any event, creating a romantic ambiance with soft pink hues for Valentine’s Day or using vibrant colors for a birthday celebration. This adaptability makes the Constellation Jar Lamp, not just a decorative item but a part of your life’s celebrations.
By incorporating color into your DIY Constellation Jar Lamp, you unlock endless possibilities for customization and creativity. Whether through colored LED lights, transparent films, or reflective materials, each method uniquely enhances your lamp’s beauty. The Constellation Jar Lamp becomes more than just a light source; it’s a personalized celestial masterpiece that brings the wonder of the night sky into your home.
Creative Ways to Use Your Constellation Jar Lamp
The DIY Constellation Jar Lamp is a stunning addition to any room and a versatile piece that can be utilized in numerous creative ways. Beyond its primary function as a charming light source, this lamp can transform spaces and occasions with its celestial beauty.
Let’s explore some innovative and imaginative uses for your Constellation Jar Lamp that will inspire you to look at it in a new light.
Enhance Your Meditation or Yoga Space
Creating a serene atmosphere is essential for meditation and yoga practices. Place one or more Constellation Jar Lamps in your meditation or yoga area to bring the calming influence of starlight indoors.
The gentle glow and star patterns can help focus your mind and relax your body, making it easier to delve into deeper states of meditation or more engaged yoga sessions. The lamp’s soft illumination provides enough light without overwhelming the senses, perfect for early morning or late-night practices.
Romantic Evening Ambiance
Transform your dining area or living room into a romantic retreat with the help of your Constellation Jar Lamp. Arrange lamps around the room or dining table to create a starlit dining experience. The subtle light from the lamps casts a dreamy glow, ideal for intimate dinners at home. Pair with soft music and a good meal for a memorable evening under the stars.
Night Light for Children’s Rooms
The Constellation Jar Lamp is an excellent night light in children’s bedrooms. The soft, starry glow can comfort kids afraid of the dark, providing them with their piece of the night sky to watch over them as they sleep. Customize the lamp with constellations with special meanings or stories behind them to make bedtime more interesting and educational.
Enhance Your Outdoor Evenings
Place your Constellation Jar Lamp(s) around your garden or patio tables to create a whimsical outdoor setting. These lamps offer a soft, starlit glow that enhances the beauty of evening gatherings or quiet nights under the sky. They’re perfect for adding a magical touch to outdoor dinners, making every meal under the stars memorable.
Use several Constellation Jar Lamps to light up garden paths or walkways. Not only do they provide a guiding light, but they also add a decorative celestial theme to your landscape. Ensure they’re placed safely and consider using battery-operated LEDs to avoid wiring issues outdoors.
Decorative Centerpieces for Events
Transform your Constellation Jar Lamps into enchanting centerpieces for wedding tables. Customize the constellation patterns to match the wedding theme or to represent significant constellations to the couple, adding a personal touch to the decor.
Whether it’s a cosmic-themed birthday party or a Halloween bash, Constellation Jar Lamps can serve as thematic decorations. Use them to set the mood and create a unique lighting element for the party space.
A Unique Gift Idea
A handmade Constellation Jar Lamp makes a thoughtful and unique gift for friends and family. Customize the lamp by including significant constellations to the recipient, such as their zodiac sign or a constellation with personal meaning. This personalized touch turns the lamp into a memorable gift that lights up their space and reminds them of your thoughtfulness.
Seasonal and Holiday Decor
Adapt your Constellation Jar Lamp for the holiday season by incorporating colors and patterns that match the festivities. Whether adding a red and green glow for Christmas or a spooky flicker for Halloween, these lamps can be easily customized to enhance your holiday decor.
Reflect the seasons change by adjusting the colors within your Constellation Jar Lamp. Use warm colors to mimic autumn’s glow, bright tones for summer vibes, cool blues for winter, and fresh greens or pastels for spring.
The DIY Constellation Jar Lamp offers endless possibilities for creative use, far beyond its initial charm as a decorative light source. Its versatility makes it suitable for enhancing various aspects of daily life, from creating a peaceful ambiance for relaxation to adding a touch of magic to special occasions. By exploring these creative uses, you can maximize the potential of your Constellation Jar Lamp and enjoy the celestial beauty it brings to every corner of your life.
Maintaining and Safeguarding Your DIY Constellation Jar Lamp
Proper maintenance and safeguarding are essential to ensure your DIY Constellation Jar Lamp continues to brighten your space with its celestial glow. Regular care will not only prolong the life of your lamp but also keep it shining as brightly as the stars it represents.
Let’s delve into some key strategies for keeping your Constellation Jar Lamp in stellar condition.
Regular Cleaning
- Dust and Debris: Over time, your Constellation Jar Lamp can collect dust and debris, dimming its light and dulling its appearance. Use a soft, dry cloth to gently wipe the jar’s outside. A damp cloth can help remove any build-up for the interior, especially on the inner surfaces where dust may settle. Ensure the jar is completely dry before reassembling.
- Cleaning the LED Light: The LED light inside your lamp also requires attention. Use a small brush or one with a flexible neck to remove dust and dirt from the inner corner of a jar. This ensures the light continues to shine brightly through your constellation patterns.
- Gentle Cleansing Solutions: Consider using a mild cleansing solution for tougher stains or residues on the jar. This solution is simply a mix of any dish detergent and water. Rinse thoroughly with water and dry completely before reassembling your lamp. Avoid harsh chemicals that might damage the jar’s surface or the constellation design.
- Care for Metallic Parts: If your lamp design includes metallic elements, such as the lid or decorative features, ensure they are kept from moisture to prevent rusting. A soft, dry cloth can polish these parts, maintaining their shine and preventing corrosion. A thin layer of clear nail polish can be applied to these areas to ward off tarnish and rust.
Checking and Replacing the Light Source
- LED Lifespan: Although LED lights have a long lifespan, they eventually need replacing. Check the light regularly to ensure it’s functioning correctly. It might be time to replace it if you notice it’s dimming or flickering. Keeping spare LEDs on hand ensures you can promptly swap out the old light, keeping your Constellation Jar Lamp glowing without interruption.
- Regular Battery Checks: Besides replacing batteries when they run low, regularly check the battery compartment for any signs of corrosion or damage. This can prevent potential issues that might not only affect the light’s performance but also the safety of your lamp. Cleaning the compartment with a dry cloth can help remove any buildup and ensure a good connection.
- Upgrading LED Lights: Technology evolves, and so do lighting options. Consider upgrading your lamp’s LED light to a newer model with better efficiency, brightness, or even customizable color options. This not only refreshes your lamp but also can enhance its functionality, such as longer battery life or more vivid light output.
- Heat Management: Ensure your LED light does not produce excessive heat, especially if enclosed in a small jar for extended periods. LEDs are generally low heat, but it’s wise to periodically check the temperature during use. Overheating can pose a risk to the lamp’s structural integrity and safety. If the lamp feels unusually warm, consider switching to an LED with a lower power output or improving ventilation around the light source.
Safeguarding Against Damage
- Placement: Consider the placement of your Constellation Jar Lamp carefully. Keep it away from high-traffic areas where it might be knocked over. Placing it on a stable surface reduces the risk of falls and potential breakage.
- Use of Protective Coatings: To further shield the exterior of your jar from scratches and wear, consider applying a clear protective sealant. This coating can help preserve the integrity of the glass and any external decorations. Make sure the sealant is suitable for the material of your jar and does not cloud its transparency, ensuring your stars continue to shine through clearly.
- Secure Display Options: Beyond placing your lamp on stable surfaces, consider secure mounting or hanging options. Wall-mounted shelves or ceiling hooks can offer a secure display space for your Constellation Jar Lamp, reducing the risk of it being knocked over. Ensure any mounting hardware is properly installed and capable of supporting the lamp’s weight.
- Silicone Bumpers: Place silicone bumpers on the bottom of your jar for added stability. These bumpers provide a non-slip surface that minimizes movement and reduces the risk of the lamp tipping over. They’re particularly useful on slick surfaces like glass tables or shelves.
- Handling with Care: When moving your lamp, handle it with care to avoid dropping it. The glass jar, though sturdy, can crack or shatter upon impact. Gentle handling is key to preserving its integrity.
Seasonal Updates and Storage
- Seasonal Changes: If you update your lamp seasonally or for special occasions, handle the materials carefully during changes. This keeps the foil and any decorative elements inside the jar in good condition for future updates.
- Proper Storage: Should you decide to store your Constellation Jar Lamp, place it in a secure, dry location. If possible, wrap the lamp in soft packaging to protect it from dust and accidental damage. Storing it properly ensures it remains in prime condition, ready to light up your space whenever you display it again.
- .Interchangeable Decor Elements: Consider creating interchangeable inserts for your Constellation Jar Lamp that can be swapped out according to the season or holiday. This approach allows you to maintain the core structure of your lamp while refreshing its appearance throughout the year. Store these inserts flat and in protective sleeves to keep them pristine.
- Climate-Controlled Storage: If you store your lamp or its components seasonally, choose a climate-controlled environment to prevent extreme temperatures or humidity damage. Fluctuating conditions can affect the materials of your lamp, leading to potential warping, peeling, or mold growth. A cool, dry place is ideal for preservation.
- Organized Component Storage: Keep all elements of your Constellation Jar Lamp neatly organized when not in use. Use labeled boxes or bags to store the LED lights, batteries, and any decorative elements. This makes it easier to find and assemble your lamp when needed and prevents loss or damage to small parts.
- Reflective Updates for Seasonal Moods: Tailor your lamp’s ambiance to reflect the current season’s mood by incorporating seasonal colors, patterns, or themes in your design updates. Light pastels for spring, warm hues for summer nights, rich colors for autumn, and cool tones or holiday motifs for winter can all bring a fresh vibe to your space, keeping your Constellation Jar Lamp relevant and engaging year-round.
Maintaining and safeguarding your DIY Constellation Jar Lamp requires a little effort but pays off in lasting beauty and functionality. Regular cleaning, careful handling, and attentive light source maintenance ensure your lamp continues to cast a soothing, celestial glow. Following these guidelines, your Constellation Jar Lamp will remain a cherished part of your home’s ambiance for years.
Conclusion
Prepare to infuse your space with mesmerizing illumination using a captivating DIY Constellation Jar Lamp. Designed to be accessible and uncomplicated, this project enables anyone to effortlessly bring celestial wonders into their environment. With this creative endeavor, you can simply capture the enchantment of the stars and create an atmosphere filled with celestial charm.
By following straightforward steps and using common materials, you can create a stunning jar lamp that will add a touch of enchantment to any space. Let your creativity shine as you embark on this illuminating journey, turning an ordinary jar into a radiant celestial masterpiece.


