Allowing children to explore their creativity can foster their imagination and inspire them to come up with unique and innovative ideas. This then leads to self-expression and can be an enjoyable and exhilarating experience for them.

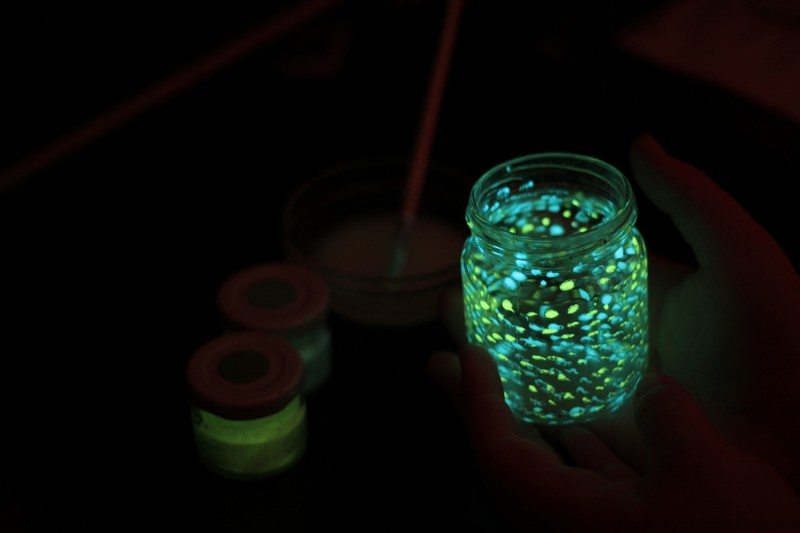
That’s why we’re sure your kids will love this glow in the dark jar project!
They can do it themselves, with your guidance. Just make sure they are wearing clothes you wouldn’t mind getting dirty. Glow in the dark paints are usually waterproof, so once they get to their clothes you have to wash them quickly!
A glowing jar will be nice especially once you have turned off their lights for bedtime. It’s also great to put them on the patio or garden.
Contents
How to Create a DIY Glow in the Dark Jar?
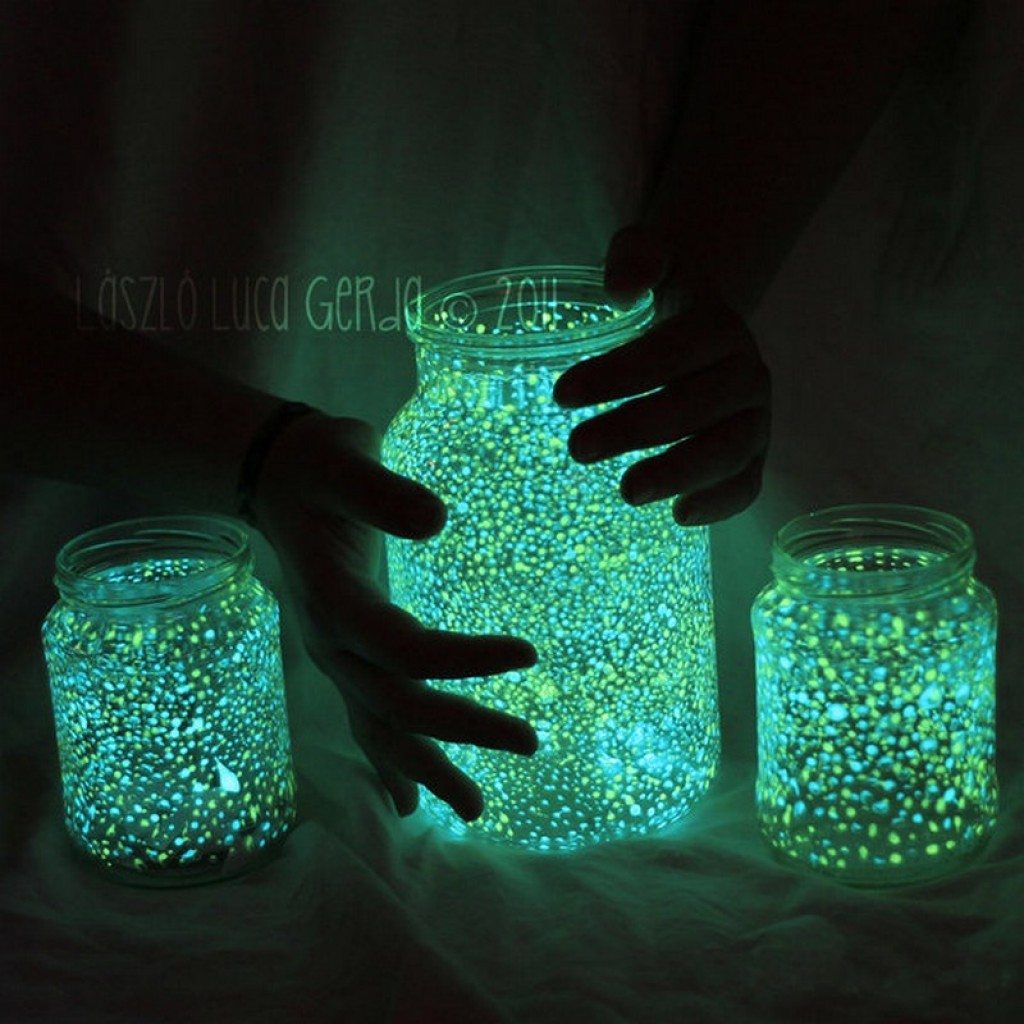
This delightful and imaginative project allows you to transform simple glass jars into mesmerizing luminous wonders that glow like ethereal beacons in the darkness.
Whether you seek a whimsical nightlight for your bedroom, an enchanting centrepiece for gatherings, or a unique gift that will leave recipients in awe, this step-by-step guide will illuminate your path to creating your very own glowing masterpiece.
Materials
- Glass Jar – the bigger the nicer
- Glowing/Luminous Acrylic Paint
- Paintbrush
- Water
Steps
1. Wash the jars
Wash your jars clean. Fill a sink or basin halfway with warm water and a few drops of mild dish soap. Soak the jars in soapy water and gently clean the contents and exteriors with a sponge or dishcloth. This will aid in the removal of any tenacious filth or grease.
After scrubbing, rinse the jars with clean water to remove all soap residue. Ensure there is no lingering soap, as it can interfere with the glow-in-the-dark paint application later on.
2. Pick your paint
A glow in the dark paint is a specialty product that incorporates phosphors, which are light-emitting compounds that emit light when subjected to radiation. Glow in the dark cosmetics come in a variety of forms, including acrylics, spray-on, and powders. Each variety has unique qualities and benefits.
Acrylic glow in the dark paint is a versatile, water-based medium suitable for various surfaces. Its popularity in numerous creative projects is due to its ease of application, quick drying time, and wide array of available colours. Also, it serves as an excellent solution for achieving a smooth and uniform finish in small to medium-sized tasks.
Choose the most suitable acrylic type for your project. It comes in a wide range of colours, providing you with an array of options to bring your creative vision to life. Whether you want a vivid or subtle glow, there’s a colour that suits your preferences.
Additionally, consider the opacity of the acrylic. There are options with a more transparent or translucent quality, while others provide better coverage. Depending on your design, you can choose the type that complements your desired effect.
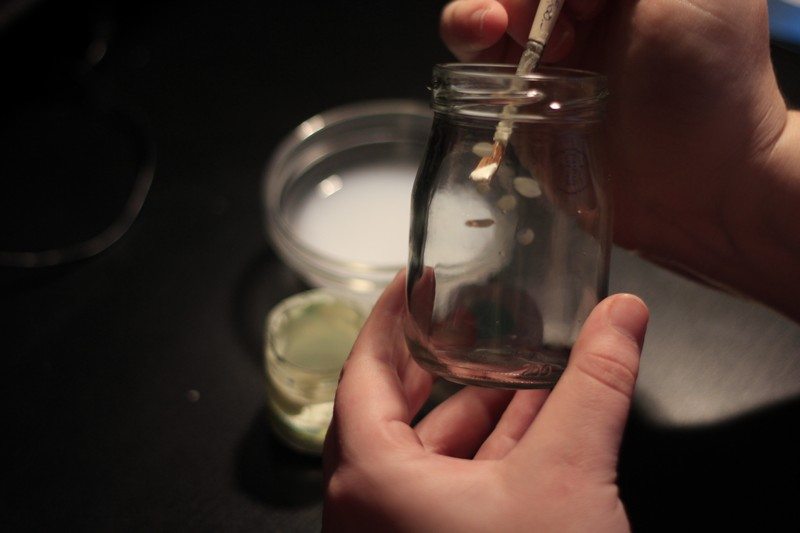
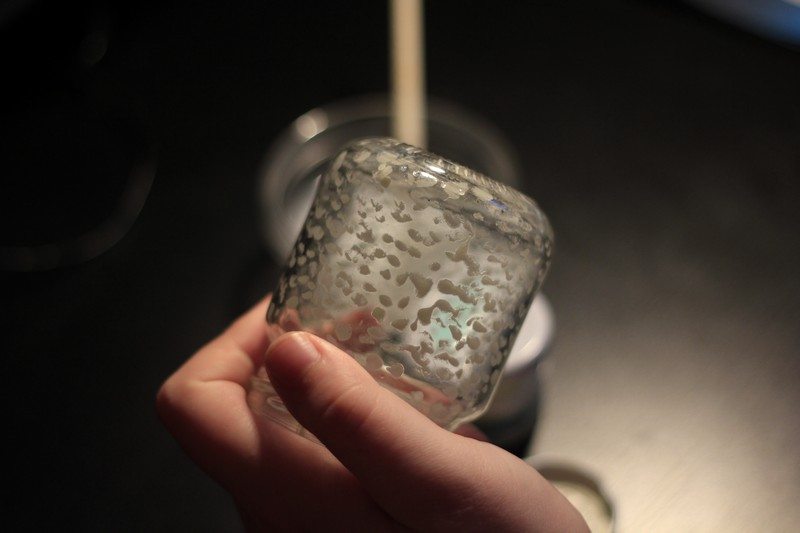
3. Choose your design and paint tiny dots in the jar
Choose and know your design. From galaxy or starry night sky to animal prints, the options for design are many.
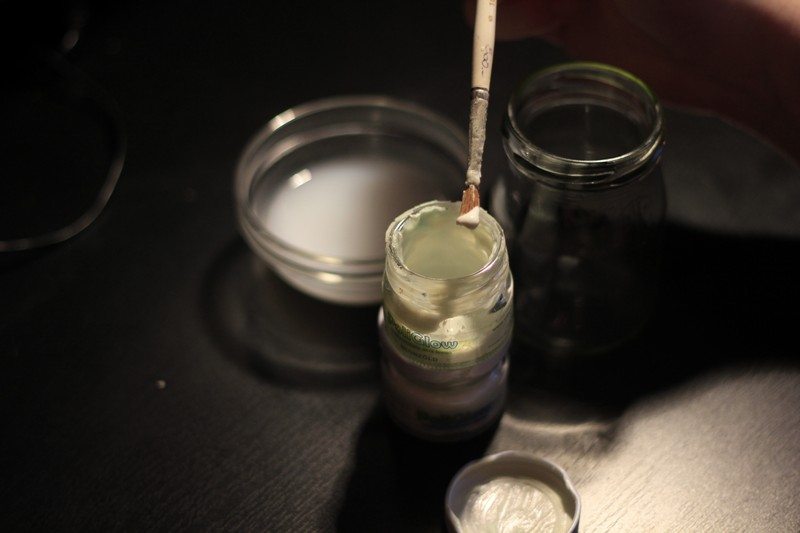
Then, mix the paint using the brush to make sure the glowing particles are evenly distributed.
Make tiny and thin dots inside the jar based on the design you want to achieve. Make sure to avoid clumps or streaks. Apply multiple coats to get the desired level of glow.
It’s best to avoid excessive paint application to ensure a smooth glow. You don’t want clumps or streaks that can affect the enchanting radiance. Instead, gently apply a thin layer, allow it to dry, and repeat if necessary. This approach guarantees a flawless and captivating glow in the dark effect.
By applying the paint in thin layers evenly, you can ensure that the glow in the dark effect is consistent and bright.
The more dots, the better.
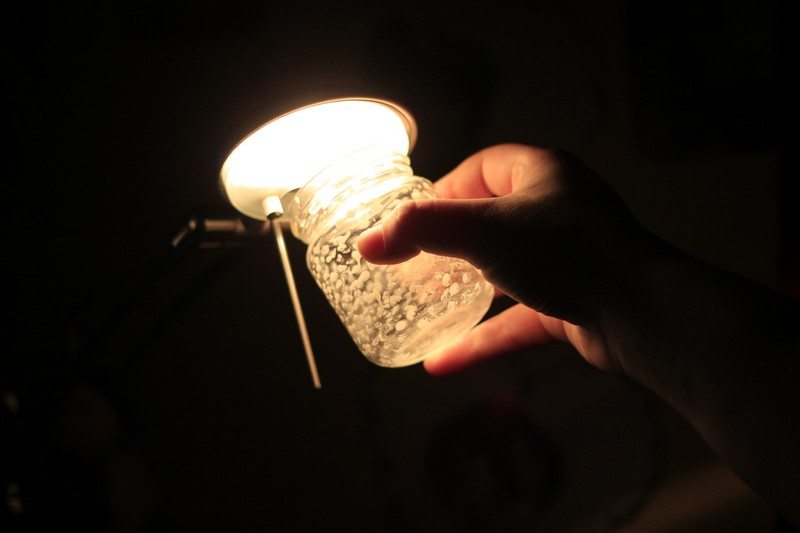
4. Expose your jar to light
To bring forth the glowing effect in a glow in the dark jar, it requires charging with light. This is because the glow in the dark paint or powder within the jar contains phosphors, which have the remarkable ability to absorb light energy and retain it. Once the light source is removed, the phosphors then release the stored energy as a radiant and enchanting glow that illuminates the jar.
The duration required to charge the glow in the dark jar varies depending on the paint type and the intensity of the light source. Certain paints may need just a few minutes of exposure to light, while others might necessitate several hours.
To determine the specific charging time for your jar, refer to the instructions provided with the paint, as they will indicate the ideal duration needed for the glowing effect to be fully activated.
It’s that easy!
Experimenting with designs when it comes to glow in the dark paint jars is a fun and creative way to personalize your project.
Catchy Advantages of DIY Glow in the Dark Jars
Get ready to light up your life with DIY glow in the dark jars! These radiant wonders aren’t just for storing stuff—they’re glowing beacons of creativity and charm. Join us on a journey as we explore the dazzling advantages of crafting your luminescent jars. From ambience to affordability, prepare to be amazed by the luminous possibilities!
1. Atmospheric Ambiance: Transform any space into a mystical wonderland with the soft, enchanting glow of DIY glow in the dark jars. Whether you’re creating a cozy nook in your bedroom or setting the mood for a romantic dinner, these jars add an ethereal ambience that’s simply irresistible.
2. Personalized Pizzazz: Say goodbye to generic decor and hello to personalized brilliance! With DIY glow in the dark jars, you have the power to customize every aspect, from the design to the glow intensity. Let your creativity shine and create glowing masterpieces that reflect your unique style and personality.
3. Kid-Friendly Creativity: Keep the little ones entertained for hours with a glow-tastic crafting adventure! DIY glow in the dark jars are perfect for sparking their imaginations and encouraging creativity. Plus, it’s a fun and educational way to teach them about light and luminescence.
4. Versatile Vessels: These jars are more than just pretty lights—they’re versatile vessels that can serve a multitude of purposes. Use them to store trinkets, organize your workspace, or add a touch of magic to your party decor. The possibilities are endless!
5. Magical Gifts: Looking for the perfect gift that’s sure to dazzle? Look no further than a handmade glow in the dark jar! Whether it’s for a birthday, anniversary, or holiday, these radiant creations make for unforgettable presents that are guaranteed to leave a lasting impression.
6. Easy Crafting Fun: Don’t let the thought of DIY intimidate you—crafting your glow in the dark jars is easier than you think! With simple supplies and easy-to-follow instructions, even beginners can create stunning luminous creations in no time.
7. Outdoor Elegance: Take your outdoor decor to the next level with the enchanting glow of DIY jars. Hang them from tree branches, scatter them around your garden, or use them to light up your patio—they’re sure to add a touch of whimsy and charm to any outdoor space.
8. Nighttime Navigation: Illuminate dark pathways and walkways with the soft glow of your DIY jars. Whether you’re hosting a backyard party or going on a camping trip, these luminous beacons ensure safe travels while adding a magical touch to the night.
9. Endless Inspiration: With DIY glow in the dark jars, the only limit is your imagination! From intricate designs to simple patterns, let your creativity run wild and create glowing wonders that are as unique and dazzling as you are.
Ready to add a touch of magic to your life? With DIY glow in the dark jars, the possibilities are endless and the advantages are undeniable. So gather your supplies, unleash your creativity, and get ready to illuminate your world like never before!
Explore these design concepts to spark your creativity for glow in the dark jars:
1. Galaxy or starry night
Create a galaxy or starry night effect by painting the jar with dark blue or black paint, then adding dots of white or yellow paint to represent stars. With the glow in the dark paint, they will glow like real stars in the sky!
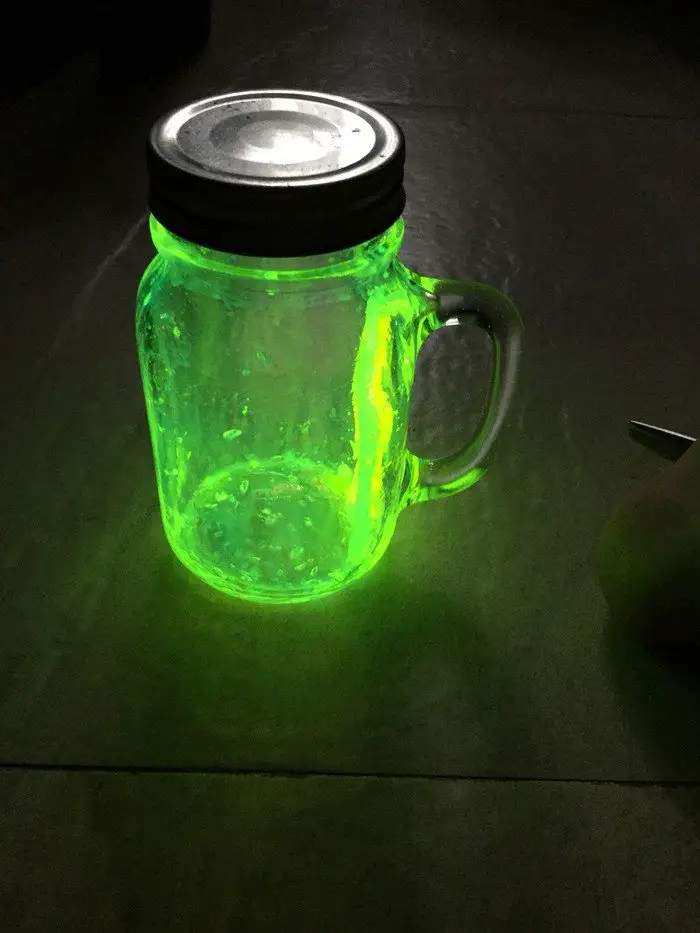
2. Aquatic theme
Combine different colours of glow in the dark paint to create unique designs and colour combinations. For example, you can use blue and green paint together to create an aquatic. Transform the jar into an underwater wonderland with glow in the dark fish, seashells, and coral. These luminous elements will recreate the enchanting allure of an underwater wonderland, turning your glow in the dark jar into a mesmerizing oceanic scene .
3. Gradient effect
Use glow in the dark paint to create a gradient effect by starting with a light colour at the top of the jar and gradually blending into a darker colour at the bottom. Use contrasting colours for a unique effect.
4. Animal Print
Begin by painting the outside of the jar in a light colour, and then let your creativity flow as you use a small brush to fashion dots of glow in the dark paint in an animal print pattern, like leopard or zebra.
Where is the best place to display your glow in the dark jars?
Glow in the dark jars creates a relaxing and cozy atmosphere. After creating your glowing jars, place them in areas where you can fully appreciate their enchanting radiance. Whether it’s on a windowsill, bedside table, or shelf in your living room, these jars emit a soft and soothing glow that brings a tranquil ambience to your home when the lights are turned off.
You can also use your glow in the dark jars as part of your decor. Use them as centrepieces for a dinner party, or place them around your outdoor space for a summer gathering.
Use the glow in the dark jars to light up a dark corner of your room or to add a touch of whimsy to your child’s bedroom. Their gentle luminescence can serve as soothing nightlights, creating a dreamy atmosphere conducive to relaxation and peaceful slumber.
Whether on the table or hanging from the ceiling, these jars will add a touch of wonder to your nightly sanctuary.
You can also take the magic of your glow in the dark jars outdoors, where they can truly shine amidst the natural darkness. Place them along walkways or hang them from trees to create a charming pathway leading to your home or to add a touch of mystique to your garden gatherings.
Whatever you decide to do, enjoy the ambience that your glow in the dark jars creates!
Click on any image to start the lightbox display. Use your Esc key to close the lightbox.


Thanks to From Panka with Love for sharing invaluable tricks on how to make a glow in the dark jar.
If you liked this project, you might also like to view DIY Galaxy Jars…
Glowing Magic in a Jar!
Embark on an enchanting journey of creativity with this unique DIY project to craft a mesmerizing glow in the dark jar. With just four simple steps, you’ll create a magical masterpiece.
Begin by gathering the materials, including a glass jar, glow in the dark paint, a paintbrush, and optional decorations for a personal touch. Then, unleash your artistic flair as you carefully apply the luminous paint to the inside of the jar, allowing your imagination to shine through.
Once dry, charge the jar under a bright light source to unlock its radiant glow. Delight in the captivating luminosity that transforms any space into a wonderland of light.
The design options for glow in the dark jars are limited only by your imagination. These enchanting luminous marvels offer a delightful canvas to unleash your creativity and add a touch of magic to any space. There is a variety of design concepts available to ignite and inspire your artistic path.
As you immerse yourself in this artistic odyssey, remember that there are no right or wrong designs—only the expressions of your heart and soul. Embrace imperfections and cherish every stroke, for they bear the essence of your imagination. Allow yourself to be captivated by the dance of light and shadows, and revel in the joy of creating something truly extraordinary.
Perfect for gatherings, relaxation, or gifting, this DIY glow in the dark jar will captivate hearts and minds alike with its otherworldly allure.
Ready to craft your radiant glow in the dark jar?
Frequently Asked Questions
1. What materials do you need for this DIY project?
For this project, you will need a clean glass jar with a lid, glow in the dark paint or powder, a paintbrush or sponge applicator, and optionally, glitter or other decorative elements.
2. Where can you find glow in the dark paint or powder?
Glow in the dark paint or powder can typically be found at craft stores, online retailers, or specialty paint shops. You may also find them in the arts and crafts section of larger department stores.
3. Can you use any type of glass jar for this project?
Yes, you can use any clean glass jar with a lid for this project. Mason jars, old candle jars, or even small jam jars work well. Just make sure they are clean and dry before you begin.
5. How long does the glow effect last?
The duration of the glow effect depends on the quality of the glow in the dark paint or powder used. Generally, the glow will start to fade after several hours in darkness but can be recharged by exposing the jar to light again.
6. Can you use multiple colors of glow in the dark paint?
Absolutely! Get creative and experiment with different colours to create unique designs and effects. Just make sure to allow each layer of paint to dry completely before adding another colour.
7. Is this project safe for children to do?
Yes, this DIY project is safe for children to do with adult supervision, especially when handling paint and other materials. It’s a fun and engaging activity for kids and adults alike!
8. Can you use the glow in the dark jar outdoors?
While these jars can certainly be used outdoors, keep in mind that extreme weather conditions may affect the longevity of the glow effect. It’s best to place them in a sheltered area if using them outside for extended periods.
9. How can you customize my glow in the dark jar further?
Get creative with your designs! You can add glitter, stickers, or even paint patterns on the outside of the jar for a personalized touch. Experiment with different shapes and sizes of jars for a variety of effects.
10. Can you wash the jar once the glow in the dark paint is applied?
It’s best to avoid washing the inside of the jar once the glow in the dark paint is applied, as this can affect the longevity of the glow effect. Instead, gently wipe the outside of the jar with a damp cloth if needed.


