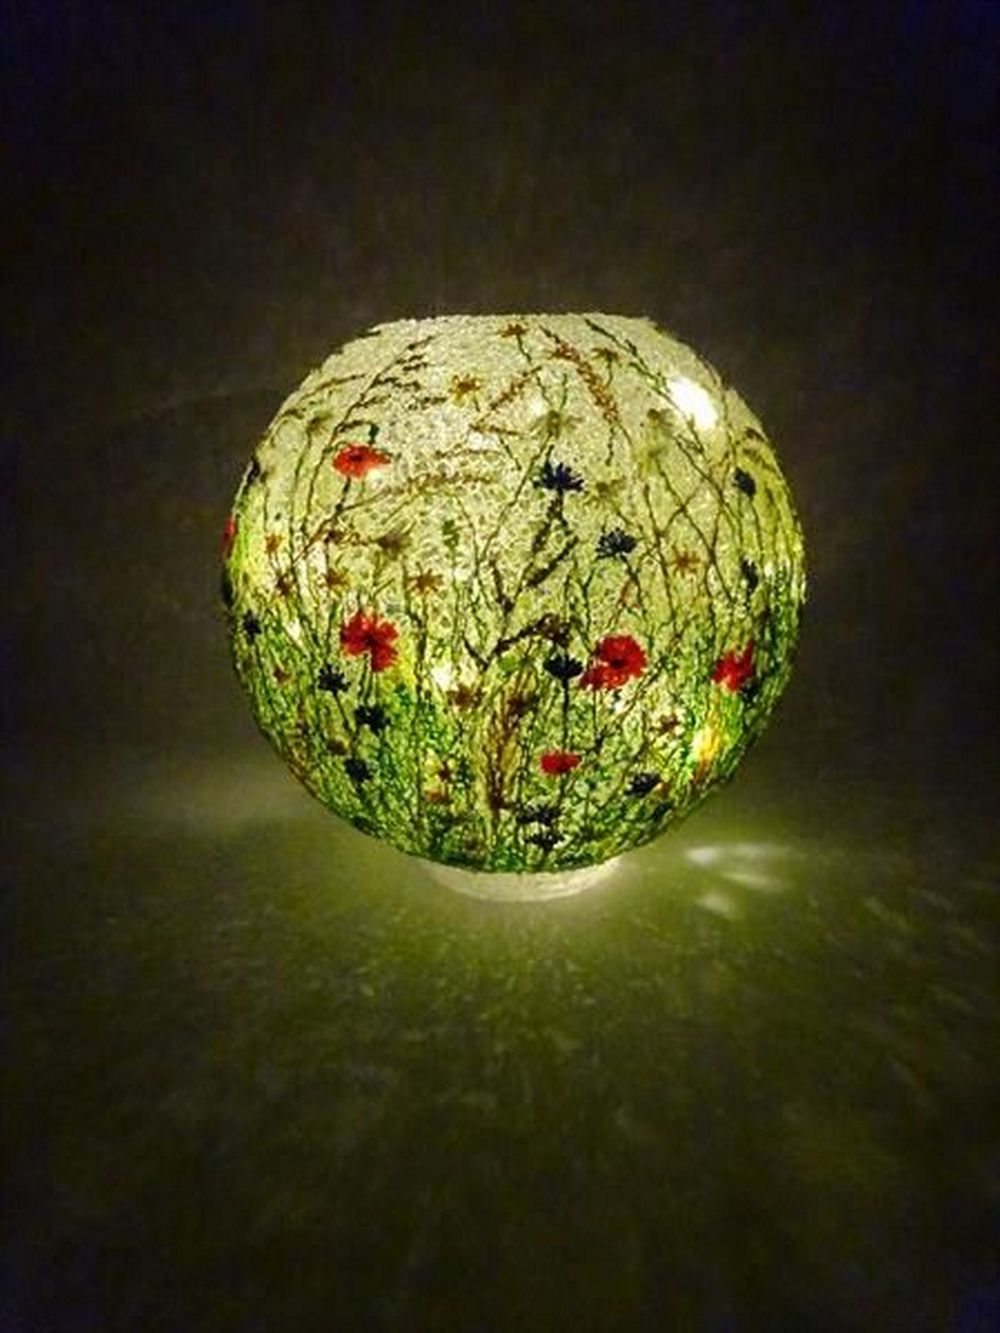
If you’re planning on having a backyard party soon, here’s a great project for you. Pressed flower lanterns would be a nice addition to your party. Not only are they beautiful, but they’re also a wonderful way to preserve your favourite blooms.

This project would cost you almost nothing to make. The finished project would be perfect as home decor, whether indoors or in the garden. Just pick a shaded area – you wouldn’t want your lanterns to be destroyed by rain.

Contents
- 1 How to Make a DIY Pressed Flower Lantern?
- 2 Conclusion
How to Make a DIY Pressed Flower Lantern?
Looking for an affordable and creative way to enhance your home decor? Look no further than DIY-pressed flower lanterns! These lanterns are easy to make and offer a stunning and natural touch to your living space. In this article, we’ll provide a step-by-step guide on how to create your own pressed flower lanterns.
These pressed flower lanterns are very easy to make. Additionally, they’d make great gifts to friends and family, too! Now get to work and start preserving your flowers through these beautiful decors!
Materials
Before you start, make sure you have all the necessary materials gathered, so you can jump right into the fun part!
- Pressed Flowers and/or Leaves
- Are the main decorative element of the pressed flower lantern, giving it its unique beauty and natural appeal.
- Few sheets of standard printer paper/construction paper
- Standard printer paper is necessary to create the lantern’s structure and provide a base for the pressed flowers.
- Tissue paper
- helps to diffuse the light from within the flower lantern, making it more aesthetically pleasing.
- Cup of flour, Salt and Water
- The cup of flour, salt, and water are necessary materials for making the paste that will hold the pressed flowers and tissue paper onto the printer paper.
- Rubber balloons
- Rubber balloons are needed to create the shape of the paper lantern and hold the structure in place while it dries.
- Battery Operated Tea Light or Votive Candle
- You can use any type of candle that fits inside your jar or bottle, but it’s recommended to use a tea light or votive candle.
- Parchment Paper:
- This will be used to press your flowers and leaves and to protect your work surface.
- Heavy Book or Object
- This will be used to press your flowers and leaves flat
Tools
- Paintbrush
- You’ll need a small paintbrush to apply the paste to the glass and the flowers.
- Scissors (optional)
- You might have one pair of scissors around, you might want to cut the paper sheets rather than tear them.
Step-by-Step Instructions
For a delightful and imaginative project, consider creating a DIY pressed flower lantern. This is an excellent opportunity to repurpose materials while producing stunning decorations that can be enjoyed for an extended period.
Collecting Flowers and Leaves
To create a pressed flower lantern, the initial step involves gathering a variety of flowers and leaves. It is vital to select ones that are comparatively flat and dry since they are simpler to press. Prior to pressing, you may have to prepare them.
Flowers with thicker stems may need to be split in half before pressing to ensure that they dry evenly. You can use a sharp knife or scissors to carefully split the stem down the middle.
Pressing the Flowers and Leaves
After gathering your flowers and leaves, it’s time to press them. There are various ways to go about it, but a popular method is by utilising a flower press.
Traditional Flower Press
Flower presses are typically made up of two wooden frames with cardboard inserts and bolts that allow you to adjust the pressure. Simply layer your flowers and leaves between the cardboard inserts and tighten the bolts to apply pressure.
Using Heavy Books
If you don’t have a flower press, you may utilise a thick book or iron to press your leaves and flowers. Create your press by positioning the leaves and flowers in between two absorbent sheets of paper. Then, add weight on top of the book by placing additional objects or books.
Leave them to dry for a week or two, checking occasionally to make sure they are completely dry.
Using an Iron
To use an iron, place your flowers and leaves between two sheets of parchment paper and iron them on low heat for a few seconds at a time.
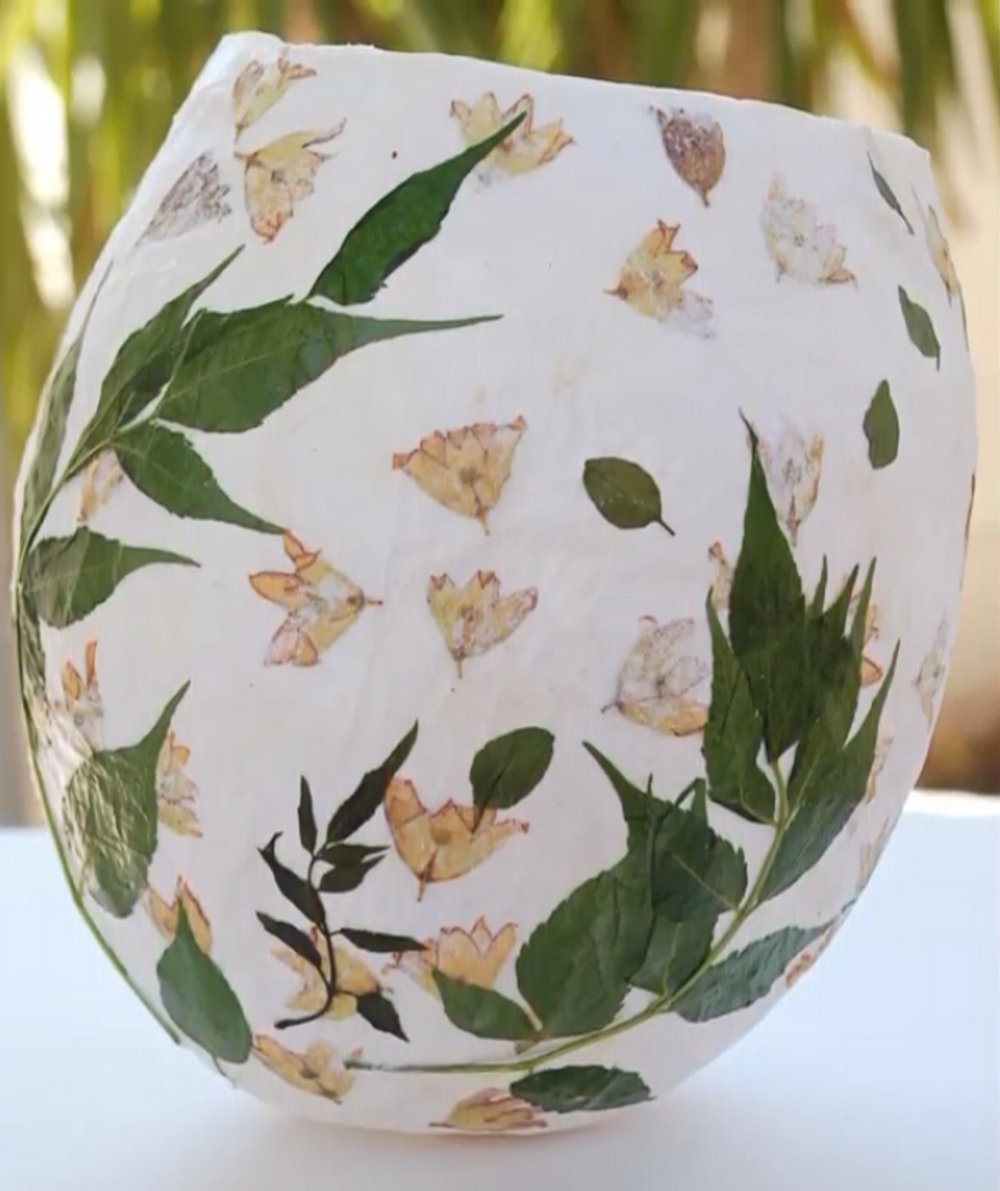
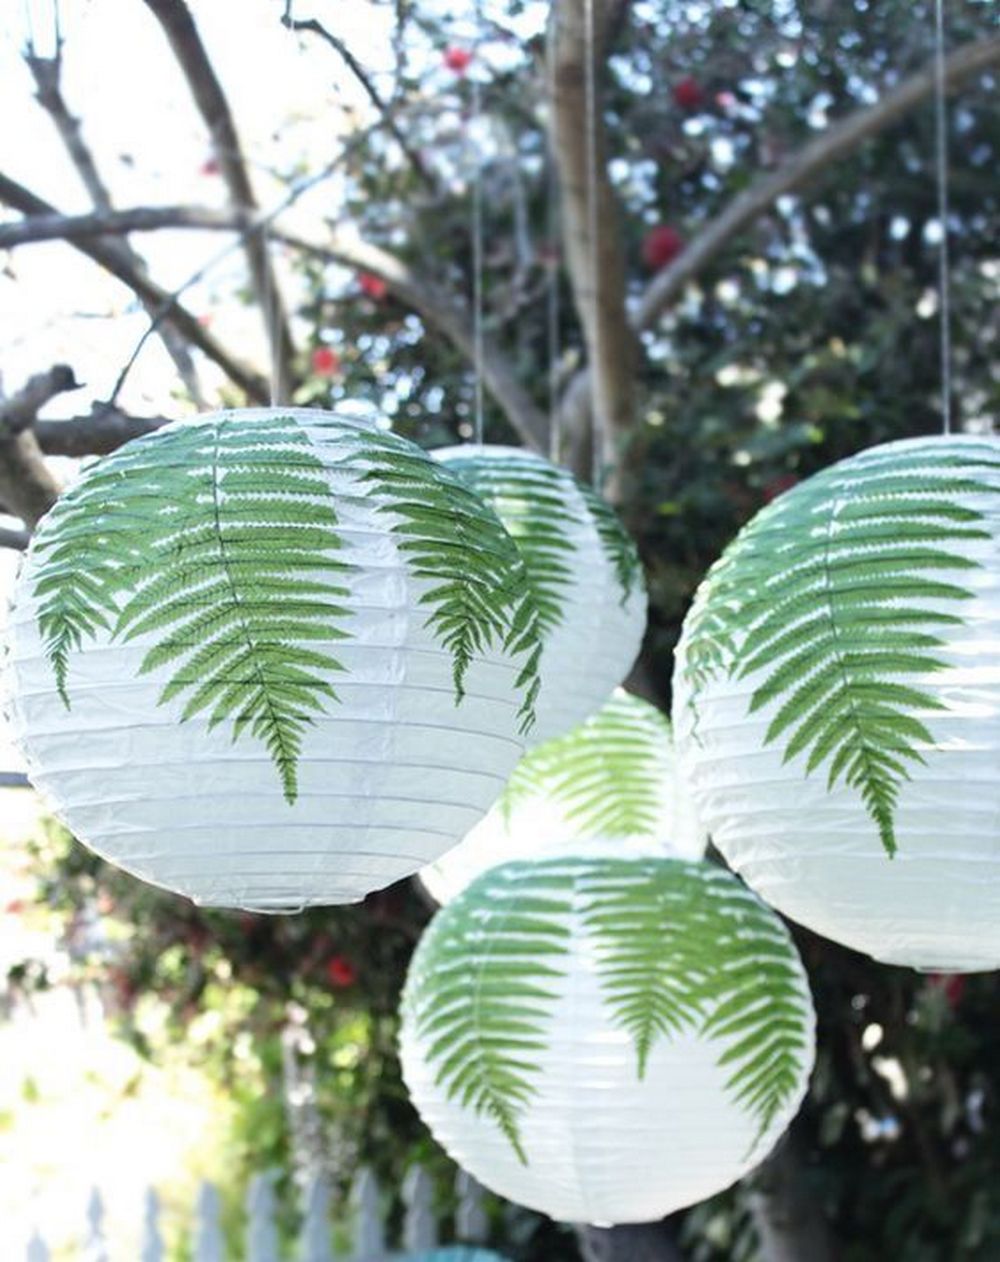
Creating Your Paper Lantern
Making a paper lantern can add a distinctive ambience to a room or outdoor area, and it can be an enjoyable and imaginative activity. To begin, gather essential materials such as tissue paper or construction paper, scissors, and a balloon.
The Paste
To construct the lantern, start by creating the adhesive paste. Mix a cup of flour, salt, and water. Blend the ingredients until a smooth and uniform paste of desired thickness for your project is achieved. If the paste is too dense, you may incorporate some water, and if it’s too runny, add more flour.
The Mould
After preparing the required paste, it’s time to move on to constructing the lantern. Lanterns can be designed in various shapes and sizes, utilising a variety of materials. However, for this particular project, a balloon will provide the ideal mould.
Choose a balloon that fits the size requirement for your lantern. Avoid picking one that is too big or too small, as it will impact the shape and sturdiness of the final product. Blow up the balloon to the desired size and securely tie it.
Before applying the paste, firmly secure the balloon by taping it to a flat surface or holding it steady with your hands to prevent any movement during construction.
The Lantern
Now that your balloon is secured, it is time to start. Cut your tissue or construction paper into strips, making sure they are long enough to cover the entire balloon.
The Base Layer
Begin by applying the base layer to the balloon. Dip each strip of paper material into the paste and layer them onto the balloon until half of the balloon is covered. Leave the top open for airflow and ensure the strips are applied in varying directions, overlapping each other to provide strength to the base layer of the lantern.
Adding Tissue Paper
After finishing the base layer, proceed to apply the tissue layer using a paintbrush due to the delicate nature of the tissue paper once it is immersed in the paste. Repeat this process until the lantern begins to take shape, usually after 3-5 layers of tissue paper.
Allow the lantern to dry, which can take several hours or overnight, depending on the humidity and size of your lantern.
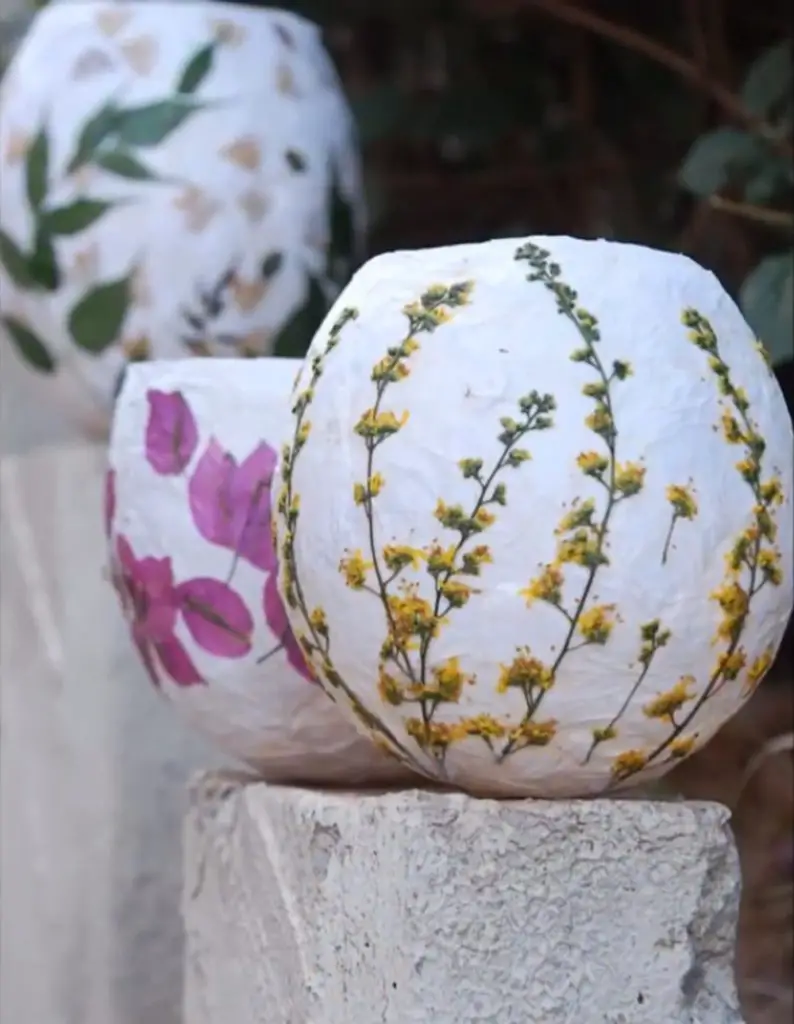
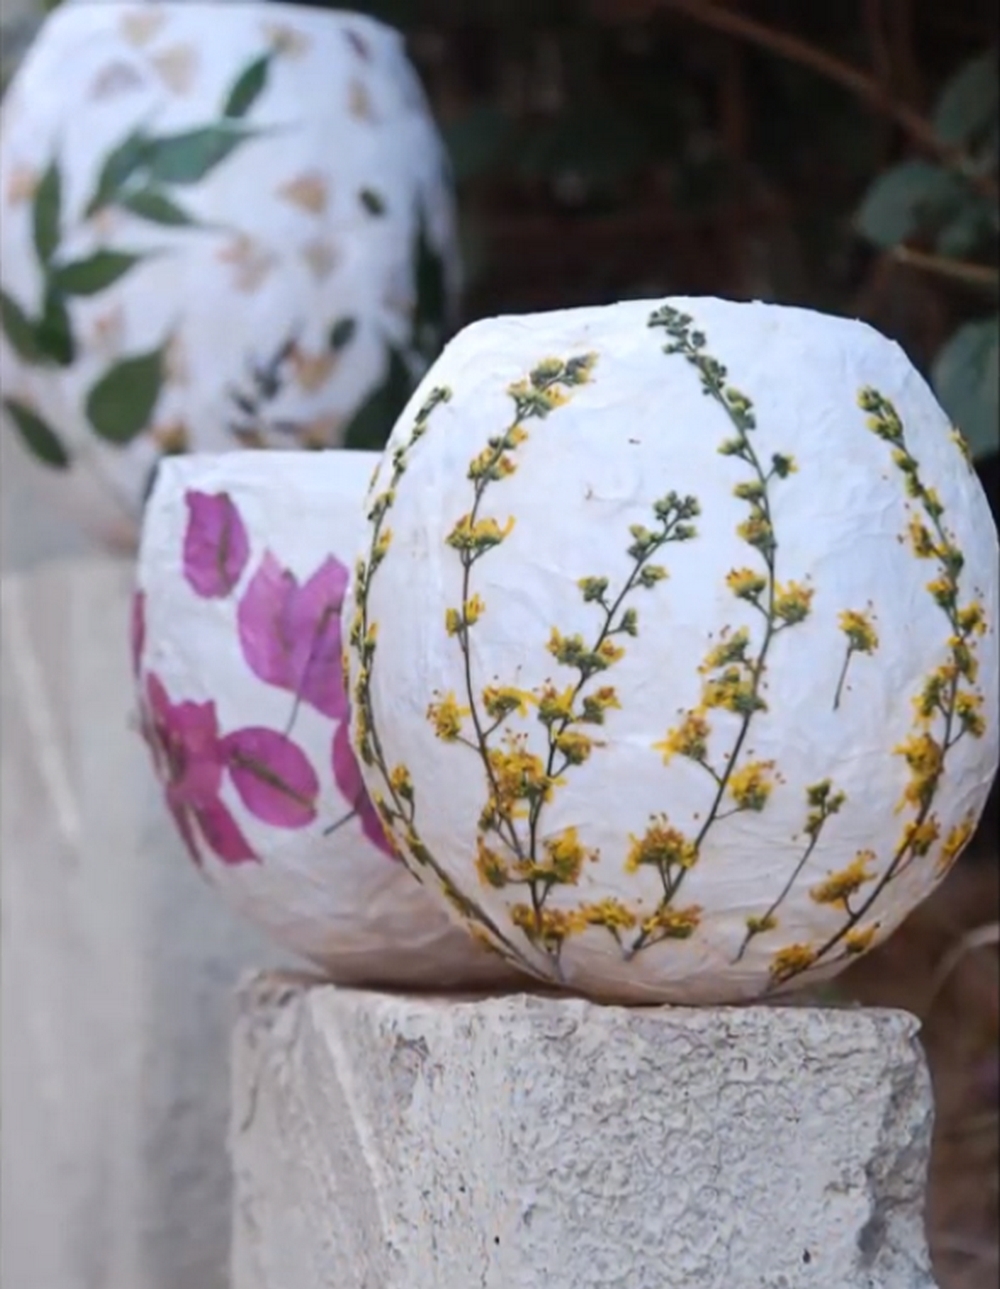
After ensuring that your lantern is completely dry, gently remove the balloon from the inside, leaving behind a stunning, translucent paper lantern that can be decorated to your liking.
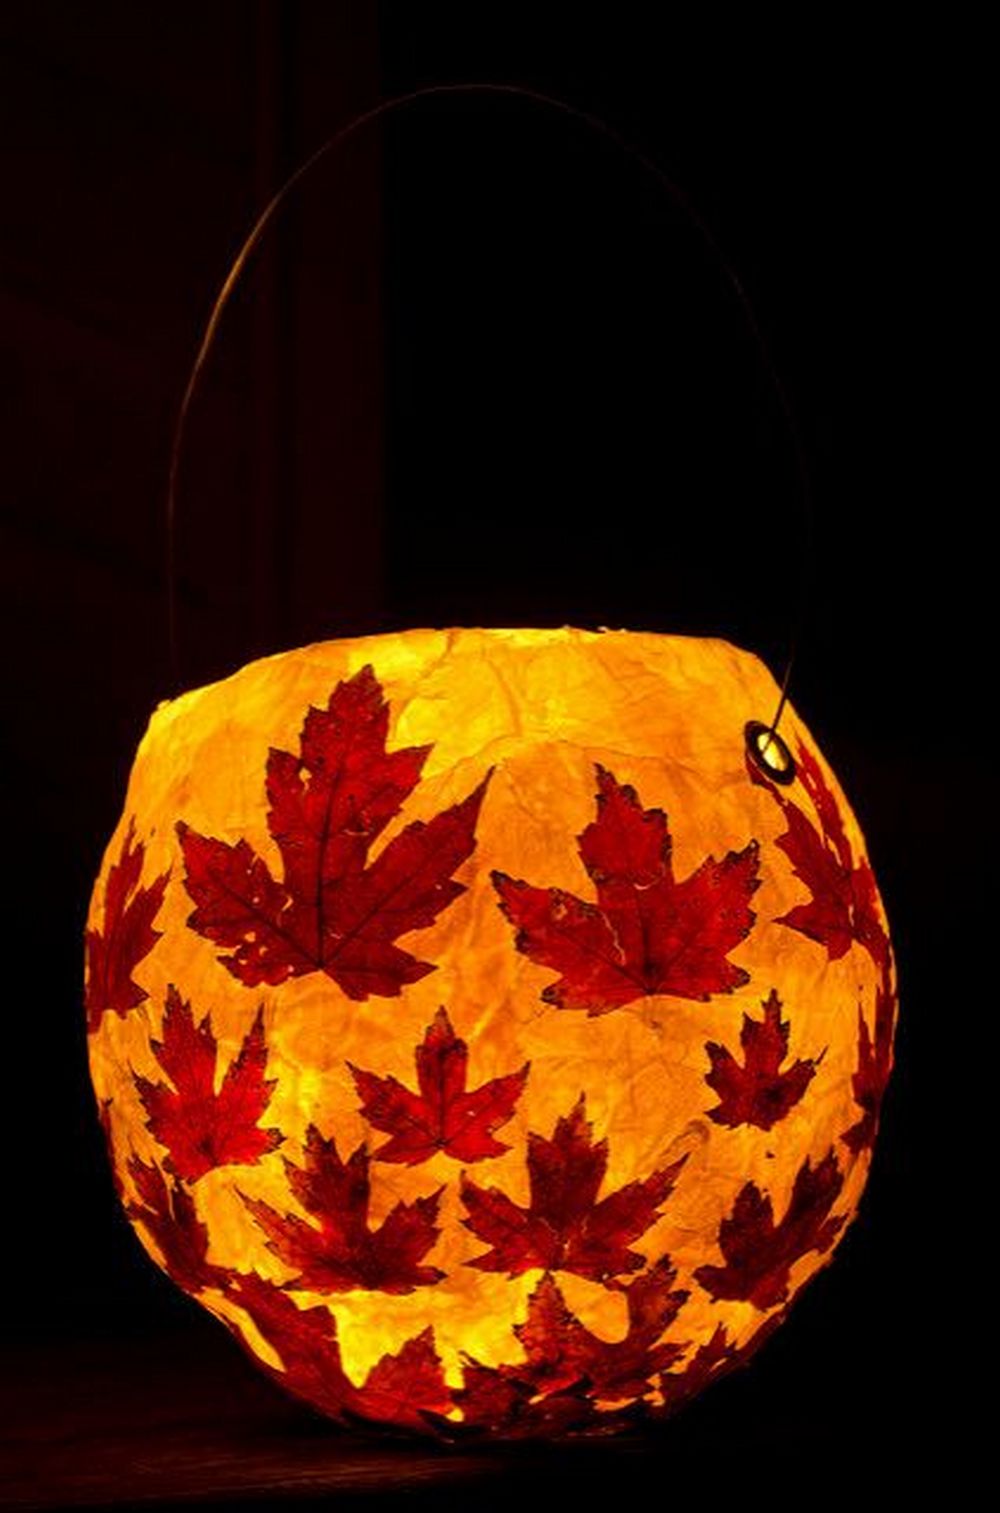
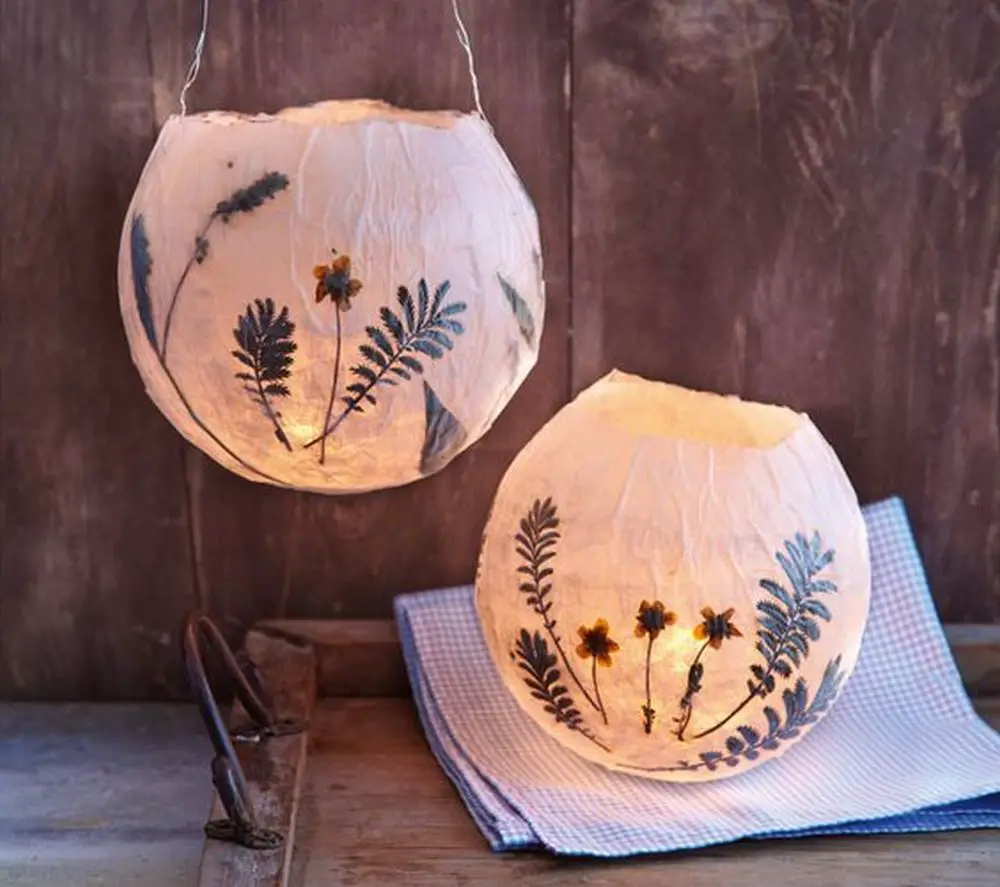
Preparing the Lantern
Ensure that your paper lantern is thoroughly dry prior to attaching the pressed flowers. Proceed to arrange the flowers and leaves on the paper lantern, using glue to secure them gently, taking care not to apply excessive force.
Covering the Lantern
Once the pressed flowers have been attached to the paper lantern, it is important to protect the design by applying a layer of parchment paper. To accomplish this, submerge the parchment paper into the paste and brush it over the pressed flowers. Leave it to dry.
Finishing Touches
After attaching all the pressed flowers and leaves, it’s time to add the final decorations. You can adorn the top of the lantern with a ribbon or twine and attach a small charm or tag to make it more personalised and unique.
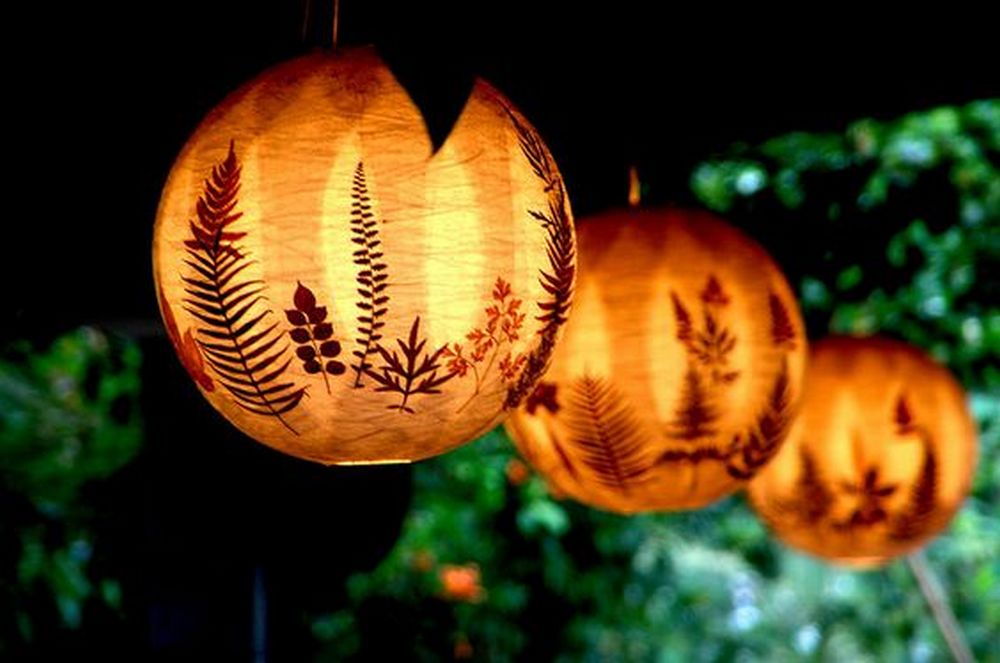
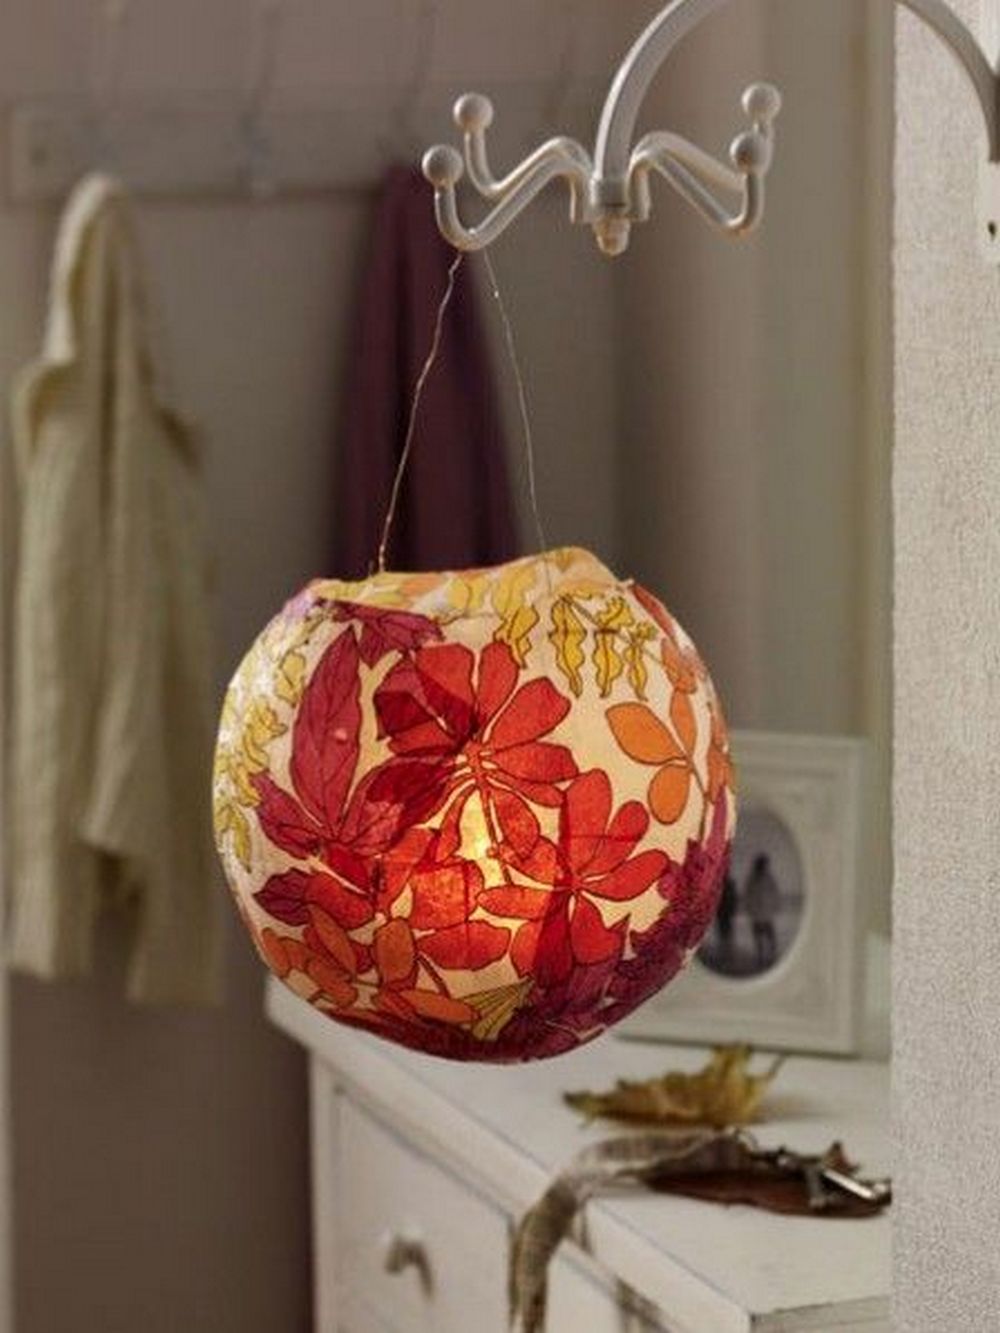
Light Your Candle
Now that your pressed flower lantern is complete, all you need to do is place a battery-operated tea light or votive candle inside the jar or bottle and light it up. The candle will create a warm and cozy ambience that will enhance the beauty of your pressed flowers.
Tips and Tricks:
- Use a variety of flower and leaf shapes to add depth and interest to your pressed flower lantern.
- Experiment with different jar and bottle shapes to create a unique look.
- If you want to add colour to your lantern, you can use food colouring to dye the Mod Podge before gluing your flowers.
- Make sure to place your pressed flower lantern on a heat-resistant surface when lighting the candle.
Conclusion
DIY-pressed flower lanterns are a beautiful and affordable way to enhance your home decor. They’re easy to make and offer a natural and unique touch to your living space. Plus, they make for great personalized gifts for loved ones. We hope this step-by-step guide has been helpful in creating your own pressed flower lanterns.
Click on any image to start the lightbox display. Use your Esc key to close the lightbox.
Learn how to make pressed flower lanterns by watching the video below.
Tired of the old Halloween pumpkin decorating ideas you usually make every year? Here’s a cute DIY project you can do for a change – black cat o’lanterns!


