Among the many advantages of the internet is the fact that it gives us too many options when it comes to decorating our homes. Ideas seem to pop up here and there and, the next thing we know, we have a new “must-have”. While some of the trends are not really necessary, it can be nice to keep up with the times.
My mother, who was born in the ’60s, likes gardening a lot and spends most of her time in her garden – it’s her sanctuary. She still sees to it that she updates herself with what’s hot in the home decorating department. The latest that caught her attention were these concrete mushrooms with lights.
Contents
- 1 The Perfect Blend of Aesthetics and Functionality
- 2 Incorporating the LED Lights
- 3 Attaching the Glass Beads
- 4 DIY Concrete Mushrooms Design Ideas
- 5 FAQ on DIY Concrete Mushroom with Lights
- 5.1 What materials do I need to make a concrete mushroom with lights?
- 5.2 How do I prepare the workspace for making concrete mushrooms?
- 5.3 What’s the process for molding the mushroom cap?
- 5.4 How long does it take for the concrete to cure?
- 5.5 How do I incorporate LED lights into my concrete mushroom?
- 5.6 Can I paint my concrete mushrooms?
- 5.7 How do I attach the LED lights to the concrete mushroom?
- 5.8 What are some design ideas for concrete mushroom lights?
- 5.9 How do I maintain my concrete mushroom lights?
- 5.10 Are concrete mushroom lights eco-friendly?
- 6 Conclusion
The Perfect Blend of Aesthetics and Functionality
Concrete mushrooms with lights effortlessly combine aesthetic appeal with practical functionality. During the day, they stand as delightful garden ornaments, adding a touch of whimsy to any outdoor space. As night falls, these captivating creations transform into enchanting sources of illumination, casting a warm glow and creating a mesmerizing ambience.
This DIY project looks good as garden decor and they also serve as lights at night. True to her words, they were really pretty… and are actually even prettier at night.
Unleashing Your Creativity
When embarking on the journey of crafting your own concrete mushroom lights, you have the freedom to unleash your creativity and explore various design possibilities.
Let your imagination run wild as you envision the perfect addition to your garden. The following materials and tools will aid you in bringing your vision to life:
Materials You’ll Need:
- Glass beads
- These will add a touch of sparkle to your concrete mushrooms, enhancing their visual appeal.
- Sand/topping Mix
- A crucial component for achieving the desired texture and durability of the mushrooms.
- Styrofoam cup
- Acts as a mold for shaping the mushroom stem.
- Bowls
- Acts as a mold for shaping the mushroom head. Preferably a larger bowl and a smaller one to create the hollow part of the mushroom head.
- Spray paint
- Choose colors that complement your garden’s aesthetic, allowing the mushrooms to seamlessly blend with their surroundings.
- PVC Pipe
- Enough to hold the mushroom cap and the strip together.
- Solar LED lights
- Provide an eco-friendly and cost-effective lighting solution for your mushrooms.
- Lacquer Thinner
- To be used to remove paint in the glass beads after painting.
Essential Tools
- Hammer drill with a concrete bit
- Enables you to create holes for inserting the stems and lights into the concrete mushrooms.
- Hot glue gun
- Ensures secure attachment of the stems and lights to the mushroom caps.
- Wet sponge/cloth
- Necessary for cleaning excess concrete and achieving a smooth finish.
Step-by-Step Guide
To ensure your success in crafting concrete mushroom lights, follow these step-by-step instructions:
Prepare Your Workspace
Before diving into the exciting process of crafting your concrete mushroom lights, it’s essential to prepare your workspace properly. By gathering all the necessary materials and tools in advance, you’ll ensure a smooth and efficient DIY experience.
Here’s a detailed expansion on how to prepare your workspace:
Find a Suitable Area
Begin by selecting a well-ventilated and spacious area for your project. It could be a garage, workshop, or any open space where you have ample room to move around comfortably. Ensure the area is well-lit, as this will facilitate precise work and enhance safety.
Clear the Space
Remove any unnecessary clutter or items that may hinder your work. Clearing the area will provide you with a clean and organized environment, allowing you to focus on the task at hand without any distractions.
Lay Down Protective Coverings
Since working with concrete can get messy, it’s advisable to protect your working surface. Lay down a plastic sheet, drop cloth, or old newspapers to prevent any unwanted spills or stains. This will make cleanup much easier once you’ve completed your project.
Organize and Arrange
Logically arrange your materials and tools. This can involve setting up designated areas for different materials or using containers to organize smaller items neatly. By establishing an orderly setup, you’ll minimize the chances of misplacing or losing any crucial components during the crafting process.
Safety First
Before beginning any DIY project, prioritize safety. Wear appropriate protective gear, such as safety goggles, gloves, and a dust mask, to shield yourself from potential hazards. Additionally, familiarize yourself with the proper usage of each tool and take necessary precautions while handling them.
Prepare Sand/Topping Mix
To kickstart the creation of your concrete mushroom lights, it’s crucial to mix the sand/topping mix with utmost precision, following the instructions provided by the manufacturer. This step ensures that you achieve a smooth and pliable consistency, laying the foundation for sturdy and visually appealing mushrooms.
Carefully measure the required quantities of sand/topping mix as directed, taking into account the recommended water-to-mix ratio. This will ensure that the concrete mixture achieves the desired texture, making it easier to work with during the shaping and moulding process.
Thoroughly blend the sand/topping mix with water, using a mixing bowl or container. Stir the mixture consistently until all the ingredients are well combined, avoiding any lumps or clumps. The goal is to achieve a homogeneous mixture that can be easily moulded and shaped to form the mushroom caps and stems.
Pay close attention to the recommended mixing time and consistency specified by the manufacturer, as this will have a direct impact on the final outcome of your concrete mushroom lights.
Moulding the Mushroom Cap
Choose a larger bowl that corresponds to the desired size of your mushroom cap. This bowl will determine the overall dimensions and proportions of the cap.
Additionally, find a smaller bowl that fits comfortably inside the larger one. The smaller bowl will create the hollow part of the cap, adding a realistic touch to your concrete mushroom.
Apply a Release Agent
Before pouring the concrete mixture into the bowls, it’s essential to apply a release agent to prevent sticking. This can be a cooking oil spray, petroleum jelly, or any suitable release agent recommended for concrete casting. Lightly coat the inner surfaces of both bowls to ensure easy removal once the concrete has cured.
Pour the Concrete Mixture
Carefully pour the prepared concrete mixture into the larger bowl, filling it up to the desired height for the mushroom cap. Take care not to overfill or underfill the bowl, as this will affect the final shape and size of the cap.
Next, place the smaller bowl inside the larger one, ensuring it sits centred and creates a hollow indentation.
Adjust the Positioning
To achieve a symmetrical and uniform shape for your concrete mushroom, gently adjust the position of the smaller bowl to the larger one. Ensure that the smaller bowl is perfectly aligned, creating a cavity in the concrete mixture that resembles the hollow part of a concrete mushroom cap. Take your time to make any necessary adjustments until you’re satisfied with the positioning.
Smooth the Surface
Once the bowls are in place, use a wet sponge or cloth to smooth the exposed surface of the concrete. This will help eliminate any imperfections, air bubbles, or excess material that may affect the final appearance of the concrete mushroom cap. Pay special attention to the edges and ensure they are well-defined and neat.
The Stipe
While patiently waiting for the mushroom cap to undergo the curing process, you can maximize your productivity by embarking on the next step of crafting the concrete mushroom lights—the moulding of the stipe. To begin this exciting stage, retrieve the Styrofoam cup and prepare to pour the cement mix into it.
Position the Styrofoam cup on a stable surface, ensuring it is upright and stable. Carefully measure the required amount of cement mix according to the instructions provided by the manufacturer. Following the recommended water-to-mix ratio, achieve a consistency that is easy to work with and mould.
Pour the cement mix into the Styrofoam cup while placing the PVC pipe in the centre of the Styrofoam cap. This will serve as the passage for the solar LED light wire to reach the mushroom cap.
Fill the cup to the appropriate level, keeping in mind the size and proportion of the mushroom design you have in mind for your garden decoration. Avoid overfilling the cup, as this may lead to an unsteady or disproportionate stem.
Once the cup is filled with the cement mix, gently tap it on the surface to eliminate any air bubbles trapped within the mixture. This ensures a solid and uniform stem structure. Smooth the top surface of the cement mix using a wet sponge or cloth to achieve a polished finish.
Allow the Concrete to Cure
Follow the manufacturer’s instructions for curing time, as it may vary depending on the specific type of concrete mix used. During the curing process, it’s important to maintain the optimal temperature and humidity levels to ensure proper setting and strength development of the concrete.
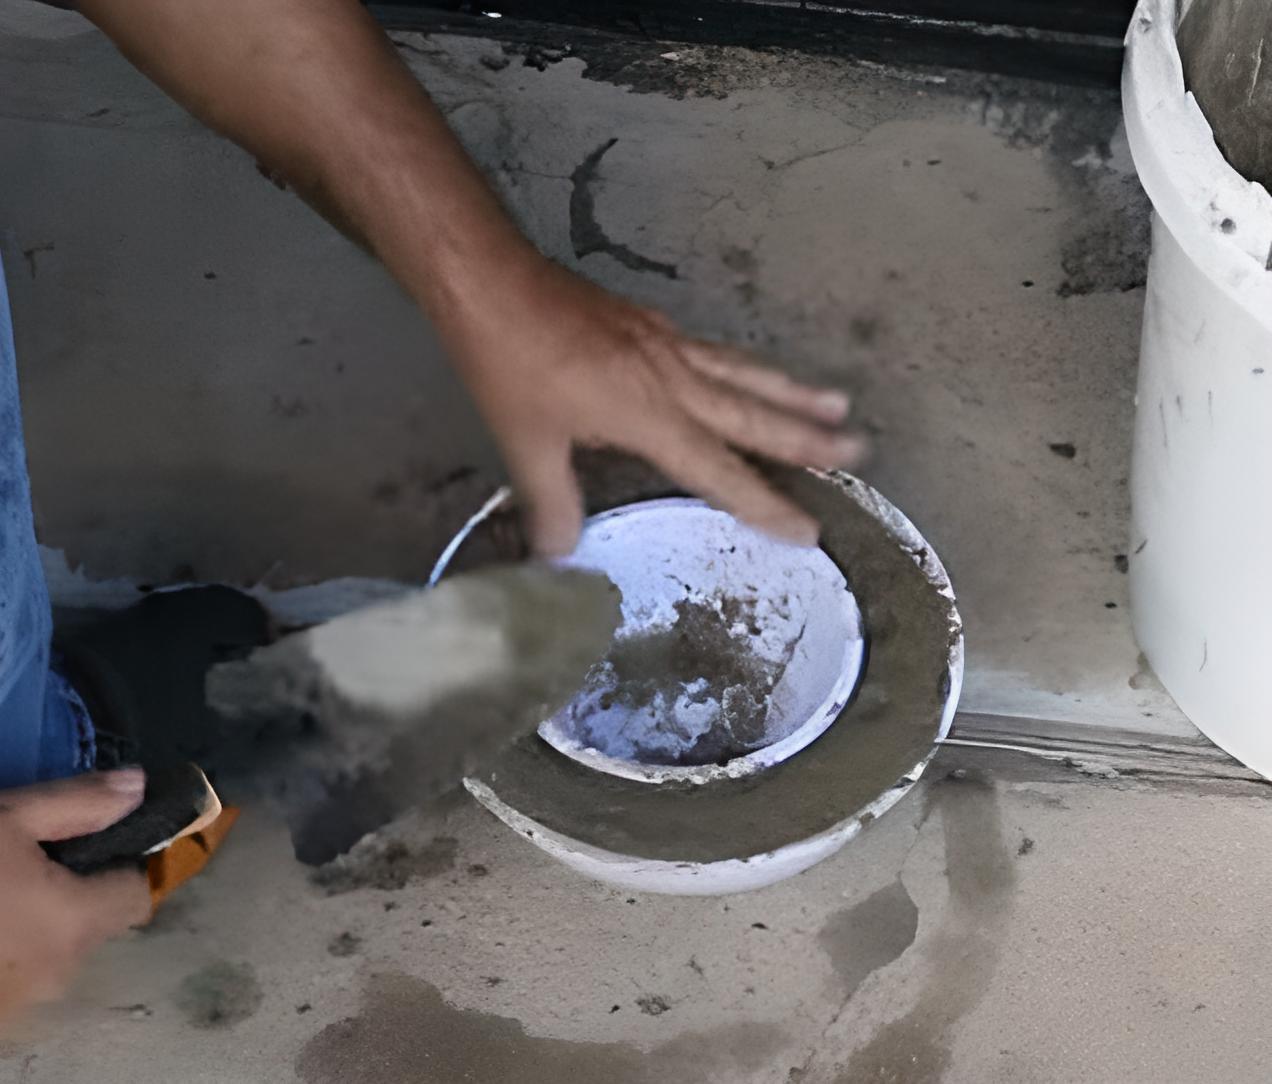
Demold the Mushroom Parts
Once the concrete mushroom has fully cured, carefully remove them from the moulds. Gently tap and wiggle them from the moulds if necessary to release any suction. Slowly invert the larger bowl to extract the concrete mushroom cap. If the cap doesn’t come out easily, you can use a soft mallet or apply gentle pressure to help release it.
Incorporating the LED Lights
To incorporate LED lights into your concrete mushroom cap, it’s essential to lay out and drill the holes in strategic positions. The number of holes will depend on the number of bulbs your LED lights possess. Here’s how:
Determine the LED Light Placement
Decide where you want the LED lights to be positioned on your mushroom cap. This can be based on your personal preference or a specific design idea you have in mind. Consider the desired pattern, spacing, and overall aesthetic appeal.
Mark the Hole Locations
Using a marker or pencil, mark the spots on the mushroom cap where you intend to drill the holes. Ensure that the markings are clear and visible, allowing for accurate drilling later on.
Take into account the size and arrangement of your LED lights when determining the hole positions.
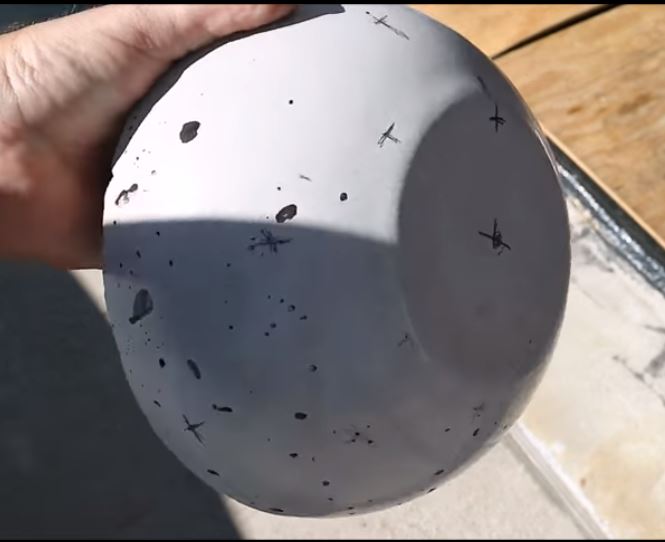
Begin Drilling
Position the drill at the first marked spot on the mushroom cap. Apply gentle pressure and start drilling using a slow and steady motion. Let the drill bit penetrate the concrete material gradually, allowing it to work effectively. Continue drilling until the desired depth is achieved, ensuring it is sufficient to accommodate the LED light bulbs.
Repeat the Process
Move on to the next marked spot and repeat the drilling process, following the same careful approach. Maintain consistency in the drilling depth across all the holes to ensure uniformity and a professional finish.
Clear away Debris
As you drill each hole, concrete dust and debris may accumulate. Use a brush or cloth to clean the holes and remove any loose particles. This will ensure that the LED lights fit securely and function optimally.
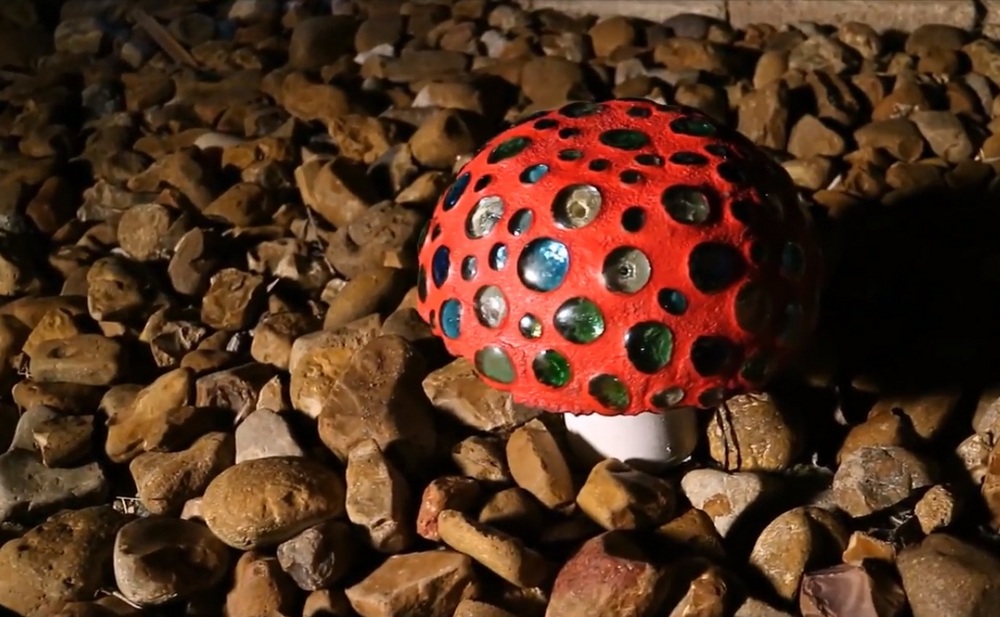
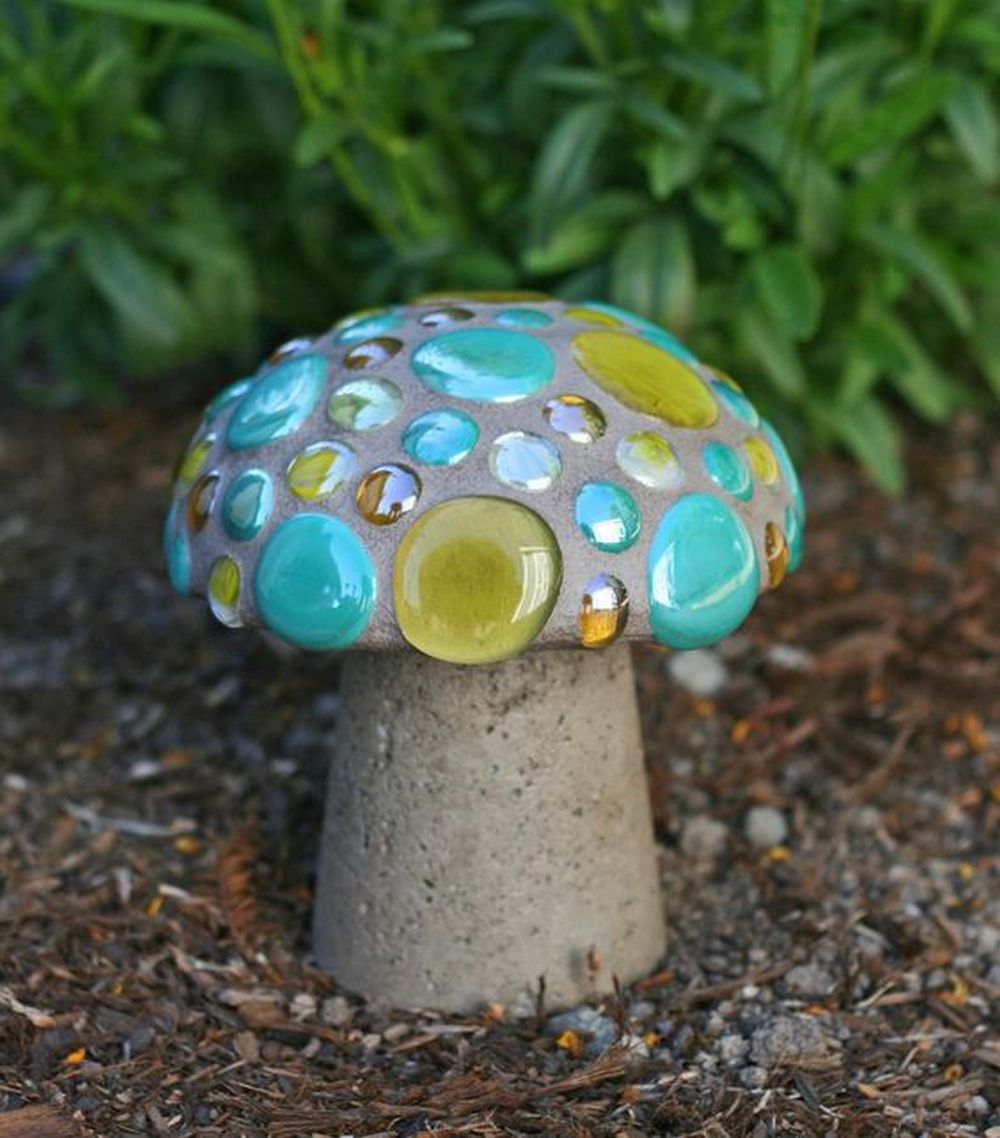
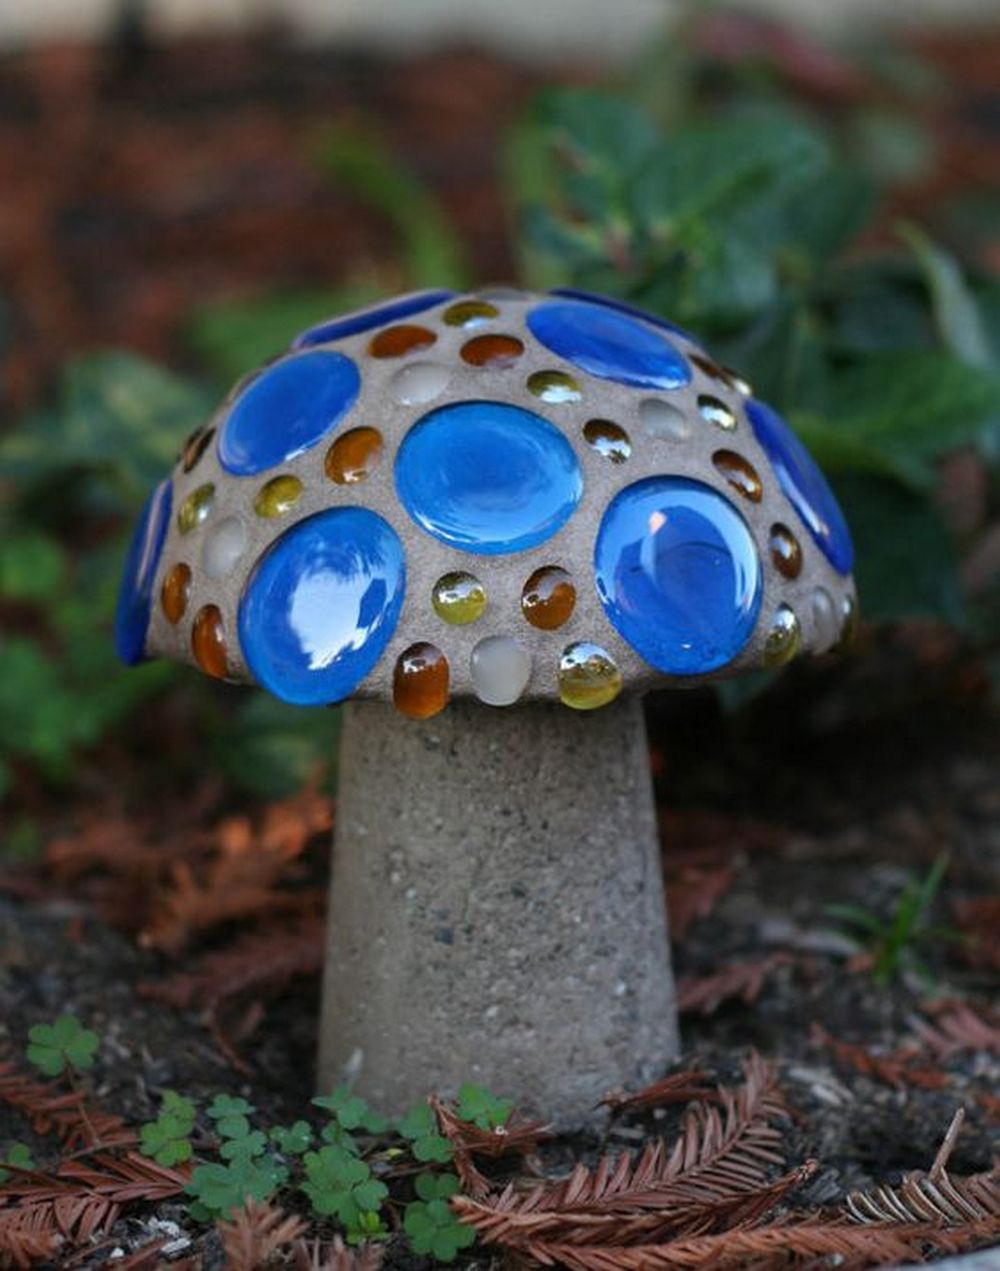
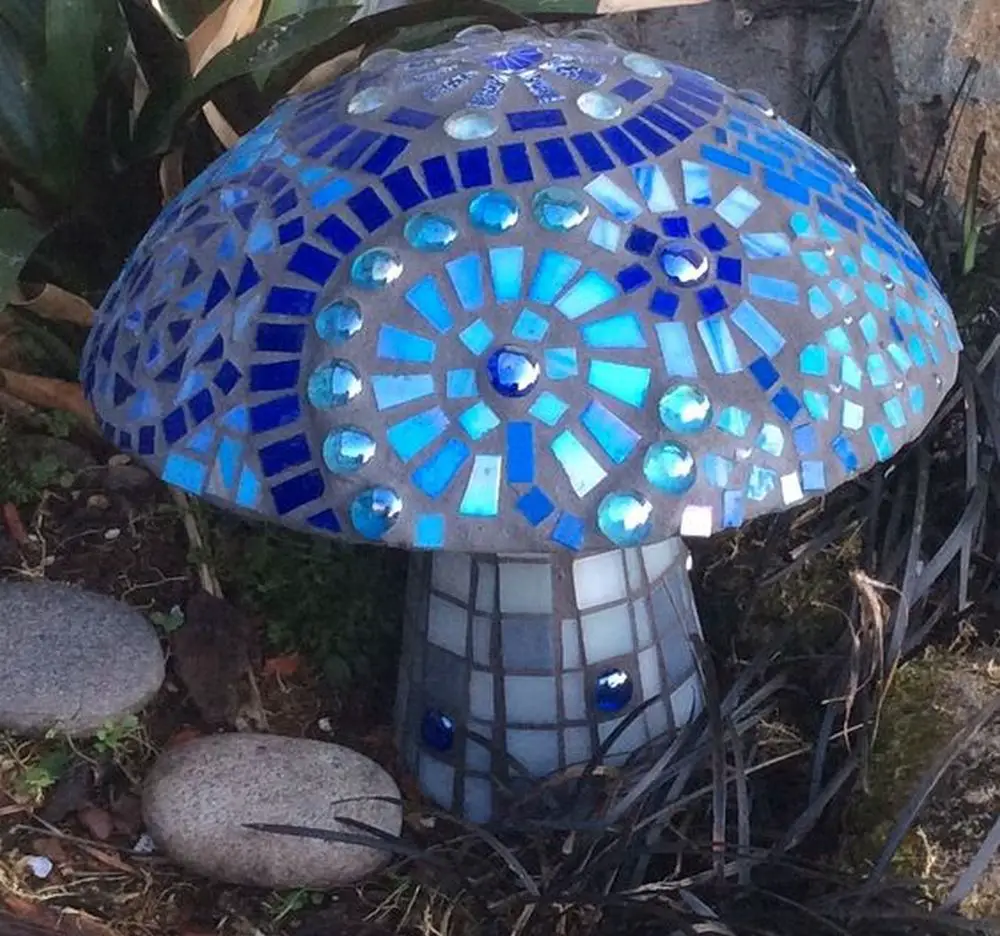
Attaching the Glass Beads
After drilling, affix the larger glass beads above the holes with hot glue. To enhance its appearance, adorn the surface of your mushroom cap with smaller glass beads. The glue serves as a temporary adhesive until the second layer of cement is applied.
Apply another layer of concrete to fill in any gaps and ensure proper bonding between the glass and concrete. Afterwards, use a sponge to wipe away any excess concrete.
Painting the Concrete Mushroom
Once the second layer of concrete has dried, proceed to paint both the mushroom cap and stipe. Allow the paint to dry before using a cloth and lacquer thinner to remove any excess paint from the glass beads. This will enhance the aesthetic appeal of the beads on the mushroom cap.
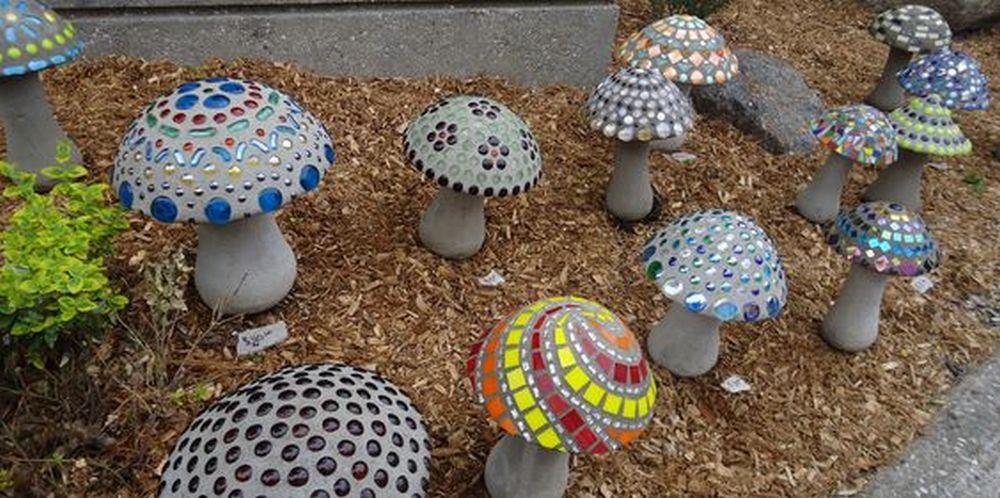
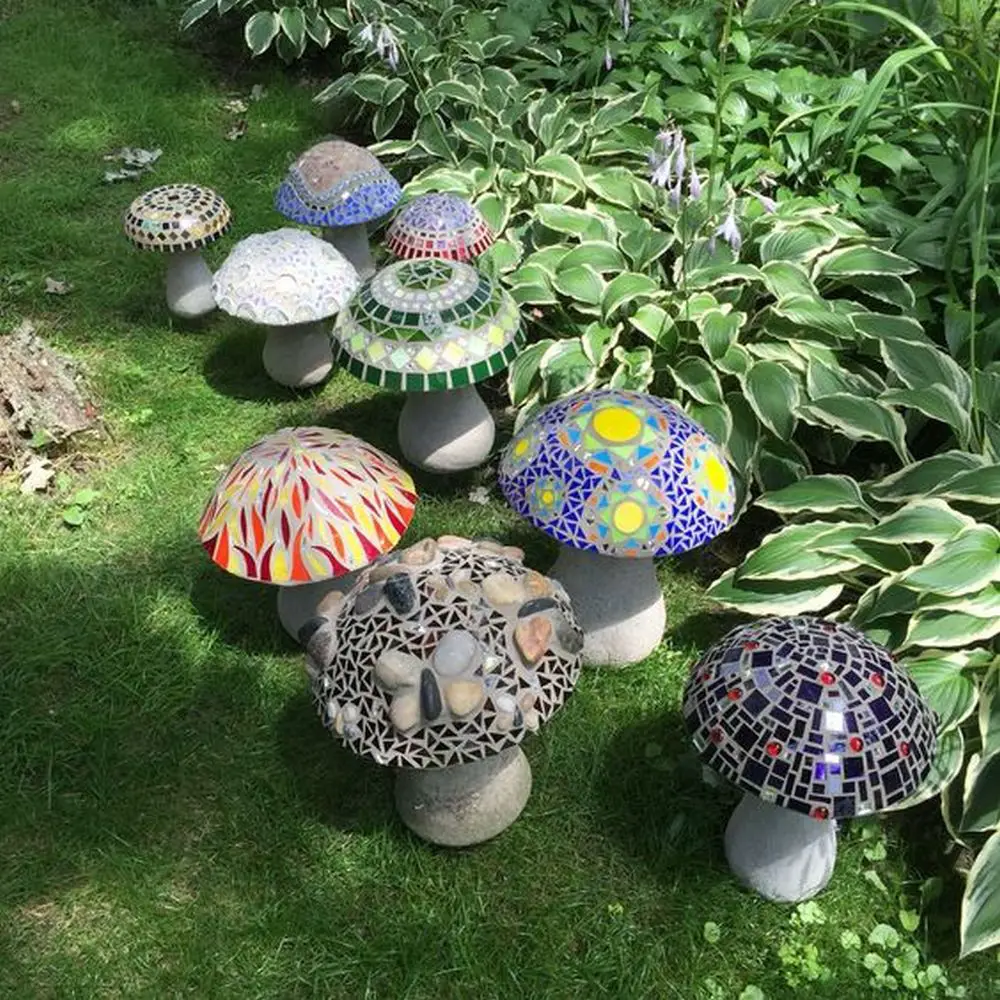
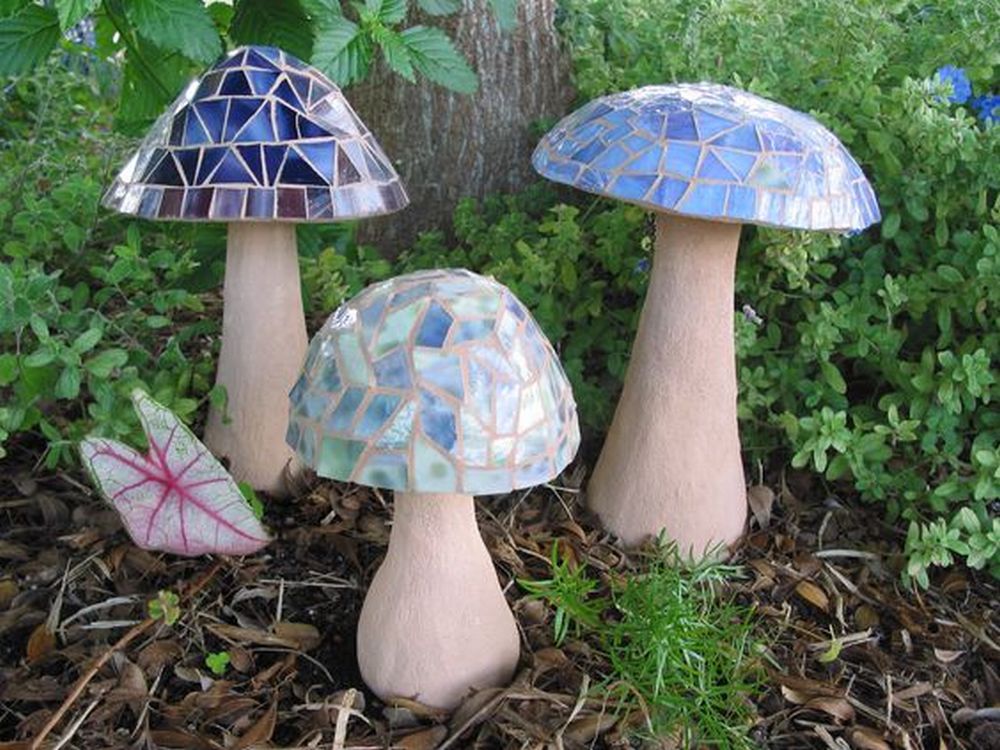
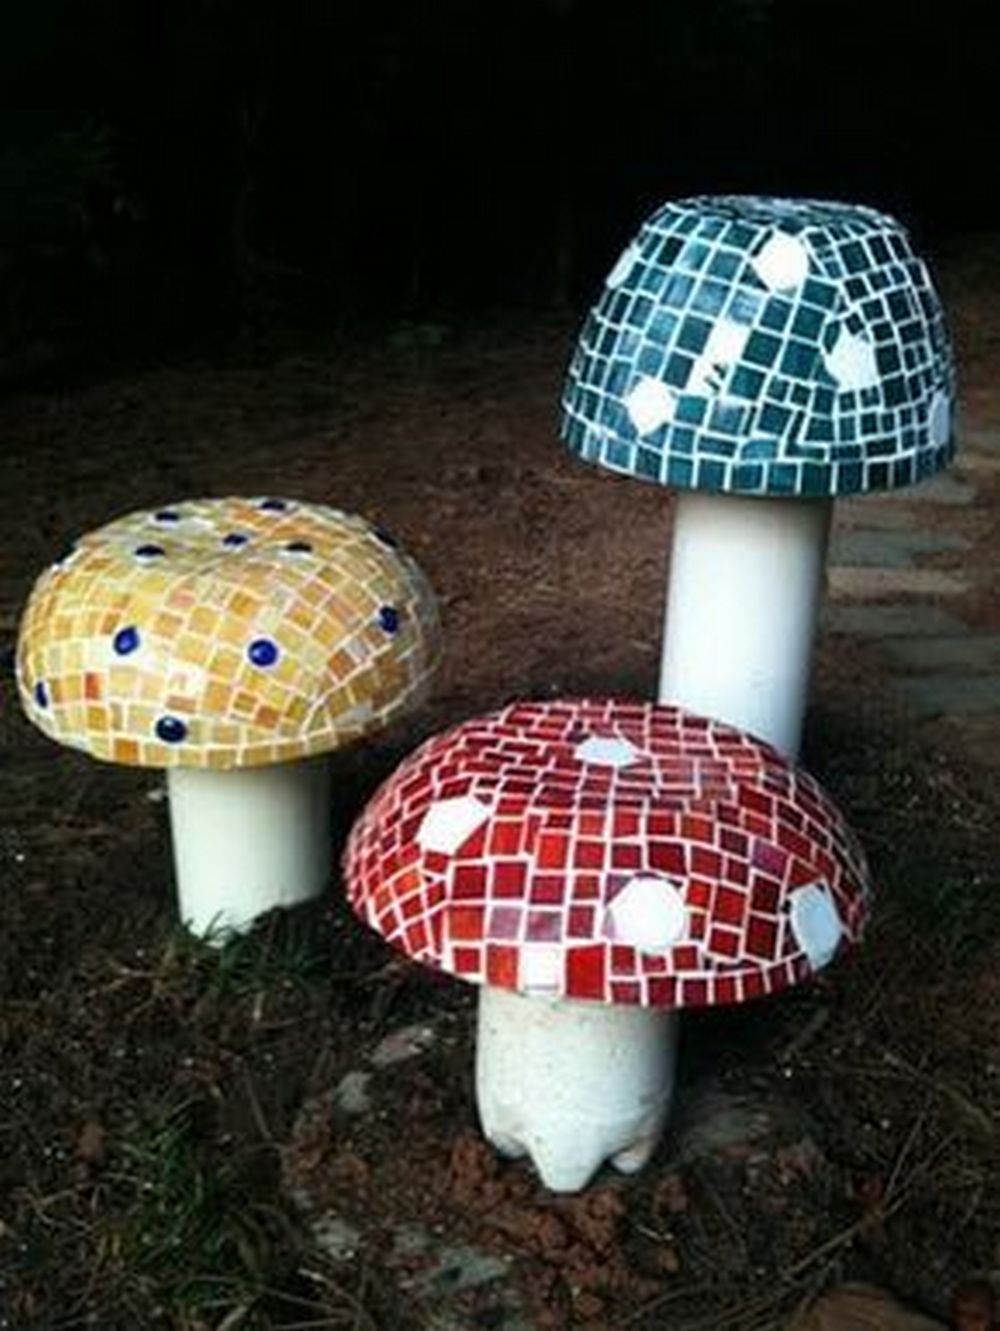
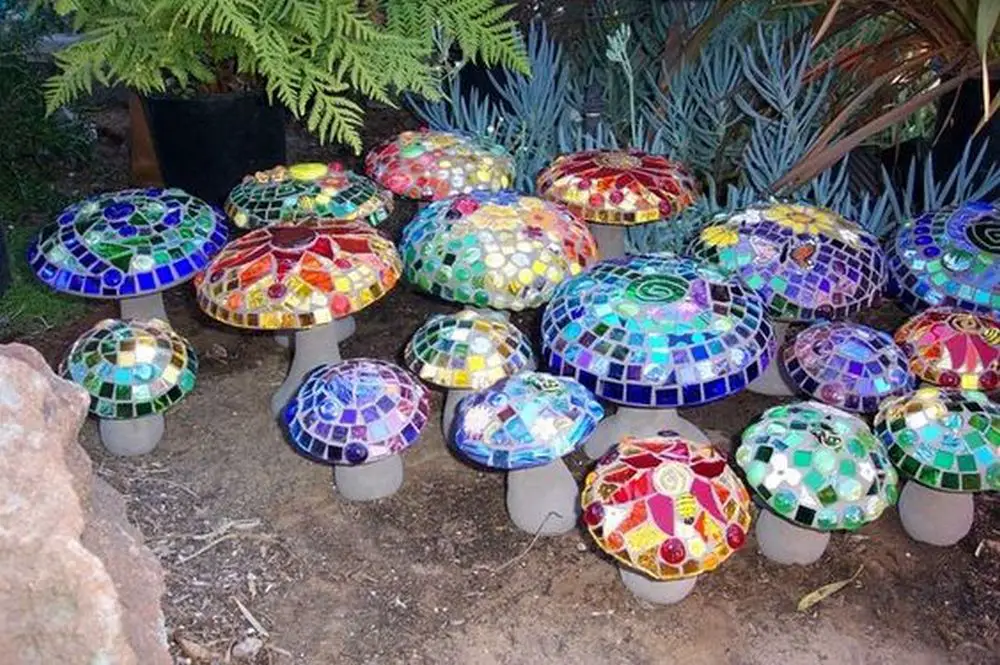
DIY Concrete Mushrooms Design Ideas
To inspire your creativity, here are a few design ideas for your concrete mushroom lights:
Earthy Elegance
Opt for natural tones, such as earthy browns and mossy greens, to create a rustic and harmonious atmosphere in your garden.
Vibrant Wonderland
Embrace bold and vivid colours to infuse your outdoor space with a sense of playfulness and whimsy.
Fairy Garden Delight
Incorporate delicate details, like intricate patterns or tiny flowers, to evoke the enchantment of a fairy garden.
FAQ on DIY Concrete Mushroom with Lights
What materials do I need to make a concrete mushroom with lights?
You need glass beads, sand/topping mix, a Styrofoam cup, bowls, spray paint, PVC pipe, solar LED lights, lacquer thinner, and essential tools like a hammer drill with a concrete bit, hot glue gun, and a wet sponge/cloth.
How do I prepare the workspace for making concrete mushrooms?
Choose a well-ventilated area, clear the space of clutter, lay down protective coverings, organize your materials and tools, and wear safety gear like goggles and gloves.
What’s the process for molding the mushroom cap?
Apply a release agent to your bowls, pour the concrete mixture into the larger bowl, insert the smaller bowl to create a hollow part, adjust positioning, and smooth the surface.
How long does it take for the concrete to cure?
The curing time varies based on the concrete mix used. Follow the manufacturer’s instructions, typically allowing at least 24-48 hours for curing.
How do I incorporate LED lights into my concrete mushroom?
Drill holes in the mushroom cap for the LED lights, determine the placement, mark the holes, begin drilling, repeat for all lights, and clear away debris.
Can I paint my concrete mushrooms?
Once the concrete is cured and you’ve attached the glass beads, you can paint the mushroom cap and stipe. Ensure the paint is dry before removing excess paint from the beads with lacquer thinner.
How do I attach the LED lights to the concrete mushroom?
Thread the LED light through the PVC pipe in the stipe, position the bulbs inside each drilled hole in the cap, and secure them.
What are some design ideas for concrete mushroom lights?
Consider earthy elegance with natural tones, vibrant wonderland with bold colors, or fairy garden delight with intricate patterns and tiny flowers.
How do I maintain my concrete mushroom lights?
Clean them regularly with a soft brush or cloth, repaint as needed, and replace LED lights if they burn out to ensure your mushrooms stay beautiful and functional.
Are concrete mushroom lights eco-friendly?
Using solar LED lights makes them an eco-friendly lighting option. Choosing sustainable materials and practices can enhance their environmental friendliness.
Conclusion
Concrete mushroom lights offer a captivating blend of artistic charm and functional lighting, making them a delightful addition to any garden. By embarking on a DIY journey, you not only unleash your creativity but also personalize your outdoor space with unique and enchanting decor.
With the step-by-step guide and design ideas provided in this article, you’re now equipped to craft your own stunning concrete mushroom lights and transform your garden into a whimsical paradise.
Click on any image to start the lightbox display. Use your Esc key to close the lightbox.
Watch the video below to learn how to make concrete mushrooms.
Are you still looking for more ways to boost the look of your garden? Check out our DIY on outdoor fountains next!


