Here’s a wonderful witch potion bottles project for every fan of all those novels and movies full of magic and witchcraft! These would make a wonderful gift or you could do it as a family project with the Harry Potter fans in your family!
Made from nothing more than an empty pill and vitamin containers (plus a lot of love and a little magic), these really are low cost yet look like they cost a small fortune.
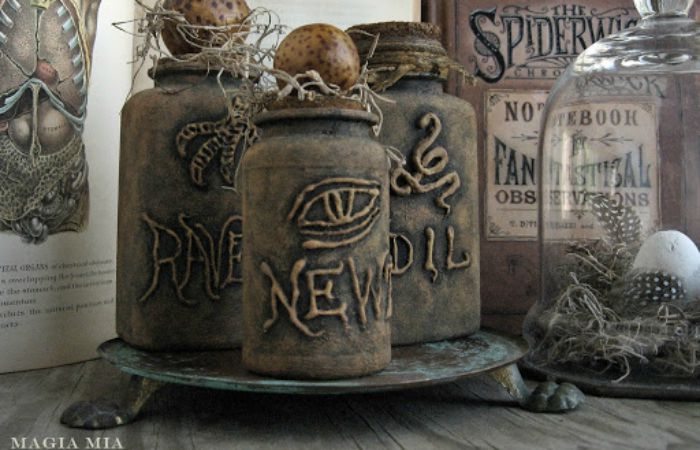
These potion bottles are a cute decor set to put in any part of your house for this Halloween. Or you can use them as awesome condiment containers when hosting a get-together this festive season!

Ready to get started?
Contents
Making Witch Potion Bottles
Materials
- Small Plastic Bottles (such as medicine and vitamin bottles)
- Tin Cans (such as seasoning containers)
- Chalk Paint Colours (black, dark brown, rust, orange-yellow)
- Sandpaper
- Tracing and Transfer Paper (optional)
- Matte Clear Coat (optional)
- Corks
- Tree Bark Chips
- Art Markers / Alcohol Ink
- Sand / Pebbles / Marbles (to give bottles some weight)
- Twine
Tools
- Hot Glue Gun
- Serrated Knife
- Sponge / Foam Paintbrush / Little Mop Brush
Instructions
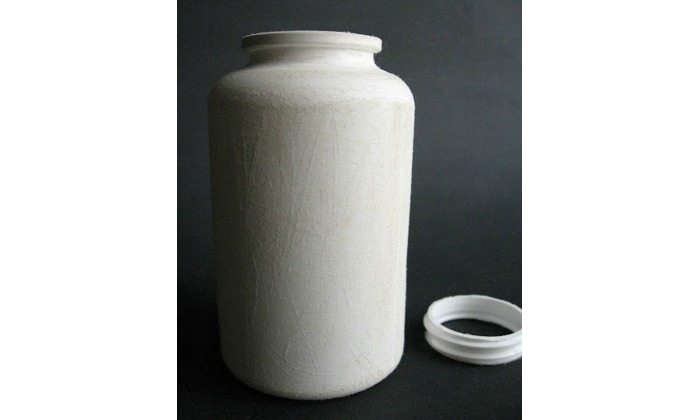
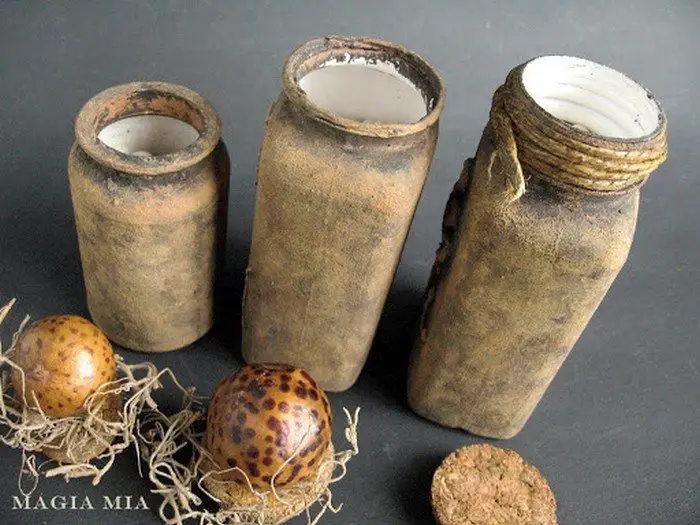
The first thing you need to do for plastic bottles is to cut off the threaded necks using a serrated knife. This will give your witch potion bottle a classic, apothecary look. Alternatively, you can cover the neck with twine, scrap fabric, or wax coating.
For tin cans, you will have to get rid of the lid. Some tin cans have plastic covers which are easier to remove.
Remove all sticker labels and sand the exterior surfaces of your containers, so that paint of your witch potion bottle will hold much better later. (If you plan to use these Halloween bottles to store spices and other food ingredients, make sure to clean them thoroughly at this point.)

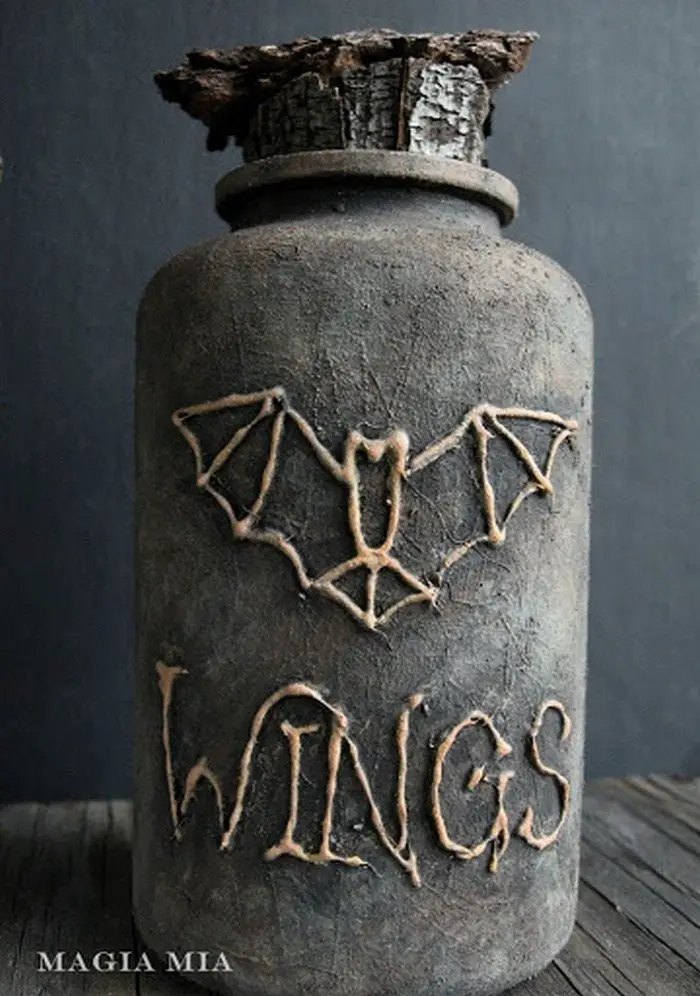
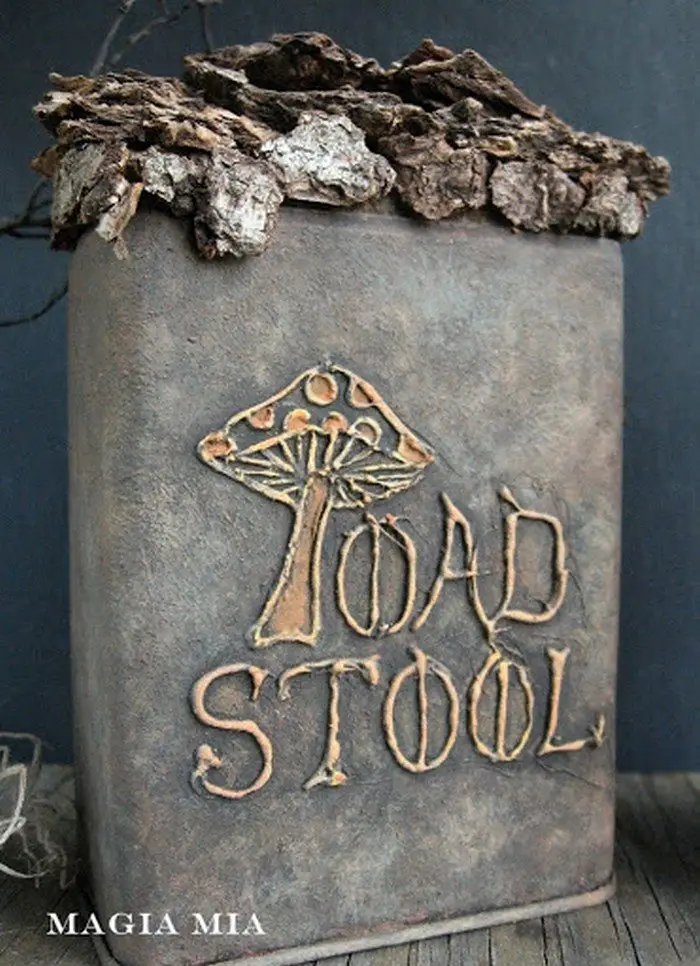
Now you can proceed to add your designs with a hot glue gun. You can do this directly to the bottles, but you can also use tracing and transfer paper if you wish to replicate your designs in the future.
When applying hot glue, let the little glue strings stay on the witch potion bottle. Don’t remove them as they add to the character of your potion bottles.

Once your designs have dried, you can then paint the witch potion bottle starting with black. (Remember that if you are going to use this to store food ingredients you should be careful not to get any paint inside.)
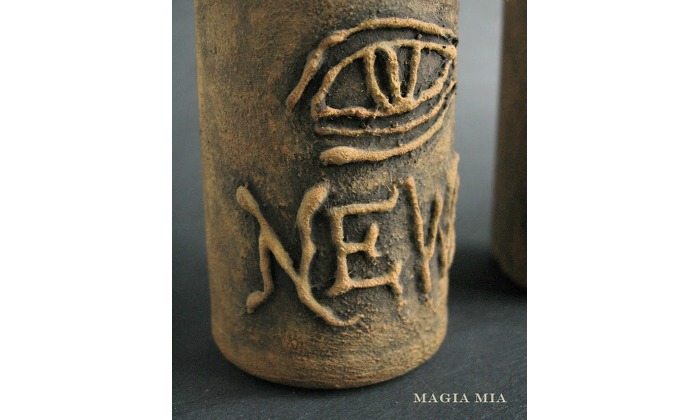
Let the paint dry. Then using a foam brush, dab on dark brown, then rust, and lastly a pale orange-yellow. Water down these paints so as not to leave any sponge or brush marks on your bottles.
Do NOT apply these lighter colors on the crevices and immediate surroundings of your witch potion bottle design. When done, you can let them dry a bit and then fine-tune the crevices with black paint if needed. The light colors on the hot glue and the dark crevices will emphasize your design.
Protect your bottles with a clear matte coat if you plan to use them for a long period, or again for next year’s Halloween.
The bottle stoppers:
Once you’re satisfied with how your witch potion bottle look, you can then play around with making the bottle stoppers. Use whatever available materials you have. What’s important is for them to look like they’re made out of things usually found in forests.
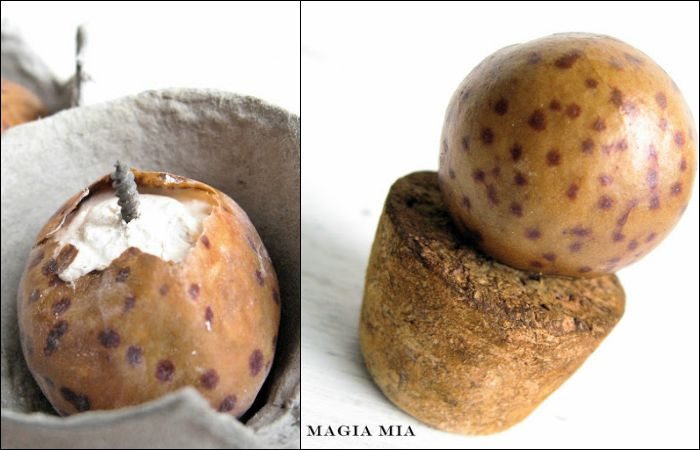
This one is made from speckled oak galls, simply filled with plaster to make it solid. An eye screw was inserted so it could be attached to a cork. To finish with a natural, rustic look a little bit of Spanish moss was added.
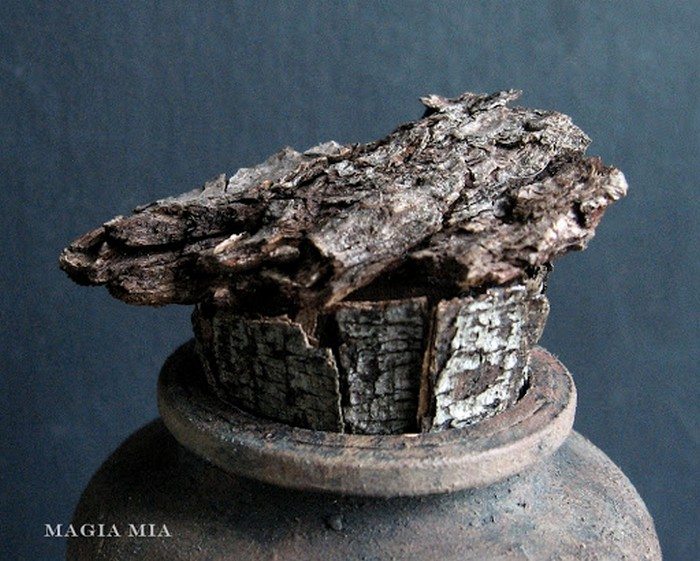
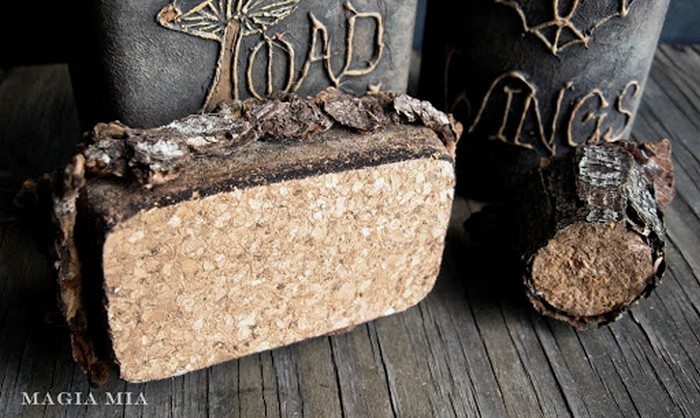
This one on the other hand consists of tree bark chips, which shouldn’t be difficult to find outdoors. :) You can simply cover a cork stopper with small bark pieces using hot glue and that’s it!
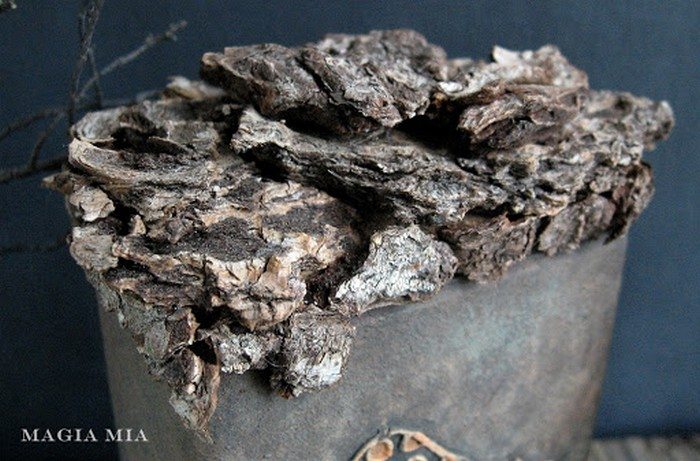
Almost the same goes for the spice tin can. If you have some cork sheets, cut them to shape and size a little larger than the tin can opening. Glue together three layers, and then sand the sides down so that the cork fits just right with the opening. Then again, cover it with bark chips.
To make your corks look old and weathered, darken them with art markers or alcohol ink.
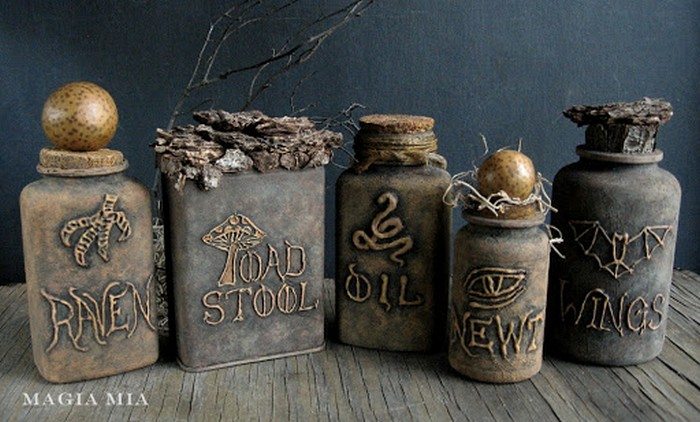
Fill each container with sand or put some small rocks to give them some weight. And you’re done!
Thanks to Maria (Magia Mia) for this wonderful project! Take a look at her amazing site. It’s full of inspiring ideas!
Click on any image to start the lightbox display. Use your Esc key to close the lightbox.![]()


Creating Potion Labels
Creating enchanting labels for witch potion bottles adds a layer of mystique and authenticity to each magical concoction. Whether you’re adorning bottles for a Halloween display, a themed event, or simply to add a touch of whimsy to your home decor, the right label can transform an ordinary container into a mysterious artifact. Here’s how you can craft your own bewitching potion labels.
Choose Your Theme
Start by deciding the theme of your witch potion bottles. Are they ancient elixirs, modern magical brews, or perhaps potions with a specific magical purpose? Your theme will guide the design, wording, and aging techniques you’ll use.
Designing Your Labels
For the design, you can either hand-draw your labels or use graphic design software for a more polished look. Incorporate elements that match the contents or supposed effects of the potion. For example, a love potion might feature heart motifs, while a sleeping draught could have crescent moons and stars.
Selecting Fonts
The font is crucial for setting the mood. Opt for fonts that evoke a sense of mystery and magic. Old-style fonts like Blackadder and Garamond give an ancient feel, perfect for witch’s potion bottles that appear as if they’ve been plucked from a medieval apothecary.
Aging Your Labels
To add authenticity, age your labels. If you’re printing them, soak the paper in tea or coffee to give it an aged look. Once dry, singe the edges carefully with a lighter for a worn effect. This technique makes your witch’s potion bottles appear as if they’ve been tucked away in a witch’s lair for centuries.
Attaching Labels to Bottles
After aging your labels to look like it came from the 1500s, you can glue them onto your witch potion bottle. Use glue for a permanent fixture, or if you prefer to change labels in the future, double-sided tape works well. For an extra touch of the old world, tie the labels to the bottles using twine or red yarn.
Protective Coating
To ensure your labels last on your witch potion bottles, especially if they will be handled frequently or used in areas prone to moisture, apply a clear sealant. This step is optional but recommended to preserve your hard work.
By following these steps, you can create captivating labels that enhance the allure of your witch potion bottles. These bottles can then serve as unique decorations, thoughtful gifts, or even as intriguing containers for your culinary concoctions. Let your creativity flow and bring the magic of witch’s potion bottles into your world.

Potion Bottle Uses and Display Ideas
Witch potion bottles aren’t just for Halloween; they offer a myriad of uses and display possibilities all year round. With a little creativity, these enchanting vessels can serve as intriguing decor, unique gifts, or even functional items in your home. Here are some magical ways to utilize and showcase your witch’s potion bottles.
Themed Decorations
Transform your living space with witch potion bottles as themed decorations. Arrange them on bookshelves among your favorite fantasy novels to create a mystical library vibe. Or, display them in the kitchen to add a whimsical touch to your cooking space. They can also serve as centerpiece arrangements for themed parties or as accents in a magical nursery.
Seasonal Displays
Witch potion bottles are perfect for seasonal displays. During autumn, pair them with pumpkins, dried leaves, and candles for a cozy, magical setup. In winter, incorporate them into your holiday decor with twinkling lights and evergreens. For spring and summer, combine them with fresh flowers or fairy lights to bring a touch of magic to your seasonal decorations.
Functional Uses
Beyond decoration, witch potion bottles can serve functional purposes. Use them as unique condiment containers during dinner parties or gatherings. Fill them with homemade bath salts or oils for a magical spa experience. They can also hold your crafting supplies, like buttons, beads, or sequins, keeping your creative space organized and enchanting.
Gifts and Favors
Filled with homemade treats, crafts, or personalized messages, witch’s potion bottles make for captivating gifts and party favors whether it’s for a birthday, wedding, or just because, a potion bottle can carry your well-wishes and spells for happiness, love, or prosperity to your loved ones.
Educational Tools
For those with young witches and wizards at home, use these potion bottles as educational tools. Fill them with different colored liquids to teach about colors, use them in simple science experiments to spark curiosity, or create a scavenger hunt that leads young minds to discover each bottle’s “magical” ingredients and their real-world properties.
Garden Magic
Bring a touch of whimsy to your garden with witch potion bottles. Use them as planters for small herbs or flowers, or hang them from trees filled with fairy lights to create an enchanting evening ambiance. They can also serve as markers for your herb garden, with labels indicating what’s planted where.
Integrating witch potion bottles into your daily life and decor, you can enjoy a splash of magic and mystery every day. Let these ideas inspire you to find new and imaginative uses for your enchanting creations.
Conclusion
Witch potion bottles offer a unique blend of creativity, functionality, and whimsy, transforming ordinary spaces into realms of enchantment. Tackling these magical vial projects, you can add a touch of the mystical to your daily life, celebrations, and decor. Let these bottles inspire your imagination and infuse your world with a bit of witchcraft and wonder.
We have more amazing Halloween decoration projects. Check out our decor ideas post.


