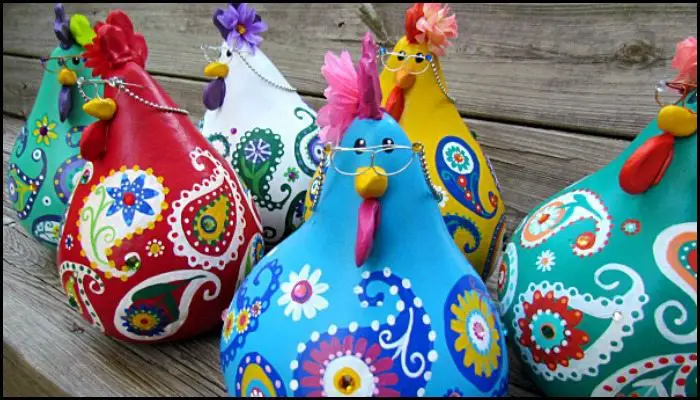
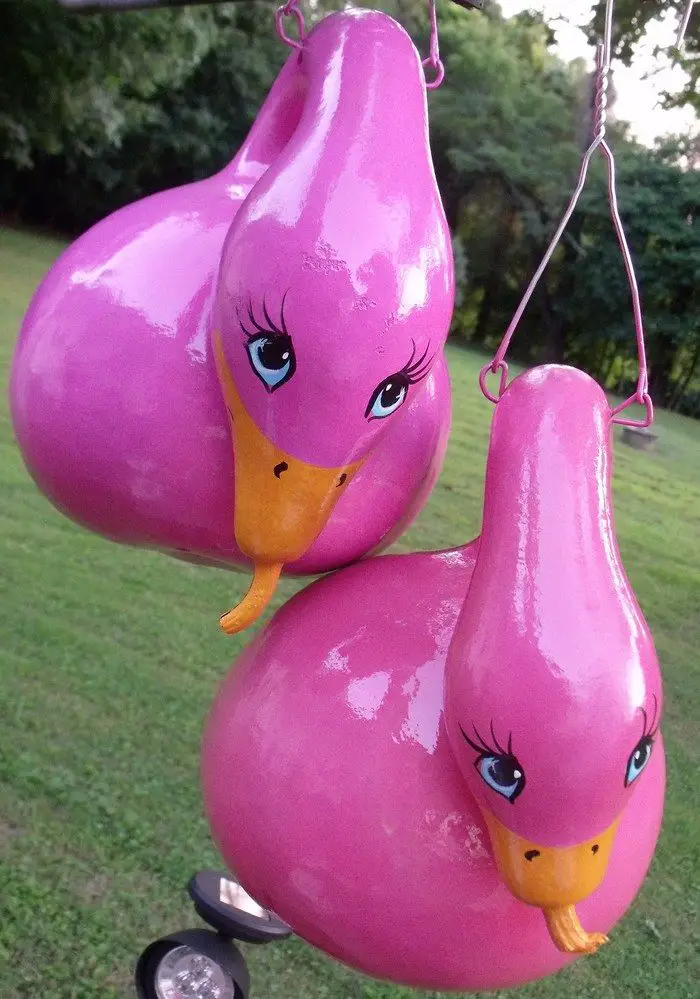
If you like having fun decorations in your garden or in your home, then this DIY paisley chicken decor just might be what you’re looking for!
These paisley chicken decor pieces are made from dried gourds. They are very easy to make that even kids can make them themselves!

Each chicken decor piece can be as unique and as cute as you want them to be. You can use recyclable materials that are available to you when making them. The only limit is your imagination. ;)

It’s a perfect gourd decor idea for the garden, backyard or kitchen. And the more chickens, the more colorful and cheerful your home looks! You can paint them according to the season or occasion and for sure they’ll make great conversation pieces.
Is this going to be your next arts and crafts project?
To make adorable decor from gourds, you’ll need some gourds, paint, and other craft supplies. Here’s the list for you:
- 3 Dried Gourds
- Acrylic Paint
- Polymer Clay
- Krylon Clear Matte Varnish Spray
- Hot Glue Gun
- Pencil
- Paintbrushes
Contents
- 1 How to make adorable gourd decor
- 2 Top 6 adorable decor ideas from gourds.
- 3 DIY Gourd Lighting Solutions
- 4 FAQ on Making Gourd Decors
- 4.1 What kind of gourds are best for making gourd decor?
- 4.2 Do I need any special tools to make gourd decor?
- 4.3 How do I prepare a gourd for painting or carving?
- 4.4 Can kids participate in making gourd decor?
- 4.5 How can I make my gourd decor durable for outdoor use?
- 4.6 Are there any eco-friendly options for gourd decor?
- 4.7 Where can I find inspiration for my gourd decor projects?
- 5 Conclusion
How to make adorable gourd decor
With just a little bit of imagination, you can turn these humble fruits into all sorts of decorations.
1. Paint the gourd
To prep your gourds for painting, give them a light sanding with fine-grit sandpaper. This will help the paint adhere better. Once they’re sanded, wipe them down with a damp cloth to remove any dust. Now you’re ready to paint! Begin by painting a base coat on each gourd. For the first gourd, use light blue paint. For the second, use white. For the third, mix some white paint with gold to create a light gold colour. It took me about three coats to get good coverage. Let the paint dry completely before moving on to the next step.
2. Add a design
Drawing paisleys is a relatively simple process. They are essentially teardrop shapes with a swirl at the top. You can sketch various-sized paisleys all over the base of the gourd, shifting some upside down and some sideways for variety. Since paisley chickens do not have paisley on their necks, I might not add them to the gourd neck. Nevertheless, feel free to get creative with your paisley placement!
When you’re ready to start filling in the paisleys, dark blue and brick red are great colors to use for the outlines. Then you can start filling them in however you like – each paisley is unique, so there’s no need to follow any specific pattern or design. Just let your creativity flow and fill them in however you like!
Some paisleys had flowers painted on them; some just had circular designs. I added dots of color to some for a bit of variety. Working with the same color scheme on all three gourds helps to make them match each other even though no two paisleys are alike.
We all love painting paisleys on gourds! We love the way they look, and the challenge of making each one unique. Some paisleys have flower designs on them, while some just have circular patterns. You can add dots of color to some for a bit of mixture. Working with the precise colour pattern on all gourds will help to make them match each other. The matching will help make them look like they belong together, despite the fact that each paisley differs from the other.
3. Draw the head
For their heads, we can use polymer clay to form the beak, comb and wattle. In this process, you shape the clay, and then bake it for about an hour at 200 degrees.
4. Attach the head to the gourd
Once the pieces have cooled and hardened, they can now be hot glued onto the gourds. Then paint the comb and wattle the brick red, and the beaks with gold. (It may take several coats of paint). You could shorten this process by using the proper color clay.
Now that the pieces have cooled and hardened, you can hot glue them onto the gourds. Next, paint the comb and wattle brick red, and the beaks with gold. It may take several coats of paint, but using the proper clay will make it more efficient.
5. The finishing step
To make a simple black dot for an eye, start by painting a small circle. Add a smaller white dot inside the circle for a highlight. Allow the paint to dry, then add two coats of Krylon clear matte acrylic spray all over to protect the paint. That’s it! Your adorable chicken decor is now complete! 😊
Thanks to Susan Myers for this great project. You can get step-by-step instructions here…
Want to see the many ways you can dress your chicken decors? Check our album below for ideas and inspiration!
Top 6 adorable decor ideas from gourds.
Gourds come in all sorts of shapes and sizes, so you can really let your creativity run wild. Paint them any colour you like, or even try out some fun patterned designs. You can use them as vases, and plant holders, or even make them into lanterns.
If you’re feeling really ambitious, you can even carve out some designs into your gourds. This can take a bit more time and effort, but the results can be truly stunning!
Have a look at more gourd art ideas we have for you below!
Click on any image to start the lightbox display. Use your Esc key to close the lightbox.
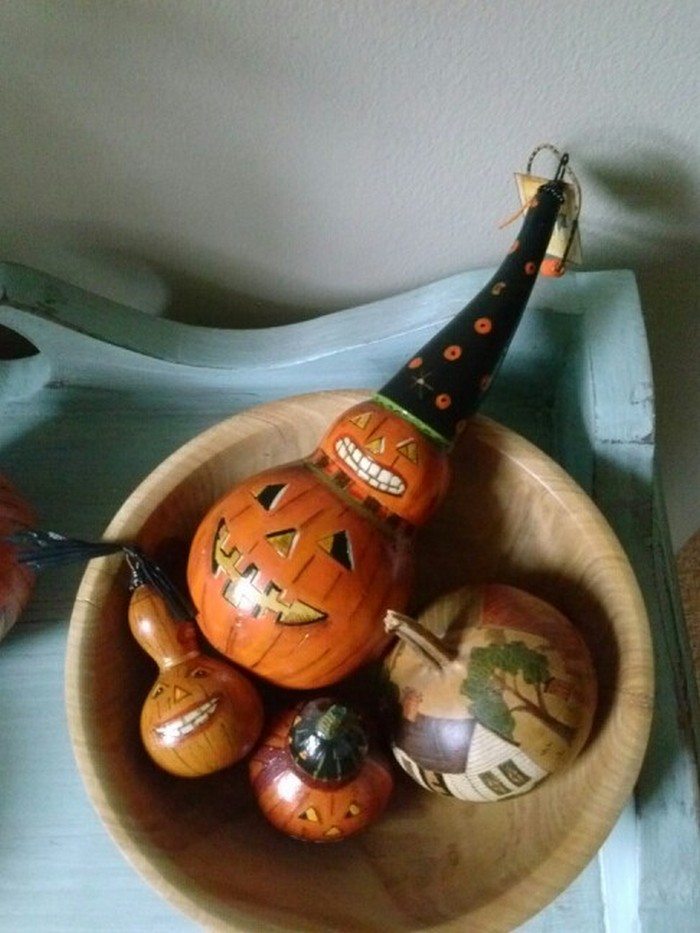
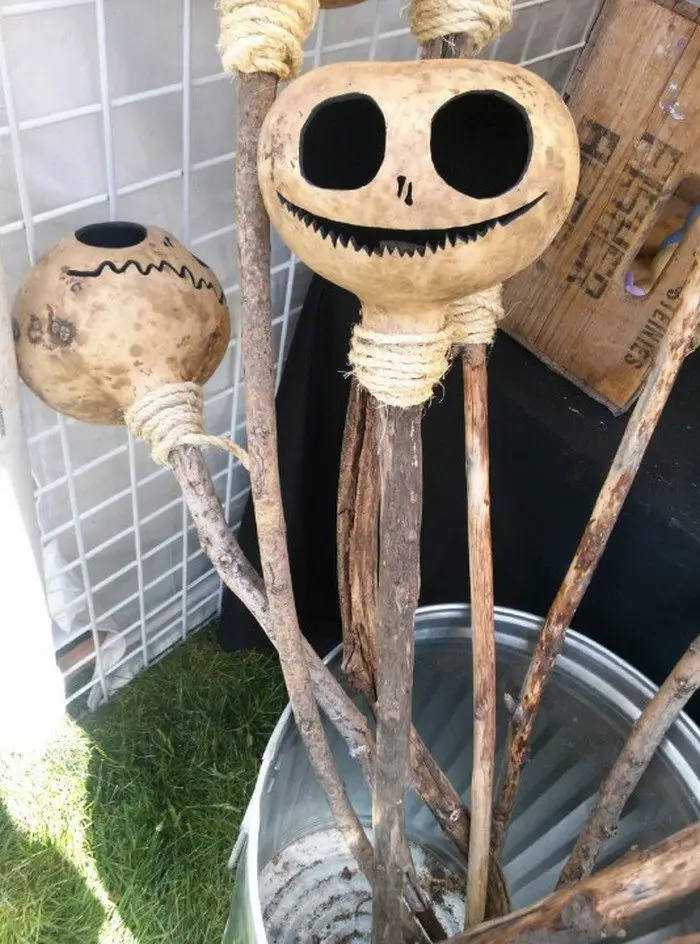
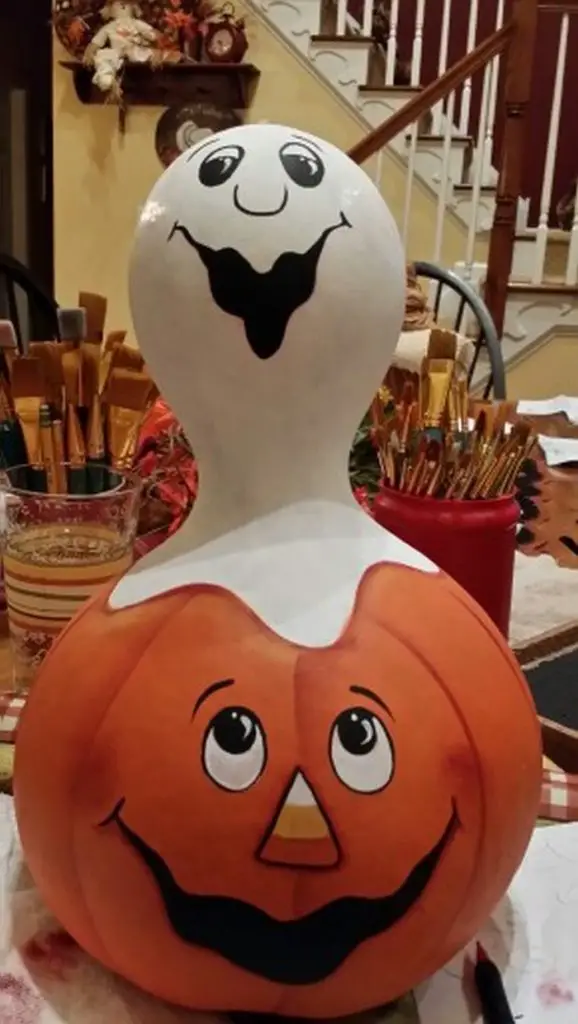
1. Halloween Gourds
Halloween gourds are a festive and creative way to celebrate the spooky season. These gourd decor pieces can be painted with eerie faces, resembling pumpkins, ghosts, or any Halloween-themed character. By carving or painting, you can transform a simple gourd into a haunting masterpiece.
These Halloween gourds make perfect decorations for both indoor and outdoor settings, adding a touch of whimsy and horror to your Halloween festivities. Whether placed on your porch to welcome trick-or-treaters or used as a centerpiece for a Halloween party, these gourd decor ideas are sure to captivate and scare in equal measure.
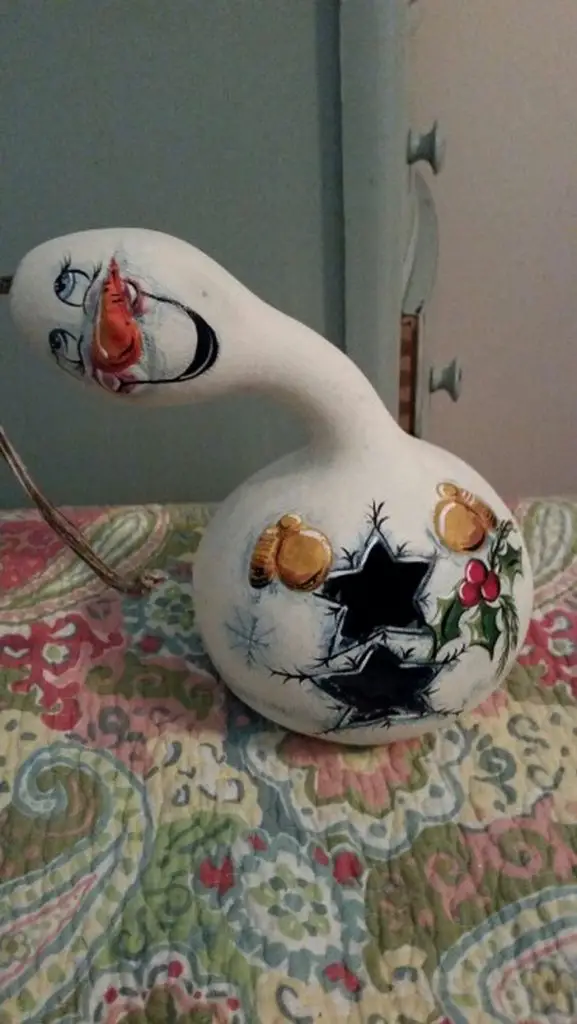
2. Snowman Gourds
Snowman gourds bring the joy of winter into your home with their charming and cheerful presence. These gourd decor creations are painted white and decorated to look like snowmen, complete with hats, scarves, and adorable faces.
You can stack smaller gourds on top of larger ones to mimic the traditional snowman shape, securing them together to create a festive winter friend. Snowman gourds are perfect for holiday displays, adding a cozy and playful touch to your winter decor. They can stand alone as a cute decoration or be grouped with other winter-themed gourd decor for a magical, snowy scene.

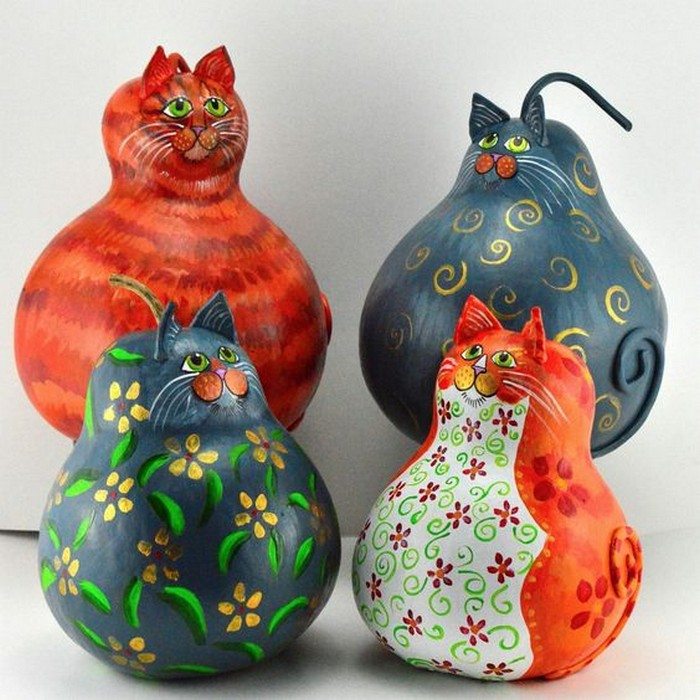
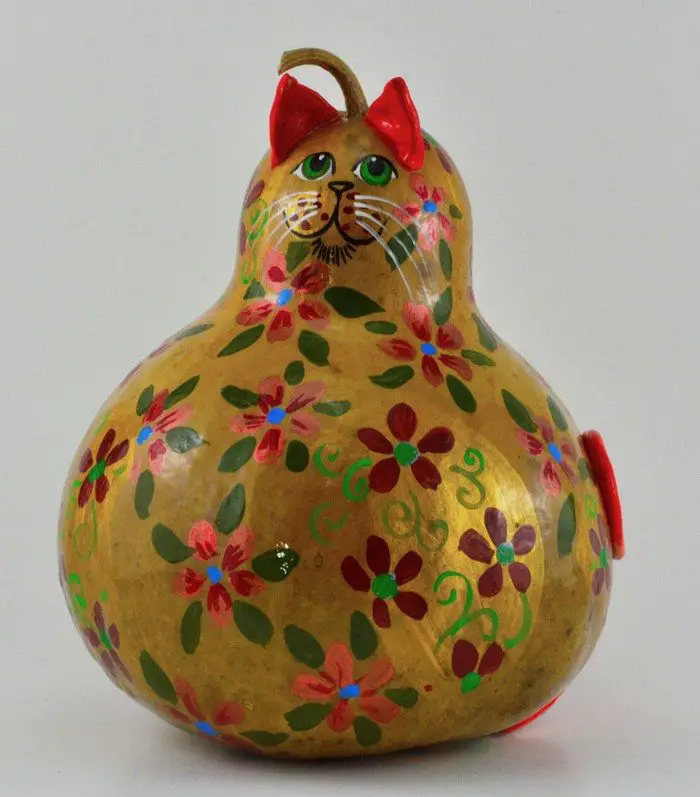
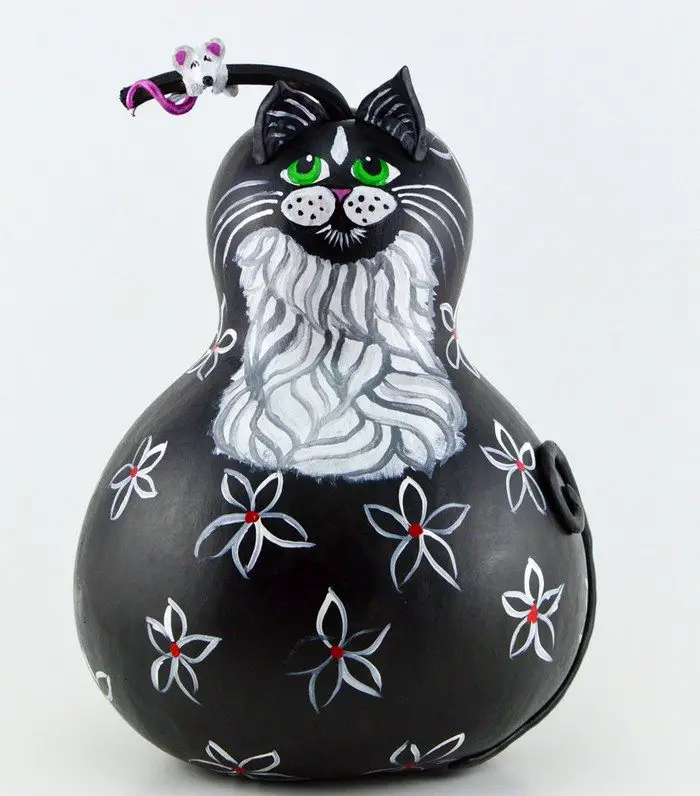
3. Cat Gourds
Cat gourds are a delightful addition for cat lovers and craft enthusiasts alike. These gourd decor pieces are painted and shaped to resemble cats, featuring whiskers, tails, and cute feline expressions.
With a variety of cat breeds and poses to choose from, you can create a whole family of cat gourds, each with its unique personality. Cat gourds can serve as adorable accents in a pet-themed room, on shelves, or as part of a larger animal-themed gourd decor collection. They’re a fun way to celebrate your love for cats and add a quirky, artistic touch to your home decor.
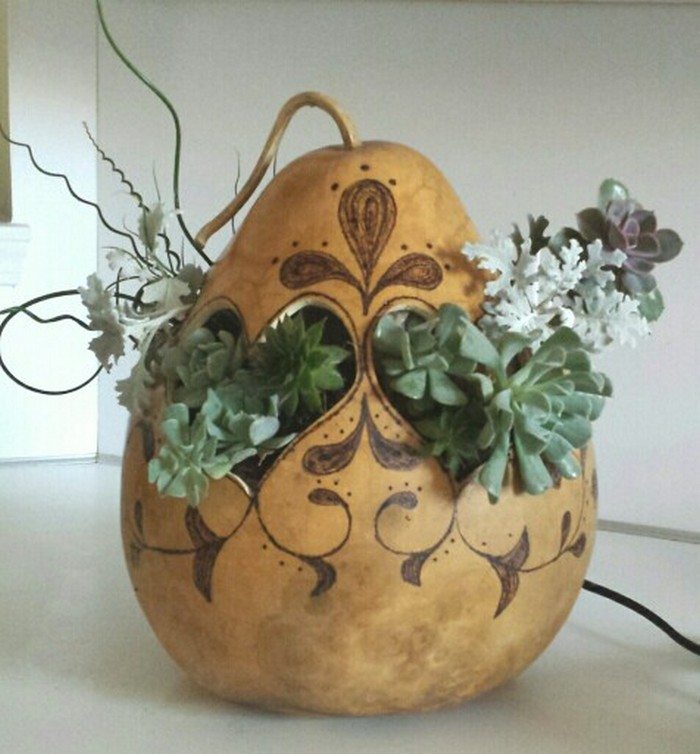
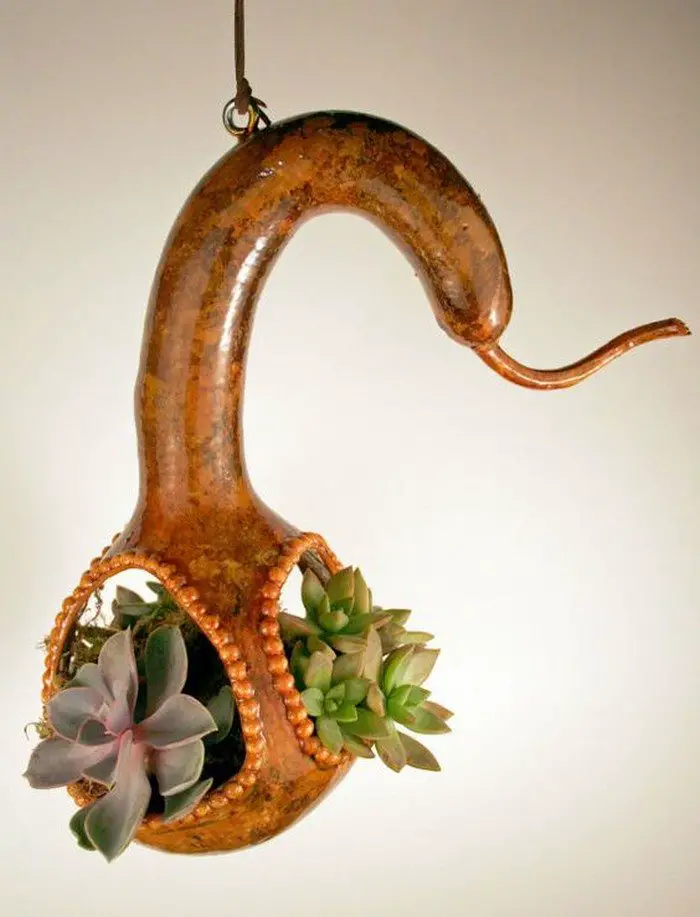
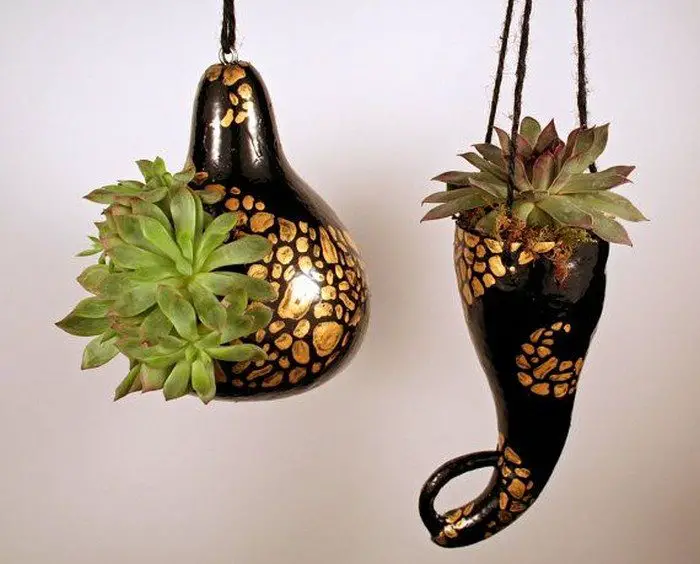
4. Gourd Planter
Gourd planters transform ordinary gourds into natural, biodegradable homes for plants. By hollowing out a gourd and filling it with soil, you can create an eco-friendly planter perfect for succulents, herbs, or small flowers. These gourd decor planters offer a rustic and organic aesthetic that complements any garden or indoor space.
They are ideal for adding a touch of nature to your home while promoting sustainable gardening practices. Gourd planters can be placed on windowsills, porches, or hung in groups for a visually striking display of greenery.
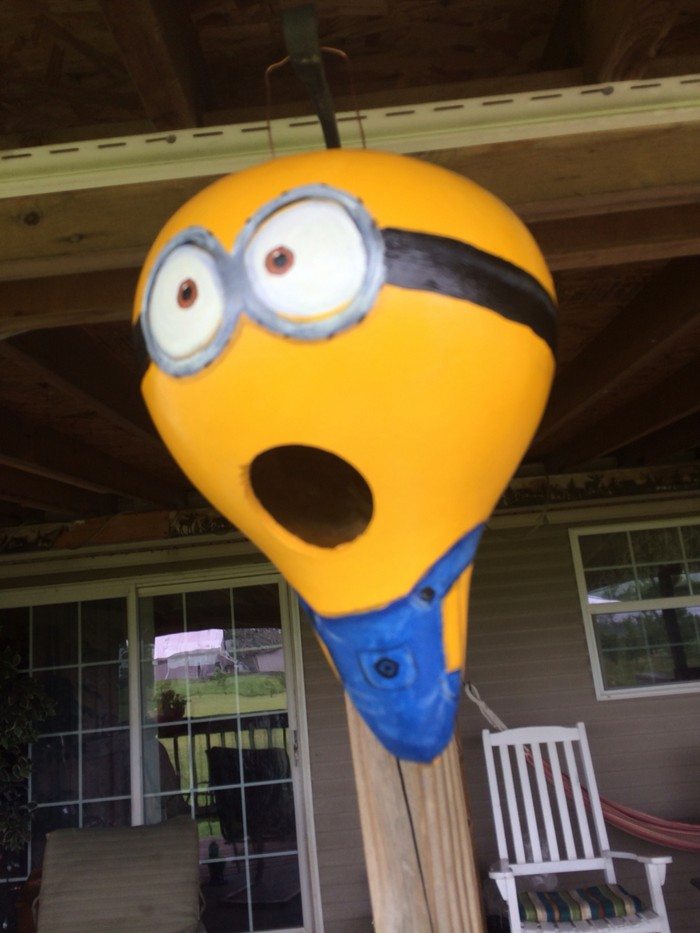
5. Gourd Birdhouse
Gourd birdhouses provide a functional and decorative habitat for feathered friends. By carving an entrance hole and emptying the interior, a gourd is transformed into a cozy shelter for birds. These gourd decor birdhouses can be painted and designed with various patterns to add a colorful and artistic touch to your garden.
Hanging them from trees or placing them on elevated surfaces attracts birds, offering them a safe place to nest while adding charm to your outdoor space. Gourd birdhouses blend the beauty of nature with the creativity of craft, making them a delightful addition to any garden.

6. Gourd Lamps
Gourd lamps illuminate spaces with their unique and warm glow. By carving intricate designs into the gourd and placing a light source inside, these gourd decor lamps cast beautiful shadows and patterns on the walls, creating a cozy and inviting atmosphere. The natural shapes of the gourds make each lamp one-of-a-kind, offering a personalized touch to your home decor.
Gourd lamps can be styled to fit any room’s theme, from modern to rustic, and are perfect for setting a relaxed and ambient mood. They are a testament to the versatility of gourds, showcasing how they can be transformed into functional art pieces.
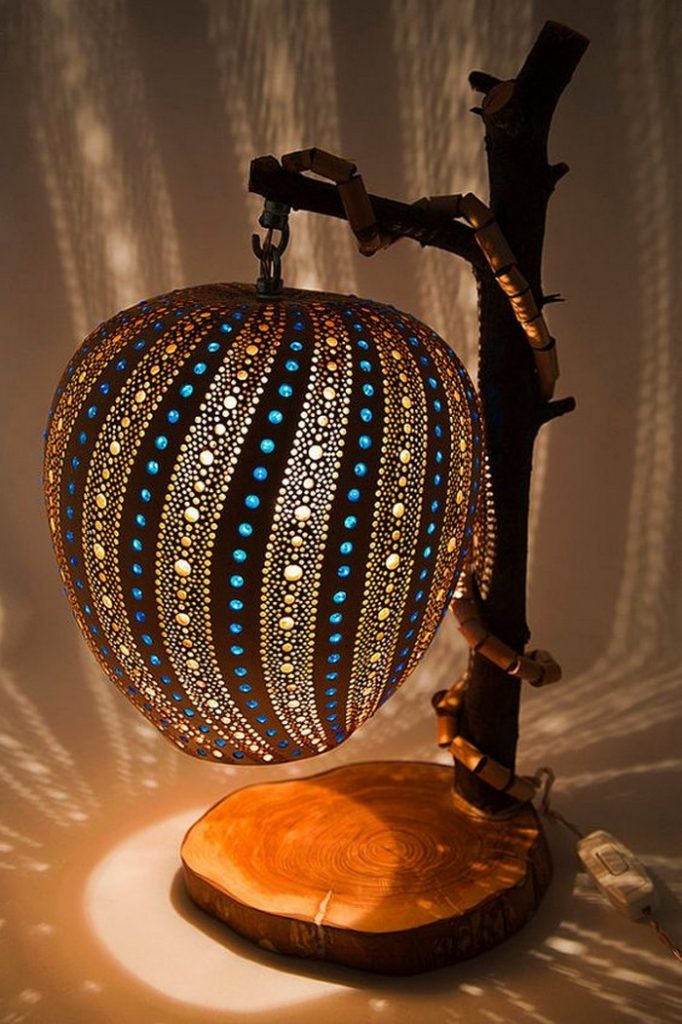
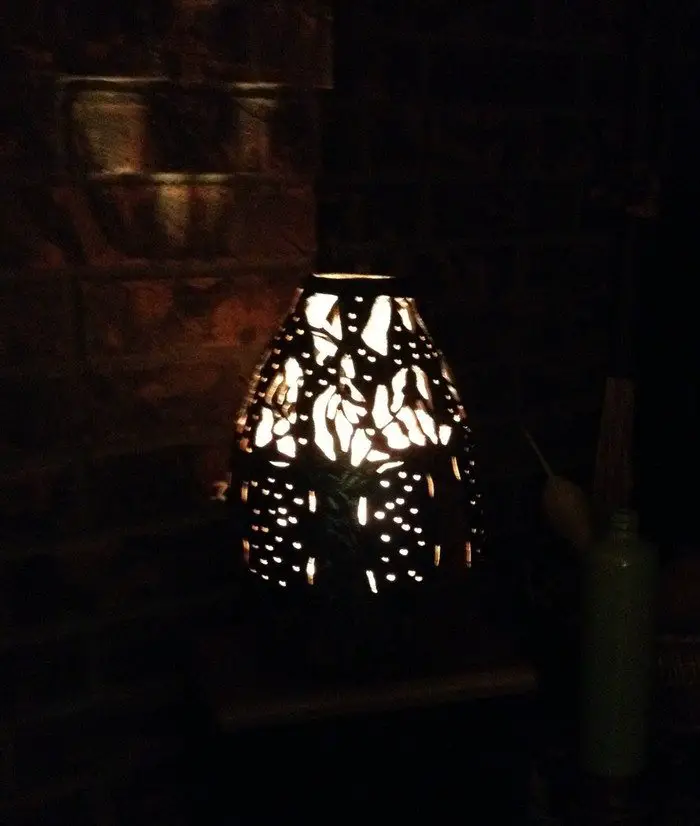
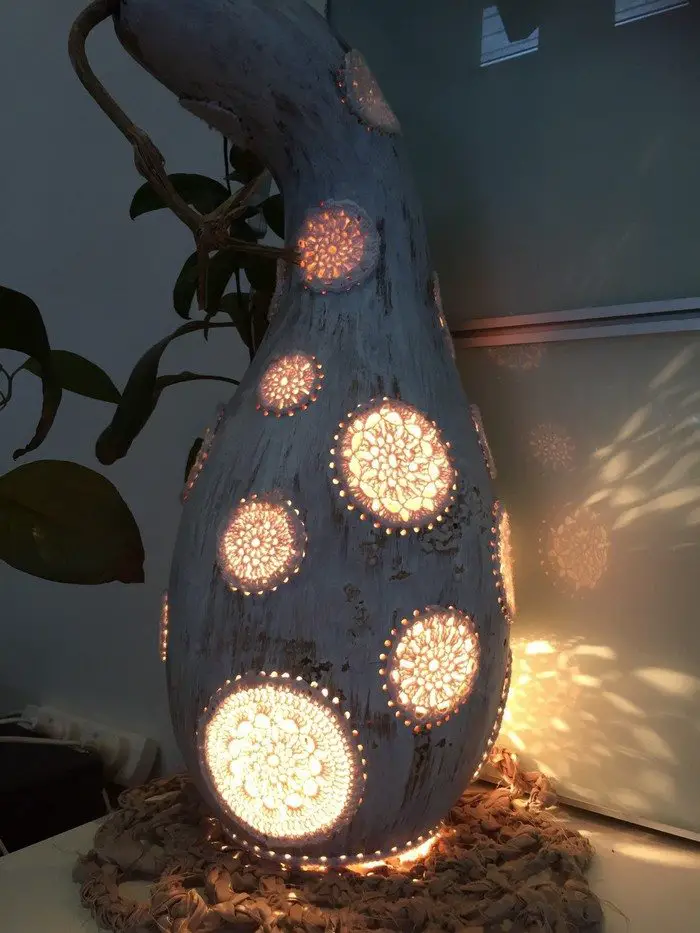
DIY Gourd Lighting Solutions
Gourd lamps are a unique and creative way to light up your home with a warm, natural glow. This guide will show you how to create your own DIY gourd lighting solutions, transforming simple gourds into stunning pieces of functional decor. Whether you’re aiming for a rustic ambiance or a modern touch, these gourd lamps can be customized to suit any style.
Choosing Your Gourds
When making the perfect gourd decor lamps, the initial step is to meticulously select gourds that will accommodate a light source and resonate with your decor aesthetic. For gourd decor, it’s crucial to find gourds of the right size. These gourds should be spacious enough to house a light fixture without compromising the gourd’s integrity.
The shape of the gourd heavily influences the lamp’s final design, making it essential to choose gourds that match the style you envision for your gourd decor. From spherical to oblong shapes, each gourd brings its unique flair to your decor project, making the selection process a cornerstone of creating captivating gourd decor lamps.
When picking gourds for your gourd decor projects, also consider the gourd’s surface texture and overall health. Gourds with smoother surfaces are preferable for intricate designs or painting, enhancing the aesthetic appeal of your gourd decor.
Yet, remember that minor blemishes can add character and uniqueness to your gourd lamps, contributing to the rustic charm of gourd decor. This thoughtful selection process ensures that each gourd lamp adds a personal and artistic touch to your home, embodying the essence of creative gourd decor.
Preparing the Gourds
After selecting the ideal gourds for your gourd decor lamps, preparing them for transformation is the next critical step. Begin by meticulously cleaning each gourd’s exterior with a damp cloth, a foundational step for any gourd decor project. This cleaning ensures a pristine surface for subsequent painting or varnishing, vital for achieving a polished finish on your gourd decor lamps.
The preparation continues with cutting an opening in the gourd, which can be at the top or bottom, depending on how you plan to integrate the light source into your gourd decor. This step is pivotal for creating a space within the gourd to place lighting fixtures, which is essential for the functionality of gourd decor lamps. Removing the seeds and pulp is next, as well as creating a clean interior that enhances the lighting effect, a detail that cannot be overlooked in gourd decor.
Sanding the gourd inside and out is imperative for creating a smooth surface, which not only improves the appearance of your gourd decor lamps but also ensures better adhesion for any coatings or decorations applied. This meticulous preparation is key to crafting durable and attractive gourd decor lamps, highlighting the importance of each step in achieving the desired outcome for your gourd decor projects.
Through careful selection and preparation of gourds, your gourd decor lamps will illuminate your space with a warm, inviting glow, showcasing the natural beauty and versatility of gourds in home decor.
Designing and Carving
When crafting gourd decor lamps, the design and carving phase is where your creativity truly shines. For an exceptional gourd decor piece, consider a design that complements the shape and size of your gourd.
Geometric patterns can offer a modern touch, while floral designs add a natural, soft appeal to your gourd decor. If you’re feeling adventurous, abstract or thematic designs inspired by nature or cultural motifs can transform your gourd into a striking decor element.
Begin by sketching your chosen design directly onto the gourd’s surface with a pencil, planning out the areas that will be carved out to allow light to filter through creatively. This planning stage is crucial for gourd decor, as it sets the stage for the carving process.
Using a specialized carving tool, carefully follow your design, removing pieces of the gourd’s shell to create your envisioned pattern. This step requires patience and precision to ensure the final gourd decor lamp accurately reflects your artistic vision. The carving process is not only therapeutic but also allows you to personalize each gourd decor lamp, making each piece a unique addition to your home.
Assembling the Lamp
After your gourd has been intricately carved and thoroughly cleaned, assembling your gourd decor lamp is the next step in bringing your vision to life. This stage involves integrating the light source into your carved gourd.
A simple LED bulb is advisable for a gourd decor lamp as it emits less heat and is safer for the enclosed gourd environment. Carefully insert the light fixture through the pre-made hole in your gourd, ensuring it fits securely.
Attention to detail is key in assembling gourd decor lamps to ensure safety and functionality. Check that all electrical components are properly installed and pose no hazard.
In some cases, drilling an additional small hole to accommodate the power cord may be necessary, ensuring it can seamlessly exit the gourd decor lamp. This careful assembly ensures that your gourd decor lamp is a beautiful piece of art and a safe and functional lighting source for your home.
FAQ on Making Gourd Decors
What kind of gourds are best for making gourd decor?
For making gourd decor, choose dried gourds that are firm and free from decay. The size and shape depend on your project, whether it’s a paisley chicken, a lamp, or a birdhouse. Larger gourds are great for bigger projects, while smaller ones are perfect for ornaments or detailed designs.
Do I need any special tools to make gourd decor?
Basic tools for making gourd decor include acrylic paint, paintbrushes, a pencil for sketching designs, a hot glue gun for assembling parts, and polymer clay for details like beaks and combs. You may need a carving tool or a small saw for more intricate work, such as carving.
How do I prepare a gourd for painting or carving?
Start by giving your gourd a light sanding to smooth the surface, which helps the paint adhere better. Wipe it down with a damp cloth to remove any dust. If carving, sketch your design on the gourd before carefully cutting it out. Always clean the inside of the gourd, removing seeds and pulp, before starting your project.
Can kids participate in making gourd decor?
Yes, kids can help with making gourd decor! Painting and assembling the simpler designs, like the paisley chickens, are fun and safe activities for children. Supervision is recommended, especially for carving or using a hot glue gun.
How can I make my gourd decor durable for outdoor use?
Apply a clear matte varnish spray after painting to protect your gourd decor outdoors. This helps seal the paint and protect the gourd from the elements. However, extreme weather conditions can still affect the longevity of your gourd decor, so consider placing them under a shelter if possible.
Are there any eco-friendly options for gourd decor?
Gourd decor itself is an eco-friendly option since gourds are natural and biodegradable. For an even more sustainable approach, use non-toxic paints and natural materials for decorating. You can also repurpose gourds as planters or birdhouses, giving them a second life in your garden.
Where can I find inspiration for my gourd decor projects?
Look for inspiration in nature, seasonal themes, or cultural motifs. Websites like Pinterest, crafting blogs, and even this article offer many ideas. Experiment with different colors, patterns, and uses to make your gourd decor uniquely yours.
Conclusion
These cute gourd decors are a delightful way to add a touch of nature and creativity to your home or garden. With just a few simple tools and imagination, you can transform dried gourds into charming decorations that reflect your style and the season. Kids and adults alike can enjoy making these eco-friendly crafts, whether painting paisley chickens or carving intricate designs for gourd lamps.
If you liked this project, you might also like to view Black Cat O’Lanterns! 🎃


