
Contents
4. Make a double layer
If you want to reinforce your cardboard play dome structure, cut extra triangles and squares to match up with the ones you have, but without flaps this time. Glue the shapes without flaps to the shapes with flaps on the outside (if the flaps are kept on the inside).
This will make a double layer of cardboard for the structure, but not a double layer for flaps. This works best if you keep the grain of the cardboard perpendicular; have one piece with a vertical grain glued to one piece with a horizontal grain.
That’s a lot of extra work to making your cardboard play dome, though, and probably not worth it. I reinforced the squares this way, but not the triangles. Note in the last picture, that the square at the edge of the door has one exposed cut edge along with a flap.

5. Glue on little reinforcing strips
This seemed to add a lot of extra strength to the cardboard play dome without being too time-consuming or difficult. Part of this I did while gluing the main pieces together.

Note the strips of cardboard. I folded these and glued them at the points of the open triangles where the windows and door were.

Next, I cut random strips of cardboard, folded them, and glued them over seams that seemed a little weak. This seemed easiest if I glued one side of the strip to one panel, held it until the glue set, then bent the strip back to apply glue to the other side and pressed it to the adjoining panel. It can be tricky to try to hold a bent strip to two panels at an angle without one becoming unglued or something.

I also glued a bottom to the door side to stabilize the structure. I was too lazy to try to glue a bottom to the whole thing; I didn’t have a huge single sheet of cardboard and it seemed like more work than it was worth. You can see the bottom in picture 1 of this step.
Note the triangular corners from the bottom piece that I folded up and glued to the outside of the structure. One side was a bit small so I glued another strip of cardboard over it to reinforce that one.

6. Prime and base coat
I was really glad that the cardboard play dome fit through the doorway so I could do this outside. I hadn’t thought about it before gluing it all together and was a bit nervous. Good thing it did fit.
I had considered smoothing out all the corners and strips by coating this thing in paper mache, sanding it down, and making it a cute hobbit house or something with a green grassy or thatched roof… but my friend said he liked the look of the strips and Josh said it would take way too long to make and to dry, and then I thought I could make it look like a junk space ship thing and use the reinforcing strips as a design element.
As I said in the intro, I didn’t want to have to buy anything for this cardboard play dome project. I happened to find some clear primer and topcoat, white spray paint, pink spray paint (which I didn’t use), and two half-full cans of metallic spray paint – one was a dark metallic gray, the other a bronzey gold color. I’d have liked more metallic spray paint, but we work with what we’ve got.

I generously covered the outside of the dome with two coats of clear primer, letting it dry between each one. I could’ve sanded the cardboard to eliminate those tiny fibers that stick out, but this was for the kids, who aren’t critics (since they don’t talk) and I was pressed for time.
After that, I painted the dome white. I think I’d have preferred black as a base coat, but I didn’t have any.

7. Add metallic corners and edges
If I’d had lighter silver spray paint, I’d have lightly coated the dome with it first before continuing with this step.
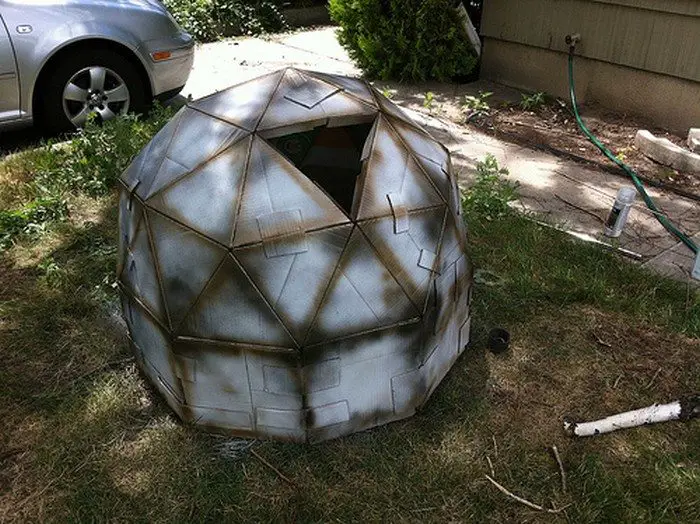
I started with the darker metallic spray paint because I liked that color better. I kept the can moving so it wouldn’t get too blotchy; I wanted it to fade from the darkened corner out toward the white, instead of being a definite line.

I painted little circles over all the corners of the dome, then sprayed a line along the edges of the triangles and squares where the seams were. I ignored the little cardboard reinforcing strips for this, knowing I’d paint over them with something different later on. Once I ran out of the darker gray metallic spray paint, I switched to the bronze-ish metallic spray paint and continued. I wasn’t worried about the two colors looking funny; I knew that after I added all the effects I planned, it’d look just fine.
8. Add detail with acrylic paint and brush
I don’t know how one would do this step using spray paint. I didn’t have any black spray paint, anyway.
I mixed black and white acrylic paint to make a dark gray. I had a wide, messy bristle paintbrush that was perfect for this. I dabbed some paint on but brushed it on a paper towel to get off the excess; I wanted the brush to be relatively dry for this. I first dragged it along the seams to darken them, then dragged it lightly over the face of the cardboard, going across the grain so it would deposit paint at the ridges. I tried to make it look rough.

Halfway through this, I decided to paint the cardboard reinforcing strips gray. Then I returned to the dark gray texturing with the large brush.

Because the base color of the dome was white, there was a bit too much contrast now. If I’d had silvery spray paint to start with, I wouldn’t have needed the metal powder.I had some metal powder in three colors: statuary bronze (really dark), bronze, and silver.
I mixed a little silver and bronze with the statuary bronze to make a dark silvery metallic color, then took a paper towel and rubbed the fine powder all over the dome. Don’t breathe this stuff in, and wash your hands after using it; it clings to EVERYTHING and has some metals in it that you probably don’t want to keep in your body. Don’t go too heavy with the powder or it’ll cover up your lovely painting job.

After the dome looked metallic enough for my taste without covering up the paint, I sprayed it very thoroughly with a clear topcoat to seal in the powder. I also used a brush on a clear coat to make sure the powder wouldn’t rub off. Like I said in the previous step… this would’ve been easier if I’d had some silver spray paint to cover the white before using the dark metallics along with the corners and edges. I could’ve skipped the powder entirely, and I think it’d look almost exactly the same.
Continued Page 3…


