For a lot of folks, a scent ain’t just a smell – it’s a whole memory. Like if you catch a whiff of some grub being whipped up, it might take you right back to Mom’s kitchen. When a breeze blows the smell of fresh flowers, you’re instantly taken back to your first dance and the corsage you brought for your date. Imagine the nostalgia you can give your love ones with DIY scented mason jar candles.

Fill your home with nature’s wonderful aromas by making your own scented mason jar candles. This DIY project is easy to do, inexpensive, and doesn’t use any hazardous chemicals!

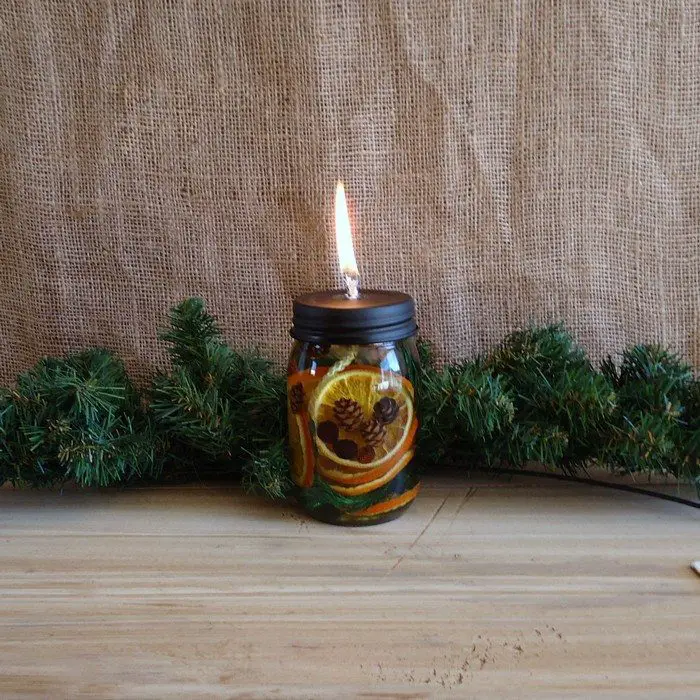
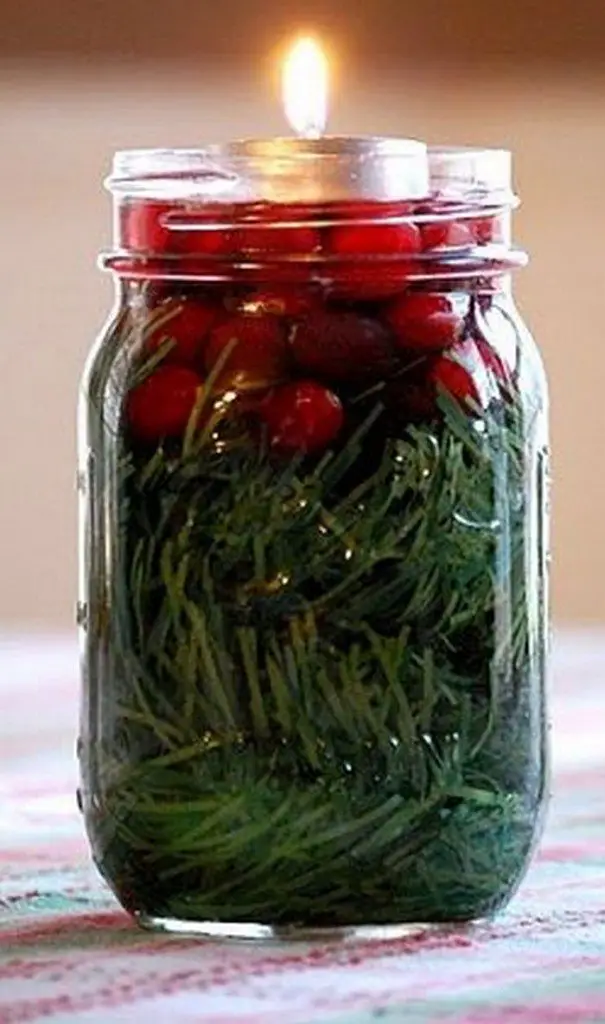
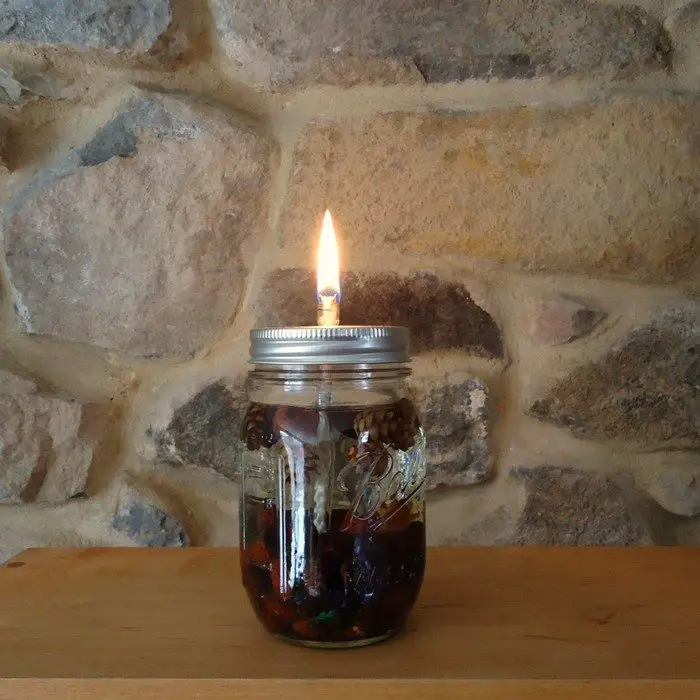
The fresh scent of pine cones adds to the Christmas feel during the holidays. There are many ways to get that scent to linger in your home, but the best way is to make mason jar candles using pine cones.
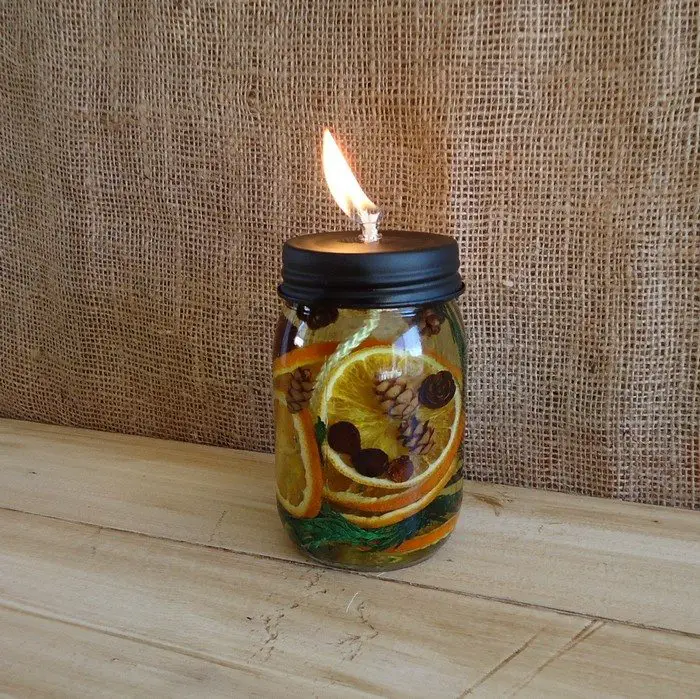
The mason jar candles with the pine cone fragrance offer a delightful aroma that enhances the festive ambience. In addition to the ever-popular pine scent, there are other options available, such as citrus, coffee, vanilla, and blended scents. The choice of fragrance ultimately depends on personal preference.
One of the notable advantages of mason jar candles is their exceptional shelf-life. Many households have incorporated the practice of utilizing these candles during the holiday season. The process involves replenishing the oil and scent, replacing the wick, and repurposing the existing mason jars.
This approach allows for a festive and cost-effective alternative to traditional candle options. Additionally, they serve as excellent decorative pieces. What’s there not to love?
If you’re thinking of doing this project again next year, why not infuse it with more creativity? These delightful candles make perfect Christmas gifts for your dear ones, adding a touch of cuteness to the holiday season! So far, everyone has fallen in love with them! :)
Contents
How to Make These DIY Scented Mason Jar Candles
Using an oil lamp wick and olive oil, this technique allows you to create a longer-burning and more environmentally-friendly candle. Gather the following materials to start crafting your own scented mason jar candles.
Materials
- Mason Jars with Lid
- 1- 1/8 Nipple
- 2- 1/8 Couplings
- 2- 3/8 in Washers
- Lamp Wicks, 100% Cotton (or make your own out of 100% cotton T-shirt)
- Olive Oil
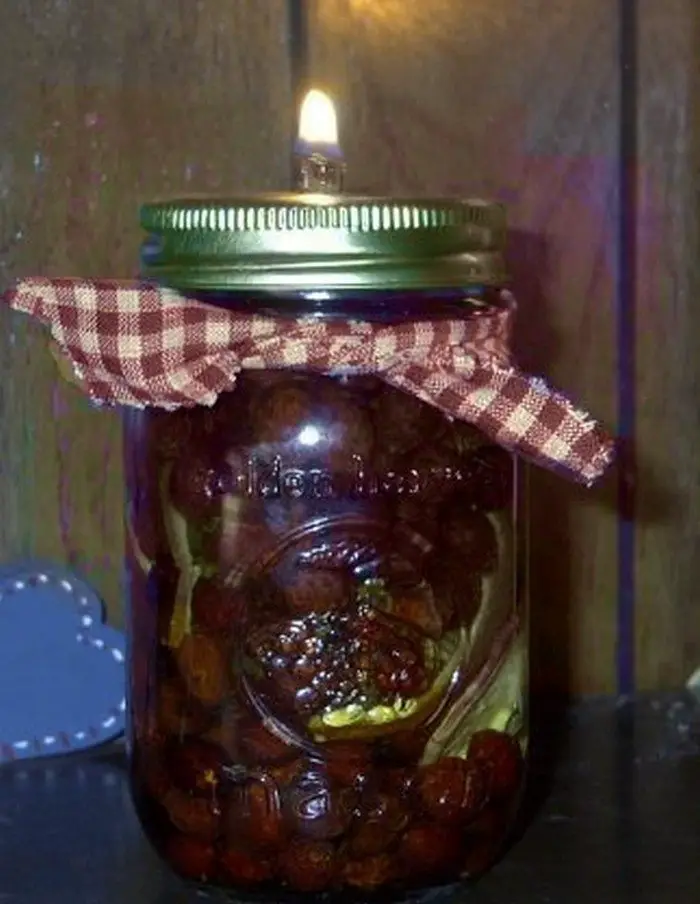
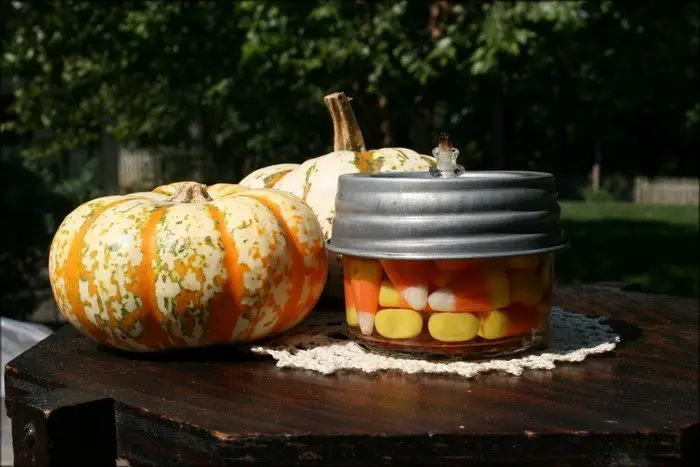
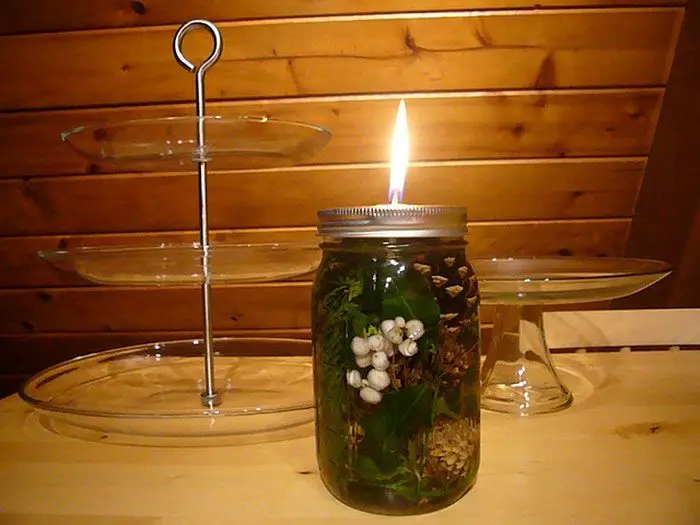
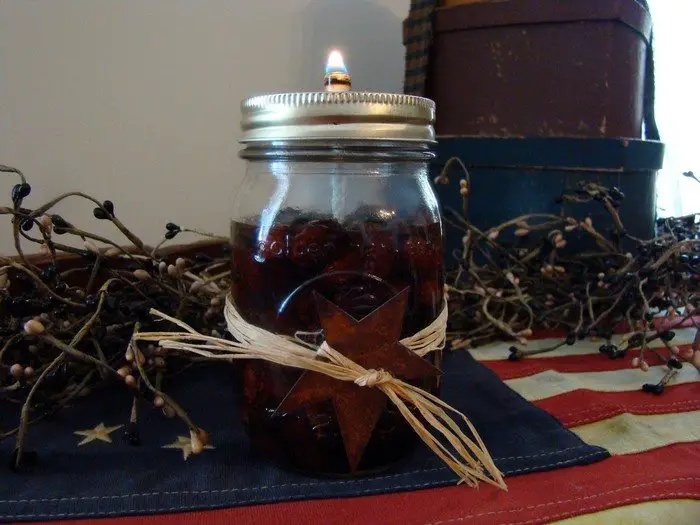
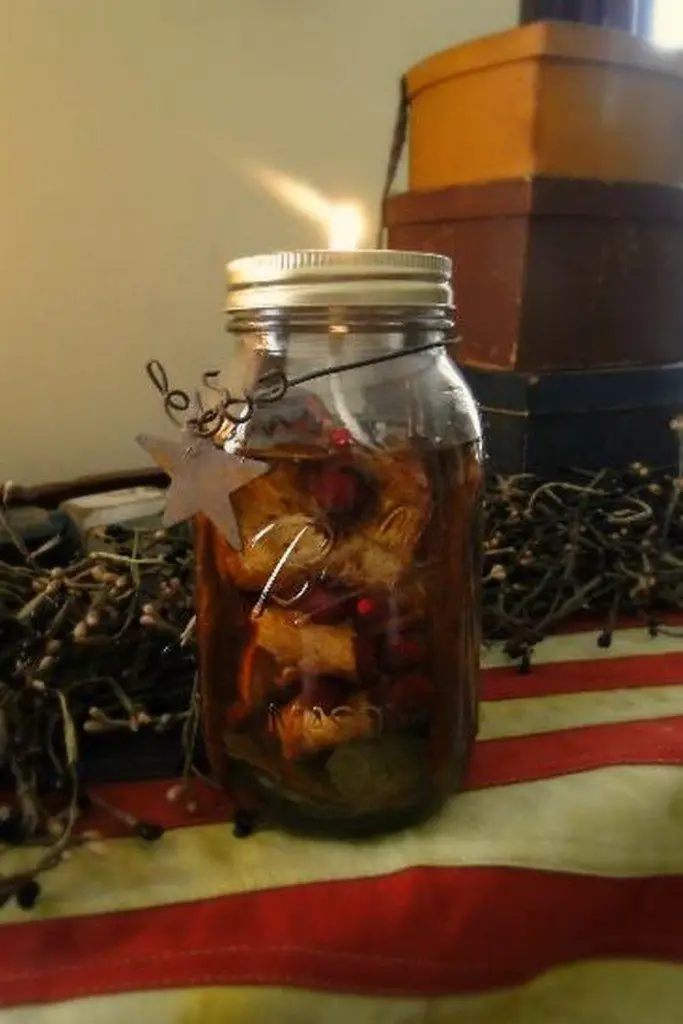
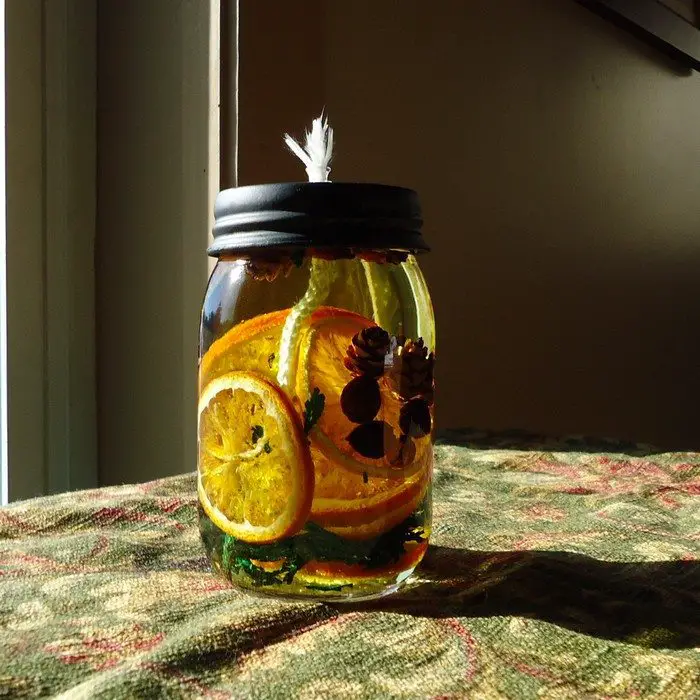
- Pine Cones, Cranberries, and any other decorative elements like Lemons, Limes, Oranges, Coffee Beans, Vanilla Beans, etc.
- Tape (optional)
Tools
- Scissors
- Cordless Drill with 3/8 Drill Bit (or large screwdriver and hammer)

Steps
Step into the world of candle-making ingenuity with this innovative method that utilizes an oil lamp wick and the natural goodness of olive oil. Say goodbye to ordinary candles and embrace a longer-lasting, sustainable alternative.
1. Prepare your mason jars
Grab the mason jar ad drill a little hole right in the middle of the lid, the same size as that 1/8 nipple. Then, take one of the 1/8 couplings and screw it onto the nipple, and slide that sucker into the hole we just made. Use the other coupling to secure the nipple in place.
2. Add your lamp wick
Take the lamp wick and snip it to your preferred length, but make sure to leave a little extra to dangle over the jar. Next, slide the wick through the nipple and yank it until it’s about an inch above the lid.
3. Secure your nipple and wick
Place the washers over the coupling and screw the lid onto the jar, securing the nipple and wick in place.
4. Add the olive oil
Fill the jar with olive oil, leaving about 1/4 inch of space at the top. You can add a few drops of essential oil if you want to add fragrance to your candle.
5. Arrange the botanicals
Use a stick to strategically position the botanicals to achieve a visually appealing arrangement. Ensure that there is sufficient space between the botanicals to enhance their aesthetic appeal. You can use tape to hold them in place if needed.
And that’s it! These scented mason jar candles are now ready to be gifted or displayed in your home!
Optional: Attach a printed gift tag or directions tag to add a thoughtful and organized touch to your presentation.
Explore the album above for inspiration or simply click the link below to discover a plethora of ideas for Scented Mason Jar Candles.
Choosing the Right Materials for Your Candles
Making DIY scented mason jar candles is a creative and enjoyable way to bring warmth and fragrance into your home. The materials you choose play a crucial role in how your candles look, smell, and burn. Let’s dive into the key components you’ll need to select for successful candle making.
Wicks
The wick is the heart of your candle. For mason jar candles, choosing the right size and material is essential. Cotton wicks are a popular choice because they burn cleanly and are easy to work with. Ensure the wick’s thickness matches the size of your jar to ensure an even burn. Pre-waxed wicks can also simplify the process, helping your candle burn more steadily.
Wax and Oils
The base of your candle can be made from various types of wax, each offering different benefits. Soy wax is a favorite for DIY scented mason jar candles due to its clean burn and ability to hold scent well.
Beeswax is another eco-friendly option, known for its natural, subtle honey scent. When adding fragrance, essential oils are preferred for their natural origins and vast range of scents. However, the concentration can vary, so start with a few drops and adjust according to your scent preference.
Botanicals and Decorations
Adding botanicals like dried flowers, herbs, or citrus slices can enhance your candle’s appearance and aroma. Choose decorations that complement your chosen scent theme. For example, lavender buds work well with lavender essential oil, while cinnamon sticks pair with spicy or warm scents. Be mindful of placement to avoid flammable materials near the wick.
Containers
Mason jars are ideal for DIY candles because they are heat-resistant and come in various sizes. Choose jars that fit the scale of your project, whether you’re making small votives or larger statement candles. Ensure the jar is clean and dry before starting your project.
Click on any image to start the lightbox display. Use your Esc key to close the lightbox.![]()


Custom Scent Blending Techniques
Creating your own unique fragrance blend is a rewarding aspect of making DIY scented mason jar candles. By combining different essential oils, you can craft a scent that perfectly matches your mood, season, or even a cherished memory. Here’s how to master the art of custom scent blending for your candles.
Understanding Scent Notes
When making DIY scented mason jar candles, mastering the art of scent composition is essential. The fragrance of a candle is much more than a single smell; it’s a layered experience that unfolds over time. This experience is crafted through the careful selection and combination of top, middle, and base notes in your scent blend.
Top Notes
Top notes are your candle’s first impression. They are the lightest scents and the first to reach the nose. Common top notes include citrus scents like lemon or bergamot, as well as herbal fragrances such as mint or lavender. Because they evaporate quickly, top notes are often bright and sharply refreshing, setting the initial mood of your candle. Incorporating these into your DIY scented mason jar candles can create an inviting and invigorating atmosphere.
Middle Notes
Following the top notes, the middle notes, or heart notes, introduce the main body of the fragrance. These scents emerge just before the top notes dissipate.
Floral scents like rose, jasmine, or ylang-ylang are popular middle notes, as are fruity scents such as berry or peach. Spices can also serve as effective middle notes. These aromas are more rounded and linger longer, forming the core of your candle’s scent identity. Middle notes play a crucial role in the overall harmony of your DIY scented mason jar candles, blending the initial and lasting impressions.
Base Notes
The base notes lay the foundation of your fragrance. These scents are rich, deep, and warm, such as vanilla, musk, or sandalwood. They are the last to develop and stay the longest, providing a lasting memory of the fragrance. Base notes give depth and solidity to your DIY scented mason jar candles, anchoring the lighter top and middle notes and ensuring the scent has a lingering presence.
Balancing the Scent Notes
Creating a harmonious scent involves balancing these three layers. The key is to ensure that the transition between top, middle, and base notes is smooth, with each stage complementing the others. A well-crafted fragrance blend for your DIY scented mason jar candles will have the complexity and depth that evolves over time, captivating and delighting the senses.
Experimentation is vital in discovering the perfect blend. Start with a base recipe and adjust the proportions of each note to suit your preference. Consider the mood or ambiance you wish to create with your DIY scented mason jar candles.
Whether aiming for a fresh, uplifting atmosphere with citrus and herbal notes, a romantic setting with rich florals, or a cozy ambiance with warm, woody scents, understanding and balancing scent notes will help you achieve your desired effect.
Blending Ratios
When crafting DIY scented mason jar candles, achieving the perfect scent is both an art and a science. The key to success lies in understanding and applying the right blending ratios of top, middle, and base notes. Starting with a basic guideline of 30% top notes, 50% middle notes, and 20% base notes can help create a balanced and evolving fragrance.
Understanding the Ratios
The proposed ratio ensures that your candle begins with a refreshing introduction, thanks to the top notes. As these lighter scents start to fade, the more substantial middle notes take center stage, defining the candle’s character.
Finally, the base notes provide a lasting impression, grounding the overall scent with their depth and persistence. This structured approach to scent blending allows DIY scented mason jar candles to offer a complex and layered olfactory experience.
Measuring and Mixing
Accuracy is crucial in achieving the desired outcome. Using droppers to measure essential oils ensures precision and consistency in your blends.
Mix your oils in a separate container, allowing for the adjustment of ratios based on your scent preferences or the specific characteristics of the oils you’re using. Some essential oils may have a stronger presence or linger longer than others, necessitating slight adjustments to the standard ratios.
Trial and Adjustment
Before adding your blend to the wax of your DIY scented mason jar candles, take the time to evaluate the scent. This can involve dipping a strip of paper into the oil mixture and allowing it to dry, then assessing the fragrance after a few minutes. If the scent seems too overpowering or too subtle, adjust the ratios accordingly. Remember, the scent will diffuse and mellow when mixed with the wax and during the burning process, so aim for a slightly stronger fragrance out of the bottle.
Committing to Wax
Once satisfied with the scent blend, gradually incorporate it into the melted wax for your DIY scented mason jar candles. Stir thoroughly to ensure an even distribution of fragrance throughout the wax. This preparatory work ensures that each candle will not only smell exactly as intended but will also provide a sensory journey as it burns, moving seamlessly through the layers of scent from the initial light top notes to the rich base that lingers in the air.
Following these guidelines for blending ratios will elevate the quality of your DIY scented mason jar candles, making them not just homemade crafts but bespoke pieces of aromatic artistry that enhance the ambiance of any space.
Testing Your Blends
Creating the perfect scent for your DIY scented mason jar candles requires patience and precision. Before committing to a full batch, it’s essential to test your scent blends. This crucial step allows you to fine-tune the fragrance, ensuring that the final product meets your expectations in terms of aroma strength and longevity.
Creating Mini Candles for Testing
One effective way to test your blends is by making mini candles. Use the same wax and wick materials as you would for your full-size DIY scented mason jar candles, but in a smaller container.
This method provides a realistic preview of how the DIY scented mason jar candles will perform, allowing you to experience the fragrance as it evolves from the top notes to the base notes during the burn. Adjustments can then be made to the blend if the scent is too strong, too subtle, or if the notes don’t harmonize as expected.
Using Scent Strips
Another method for testing your DIY scented mason jar candles blend is using scent strips, also known as blotter strips or perfume testing strips. Dip these strips into your essential oil blend, then allow them to dry. Smelling the strips gives you an initial impression of your fragrance combination.
However, keep in mind that the cold scent of your DIY scented mason jar candles throw (the fragrance from the candle when not lit) can differ from the hot scent throw (the fragrance when the candle is burning). Therefore, while scent strips are useful for a preliminary assessment, testing with a mini candle provides a more accurate representation of the final product.
Evaluating and Adjusting
After testing your scent blend with either method, take notes on your impressions. Consider whether the fragrance is balanced and if it evolves well as it transitions from the top to the base notes. If adjustments are needed, experiment with the ratios of top, middle, and base notes. Sometimes, even a small tweak can significantly enhance the overall scent profile of your DIY scented mason jar candles.
Repeating the Process
Testing is not always a one-time task. Be prepared to repeat the process to achieve the perfect balance. This iterative approach ensures that your DIY scented mason jar candles will have a pleasant and lasting fragrance that adds a special touch to any environment.
Recording Your Recipes
When diving into the world of DIY scented mason jar candles, developing a system for recording your recipes is as crucial as the crafting process itself. By meticulously documenting each scent blend, including the types of oils and their specific proportions, you create a valuable resource for your candle-making journey. This practice not only ensures that you can replicate your most successful creations but also helps in refining your skills over time.
Creating a Candle Making Journal
Start by setting up a dedicated DIY scented mason jar candles journal or digital document. For each recipe, note the date, the names of the essential oils used, and their exact measurements. Include details about the wax type, wick size, and any other components that might influence the candle’s performance, such as dye or additives. This comprehensive approach turns your notes into a detailed guide for future candle making.
Benefits of Detailed Records
Recording your recipes offers several benefits. It enables you to replicate your favorite DIY scented mason jar candles with precision, ensuring consistent quality and fragrance. Additionally, it allows you to track your progress as a candle maker, understanding which combinations work best and why. Over time, your journal becomes not just a record but a repository of personal craftsmanship and creativity.
Experimentation and Adjustment
A detailed record also simplifies the process of experimentation. As you tweak your blends or try new combinations, you can compare the outcomes with past attempts, making informed adjustments.
This could involve altering the ratio of essential oils, switching wax types, or experimenting with different wick sizes. By comparing new results with your documented recipes, you make each batch of DIY scented mason jar candles an opportunity for learning and improvement.
Scented Serenity!
Embark on a delightful journey into the captivating world of candle-making as you indulge in crafting your own DIY scented mason jar candles. With just five simple steps, you’ll uncover the secrets to creating not only beautifully scented candles but also ones that burn longer and are eco-friendly.
The magic lies in using an oil lamp wick and harnessing the natural goodness of olive oil, elevating your candles to a whole new level of sustainability. Learn the techniques to infuse your candles with delightful aromas that will fill your living space with a warm and inviting ambience.
Unleash your creativity as you follow this simple guide to infuse delightful scents into your homemade candles. Elevate your candle-making skills and fill your living space with the captivating aromas of your personalized creations.
If you like this project, you might also want to check DIY Decorative Water Candles…


