Want to level up on your pumpkin decor this year? This is a good beginner project for trying your hand at pumpkin carving!
It’s pumpkin season again and soon we’ll be seeing lots of different pumpkin decors around the neighbourhood. But of all the decor ideas, pumpkin carvings are always the most impressive.
If you’ve ever tried to carve pumpkins you know how difficult and messy it can get. Good thing there are artificial pumpkins, just like the one used in this DIY project! Artificial pumpkins are easier to carve and less messy. And unlike real pumpkins, they last forever so you can use your decor for many more years after. We also love that you can always glue pieces back together in case you drop and break your artificial pumpkin. :)

Don’t have artificial pumpkins in your local stores? You can get one from Amazon instead and make a Tinker Bell pumpkin carving.
Make your very own successful pumpkin carving. Gather the materials and tools below to get started!
Contents
How to Make Your Tinker Bell Pumpkin Carving
Materials for the Tinker Bell pumpkin carving:
- Artificial Pumpkin
- Printout of Tinker Bell silhouette
- Small Light Bulb
Tools:
- Pushpin
- Small Knife
- Cordless Drill with 1/16 and 1/8 bits
- Artificial Carving Saw (like this)

The Tinker Bell silhouette is from Google’s image. Print it out and tape it to your pumpkin.

When it comes to Halloween festivities, pumpkin carving stands as a quintessential tradition. Yet, amidst the sea of typical jack-o’-lanterns, there’s a world of opportunity for creativity and imagination.
Enter Tinker Bell pumpkin carving – a whimsical twist that adds a sprinkle of fairy dust to your Halloween décor. In this guide, we’ll explore pro strategies to transform your pumpkin into a magical masterpiece.
Selecting the Perfect Pumpkin
The foundation of any successful pumpkin carving endeavour begins with selecting the perfect pumpkin. When choosing your canvas, opt for a medium to large-sized pumpkin with a smooth, even surface. Look for one that is firm and free of blemishes, ensuring optimal carving conditions.
Pro Tip: Consider the shape of the pumpkin – a taller, elongated pumpkin may better suit Tinker Bell’s slender silhouette.
Preparing Your Workspace and Tools
Before diving into the carving process, it’s essential to prepare your workspace and gather the necessary tools. Set up a clean, well-lit area with ample room to work comfortably. Lay down newspaper or a disposable tablecloth to catch any pumpkin guts and make cleanup a breeze.
Pro Tip: Invest in high-quality carving tools for precise and efficient carving, ensuring smooth and clean lines in your design.
Carving the Pumpkin
Once the design is traced, begin carving along the lines using your pumpkin carving tools. Start with the smaller, more intricate sections and gradually work your way outward, taking care to maintain smooth and clean lines throughout.
Pro Tip: To achieve varying depths and textures in your carving, experiment with different carving techniques, such as shallow cuts for highlights and deeper cuts for shadows.
Adding Depths and Textures
Pro Tip: To elevate your pumpkin carving game, delve into the art of creating varying depths and textures by experimenting with a range of carving techniques. Here’s how:
1. Start with a Sketch: Before diving into carving, sketch your design directly onto the pumpkin’s surface using a marker or pen. This serves as your roadmap, guiding your carving efforts and ensuring precision.
2. Shallow Cuts for Highlights: Begin by making shallow cuts along the outlines of your design. Use a small serrated knife or linoleum cutter to carefully trace the edges, creating defined lines. These shallow cuts will act as highlights, adding dimensionality to your carving.
3. Deeper Cuts for Shadows: Identify areas where you want to add depth and shadows to your design. Using a larger carving tool or kitchen knife, carve deeper into the pumpkin to remove more flesh in these areas. This creates contrast and depth, enhancing the overall visual impact of your carving.
4. Experiment with Angles: Vary the angle and depth of your cuts to achieve different effects. Carving at a slight angle can create subtle shadows and highlights, while deeper cuts produce more pronounced shadows.
5. Texture Play: Explore texture by incorporating different carving patterns and techniques. For instance, use a gouge or V-shaped carving tool to create fine lines, crosshatching, or stippling for added detail and visual interest.
6. Layering Technique: For intricate designs or layered elements, consider carving sections of the pumpkin at different depths. This creates a layered effect, with some parts of the design appearing closer to the surface than others, adding depth and complexity.
Illuminating Your Masterpiece
With the carving complete, it’s time to bring your Tinker Bell pumpkin to life! Place an LED tea light or candle inside the pumpkin to illuminate the design from within, casting a warm and enchanting glow.
Pro Tip: For added visual impact, consider placing the pumpkin on a pedestal or riser to elevate it and create a focal point in your Halloween display.
Displaying Your Tinker Bell Pumpkin
Once illuminated, find the perfect spot to display your Tinker Bell pumpkin masterpiece. Whether it’s on your front porch greeting trick-or-treaters or as a centrepiece for your Halloween party, your creation is sure to captivate and delight all who see it.
Pro Tip: To prolong the life of your pumpkin carving, consider applying a thin coat of petroleum jelly to the cut edges to help seal in moisture and prevent premature wilting.
Tinker Bell pumpkin carving is a delightful way to add a touch of magic to your Halloween décor. With these pro strategies and a sprinkle of imagination, you can transform an ordinary pumpkin into a whimsical masterpiece that will enchant and inspire all who behold it.
Steps:
Start with an artificial Pumpkin (any size will do).

1. Use a pushpin and follow the outer image and pock and pock all around.

2. Use the tools for carving — hot knives…
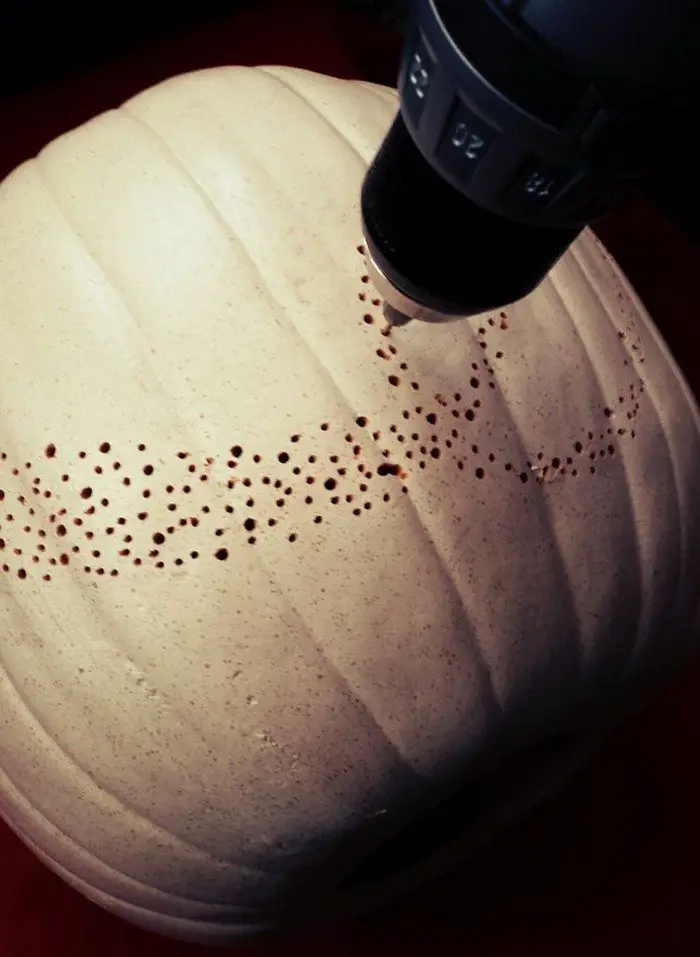
cordless drill 1/16 and 1/8 bits…

and artificial carving saw.
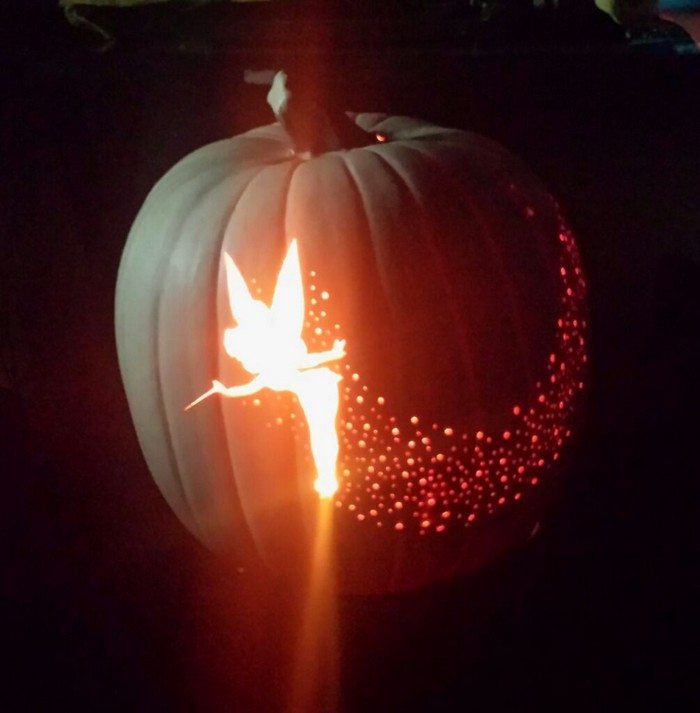
3. Use a small light bulb to give it the most magical fairy light up.

And this is what your Tinker Bell pumpkin carving will look like when done!
All you need is to be very careful, especially with the finer details. Be patient! With an artificial pumpkin, it’s not that difficult to make this Tinker Bell pumpkin carving project a success! :)
Thanks to
Creative Designs and Techniques to Try Today!
Tinker Bell pumpkin carving offers a whimsical and enchanting way to celebrate Halloween. With its delicate features and magical aura, Tinker Bell’s silhouette lends itself perfectly to the art of pumpkin carving. In this guide, we’ll explore a variety of creative designs and techniques to help you bring Tinker Bell to life on your pumpkin canvas.
1. Classic Tinker Bell Silhouette
The classic Tinker Bell silhouette is a timeless design that captures the essence of this beloved fairy. Start by selecting a medium to large-sized pumpkin with a smooth surface. Print out a stencil of Tinker Bell’s silhouette and carefully transfer the design onto the pumpkin using pins or tape.
Use a sharp carving knife or pumpkin saw to carefully carve along the traced lines, creating a clean and defined silhouette. Illuminate your creation with an LED tea light or candle placed inside the pumpkin, casting a warm and enchanting glow.
2. Tinker Bell in Flight
For a dynamic and visually striking design, consider depicting Tinker Bell in mid-flight. Begin by sketching out the outline of Tinker Bell’s body and wings on the pumpkin’s surface using a marker or pen. Next, carefully carve away the pumpkin flesh around the outlined areas, creating depth and dimension.
Pay close attention to the details of Tinker Bell’s wings, carving delicate lines and curves to mimic the appearance of feathers. Once carved, place an LED tea light or candle inside the pumpkin to illuminate the design and bring Tinker Bell’s flight to life.
3. Tinker Bell and Peter Pan
For a whimsical and nostalgic design, consider carving Tinker Bell alongside her beloved companion, Peter Pan. Begin by sketching out the outlines of Tinker Bell and Peter Pan’s silhouettes on the pumpkin’s surface, positioning them side by side.
Carefully carve away the pumpkin flesh around the outlined areas, paying close attention to the intricate details of their clothing and features. Once carved, illuminate the design with an LED tea light or candle, bringing this iconic duo to life in pumpkin form.
4. Tinker Bell Amongst Fairy Dust
Capture the magic of Tinker Bell’s fairy dust with a design that depicts her surrounded by a sparkling aura. Begin by carving Tinker Bell’s silhouette onto the pumpkin’s surface, ensuring that she is positioned in the centre of the design. Next, use a fine carving tool or drill to create small holes or indentations around Tinker Bell, representing twinkling fairy dust.
Experiment with different patterns and densities to achieve the desired effect. Once carved, place an LED tea light or candle inside the pumpkin to illuminate the design and bring Tinker Bell’s enchanting presence to life.
5. Tinker Bell and the Lost Boys
Celebrate the camaraderie and adventure of Neverland with a design that features Tinker Bell alongside the Lost Boys. Begin by sketching out the outlines of Tinker Bell and the Lost Boys’ silhouettes on the pumpkin’s surface, positioning them in a playful and dynamic arrangement.
Carefully carve away the pumpkin flesh around the outlined areas, paying attention to the details of their clothing and expressions. Once carved, illuminate the design with an LED tea light or candle, capturing the spirit of friendship and mischief in pumpkin form.
6. Tinker Bell in Nature
Embrace the natural beauty of Tinker Bell’s woodland home with a design that incorporates elements of nature. Begin by carving Tinker Bell’s silhouette onto the pumpkin’s surface, surrounded by delicate vines, flowers, and leaves.
Use a fine carving tool to create intricate details, such as the veins in the leaves and the petals of the flowers. Once carved, place an LED tea light or candle inside the pumpkin to illuminate the design, creating a magical scene inspired by the enchanting world of Tinker Bell.
Tinker Bell pumpkin carving offers a creative and whimsical way to celebrate Halloween. Whether you opt for a classic silhouette or a more elaborate design, the key is to embrace your imagination and let your creativity soar.
With these design ideas and techniques, you can bring the magic of Tinker Bell to life on your pumpkin canvas, enchanting all who behold your creation. So, gather your carving tools and let the pumpkin carving festivities begin!
Wrapping Up
As we conclude our journey of Tinker Bell pumpkin carving in three fun steps, we are left with a sense of enchantment and accomplishment. From selecting the perfect pumpkin to bringing Tinker Bell’s whimsical silhouette to life, each step of the process has been a magical adventure filled with creativity, joy, and wonder.
First and foremost, Tinker Bell pumpkin carving is a celebration of imagination and artistic expression. Through the careful selection of our pumpkins and the intricate carving of Tinker Bell’s iconic image, we have unleashed our inner artists and brought a touch of Disney magic to our Halloween decorations. Each pumpkin is a unique reflection of our creativity, with its own personality and charm.
Tinker Bell pumpkin carving is a journey back to the beloved fairy tales of our childhood. As we carve out Tinker Bell’s delicate features and graceful wings, we are transported to a world of fantasy and wonder. The sight of Tinker Bell’s silhouette glowing in the darkness evokes feelings of nostalgia and reminds us of the joy and innocence of youth.
Additionally, Tinker Bell pumpkin carving is a shared experience that brings friends and families together. Whether we carve pumpkins with loved ones or gather for a pumpkin carving party, the process fosters bonds and creates lasting memories. Laughter fills the air as we share carving tips, admire each other’s creations, and revel in the magic of Halloween.
Furthermore, Tinker Bell pumpkin carving is a testament to the power of storytelling and imagination. As we proudly display our Tinker Bell pumpkins, we invite others to join us in a world of enchantment and fantasy. Our pumpkins serve as symbols of creativity and magic, sparking conversations and inspiring smiles wherever they are seen.
Tinker Bell pumpkin carving in three fun steps is a delightful and whimsical adventure that allows us to embrace our creativity, celebrate the magic of Halloween, and create cherished memories with loved ones. As we admire our finished creations, let us bask in the joy of bringing a touch of Disney magic to our homes and neighbourhoods. So, until next Halloween, may your pumpkins be merry, your carvings be whimsical, and your Tinker Bell dreams continue to inspire wonder and delight.
Frequently Asked Questions
1. What materials and tools do you need for Tinker Bell pumpkin carving?
You will need a medium to large-sized artificial pumpkin, a printout of Tinker Bell silhouette, a small light bulb, a pushpin, asmall knife, a cordless drill with 1/16 and 1/8 bits, and an artificial carving saw.
2. Do you need a template for Tinker Bell pumpkin carving?
While templates can be helpful, especially for beginners, you can also freehand Tinker Bell’s silhouette onto the pumpkin using a marker or pen. If you prefer a template, you can find printable ones online or create your own by tracing Tinker Bell images onto sturdy paper.
3. How do you transfer the design onto the pumpkin?
You can also use a printed template and transfer it to the pumpkin’s surface and secure it with tape. Use a poking tool or the tip of a knife to trace the outline of the design onto the pumpkin. Once the outline is complete, remove the template and begin carving.
4. What carving techniques work best for Tinker Bell’s features?
Start by carving out the outline of Tinker Bell’s silhouette, focusing on her wings, dress, and facial features. Use a variety of carving tools, including small serrated knives and linoleum cutters, to achieve intricate details and smooth lines. Take your time and work slowly to avoid mistakes.
5. Should you carve through the pumpkin or just create shallow cuts?
It depends on personal preference and the level of detail you want to achieve. Shallow cuts can create a subtle glowing effect when illuminated while carving all the way through allows more light to shine through and creates a brighter display.
6. How can you add extra flair to your Tinker Bell pumpkin carving?
Get creative with accessories like glitter glue, rhinestones, or acrylic paint to embellish Tinker Bell’s dress, wings, and hair. You can also carve additional designs around the pumpkin or add LED lights for a sparkling effect.
7. What should you do if you make a mistake while carving?
Don’t panic! Mistakes happen, especially when carving intricate designs. If you accidentally remove too much pumpkin flesh or make a wrong cut, you can try smoothing out the area with a damp cloth or using toothpicks to hold pieces in place. Alternatively, you can adjust your design to incorporate the mistake creatively.


