Last Updated on September 17, 2024 by Team Ideas24
Cut off your hand, put it inside a frame and hang it on your bedroom wall… JUST KIDDING!
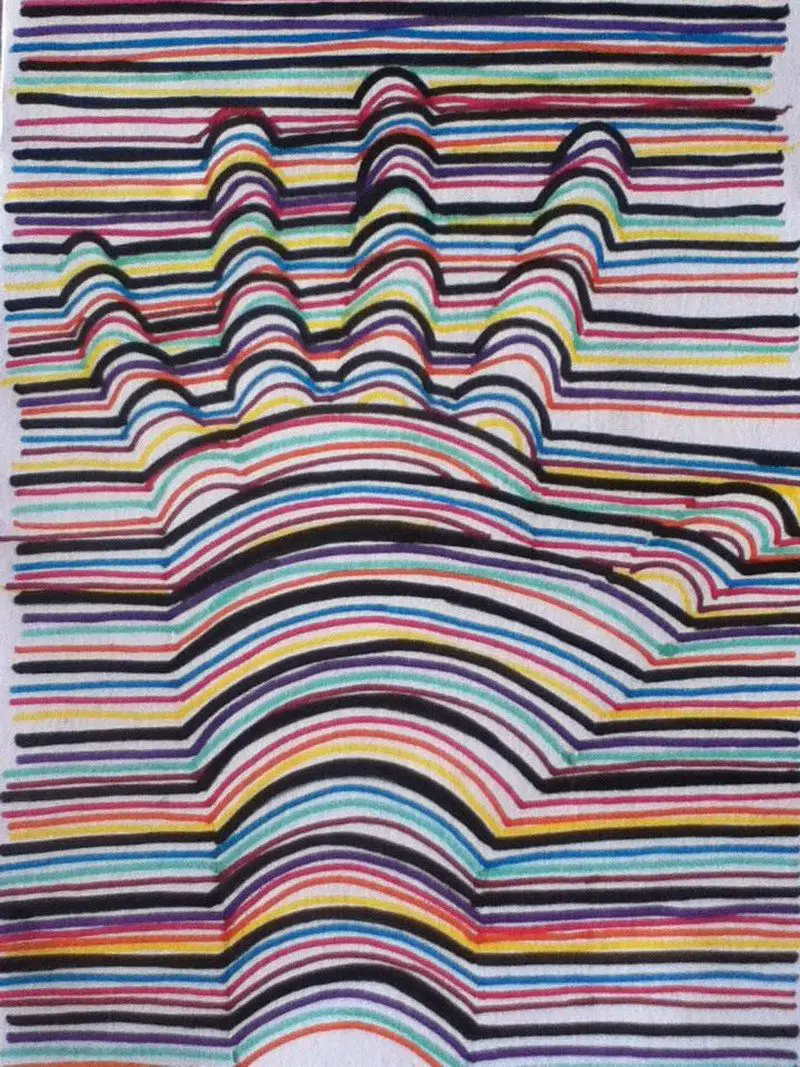
But you can make a 3D hand art instead, and we’re not kidding! This art project is very cool yet very simple. The only trick here is too be very precise in drawing the lines – curved lines on all parts of your hand, and straight horizontal ones where there’s supposed to be a flat surface. Make sure these lines are very distinct from each other! :)
Contents [show]
Creating 3D Hand Art
Materials
- Paper
- Pencil
- Felt tip markers – various colours of your choice
Steps
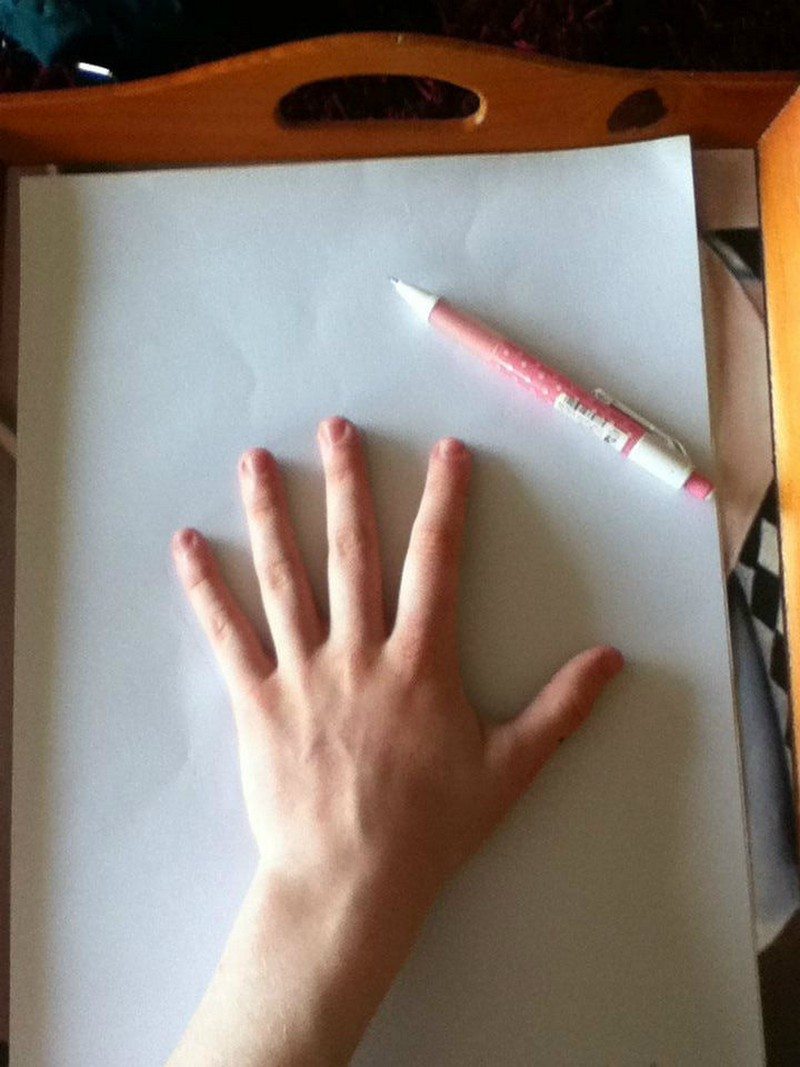
Start by placing your hand on the piece of paper and draw round your hand using a pencil.
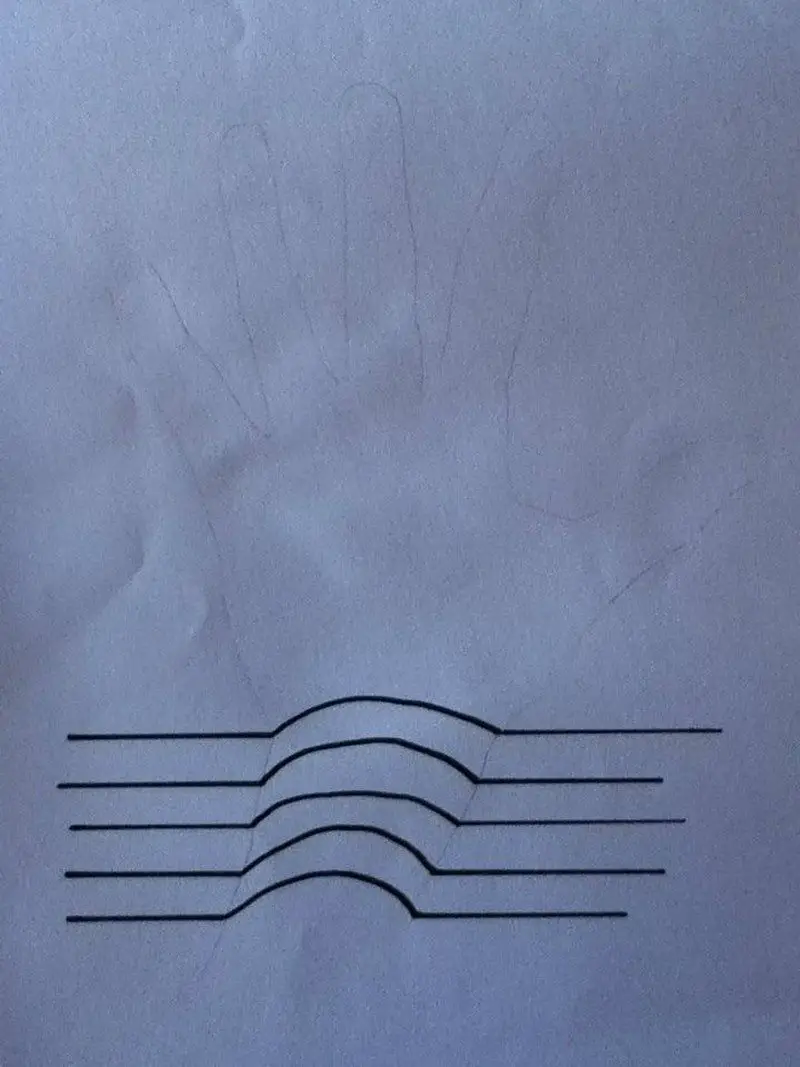
Then draw lines on the outside of the outline of your hand. I used a ruler to draw the lines.
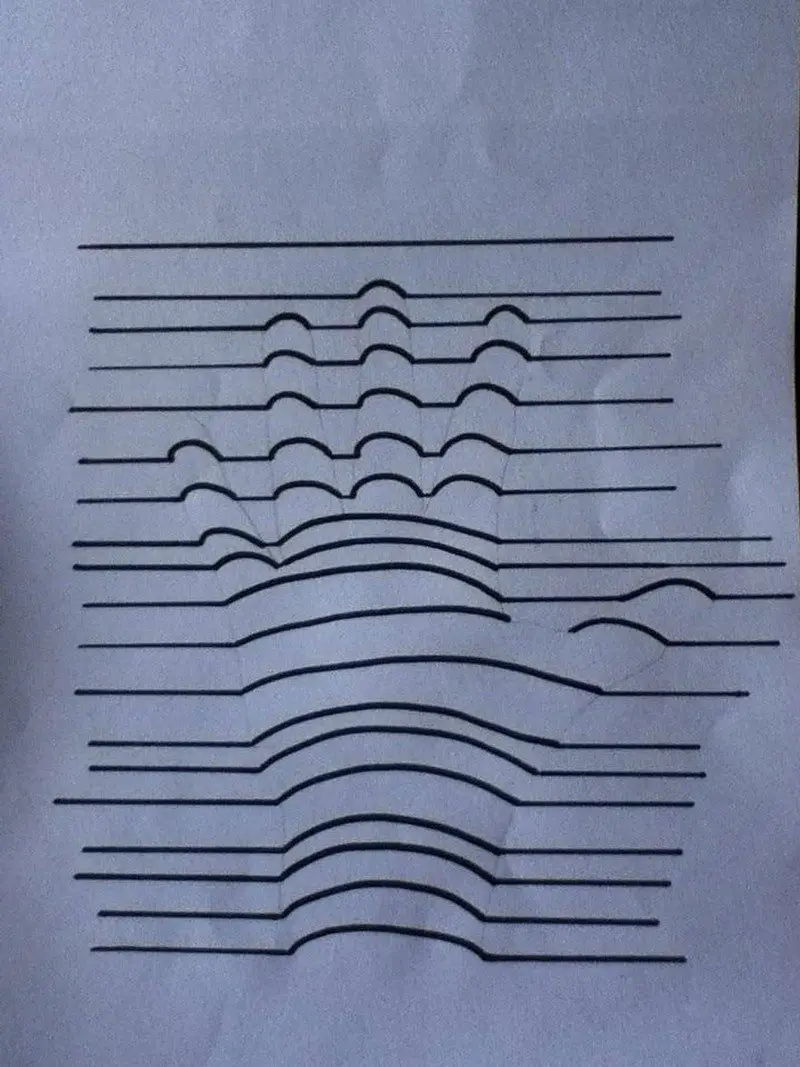
Draw curved lines inside the outline. For extra help follow the pictures for direction. I didn’t erase the pencil it helped with the shadowing to give the 3D depth.
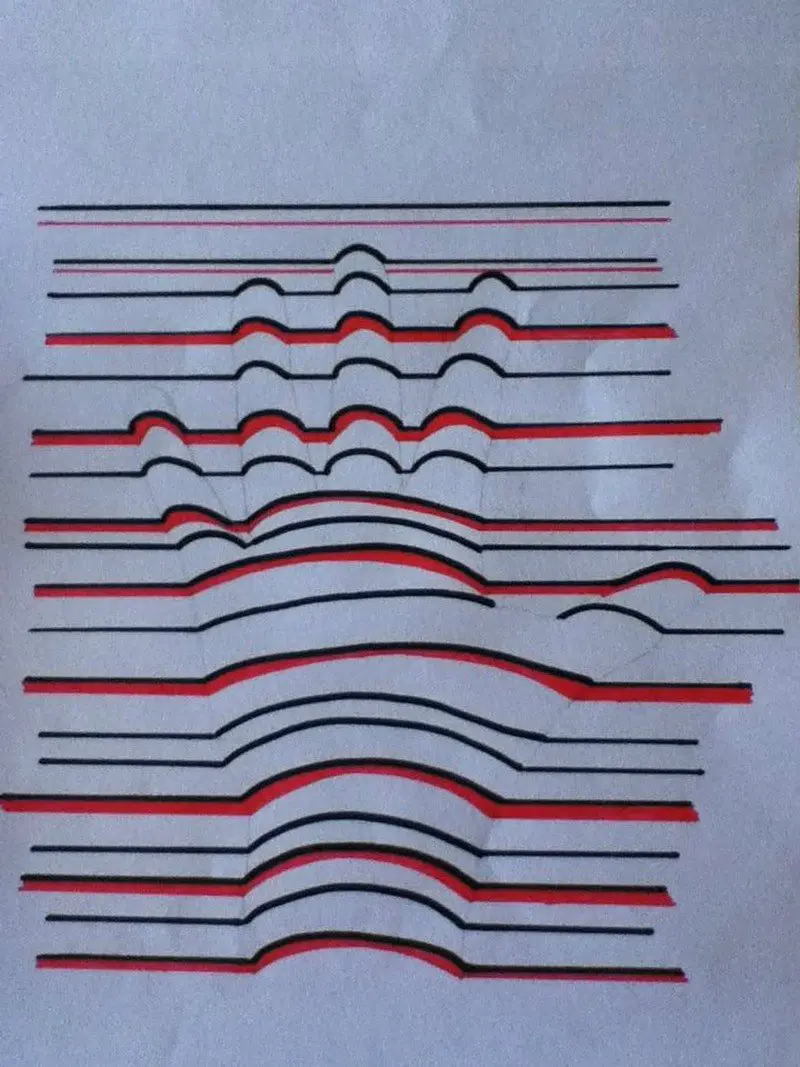
Draw more lines using different colours.
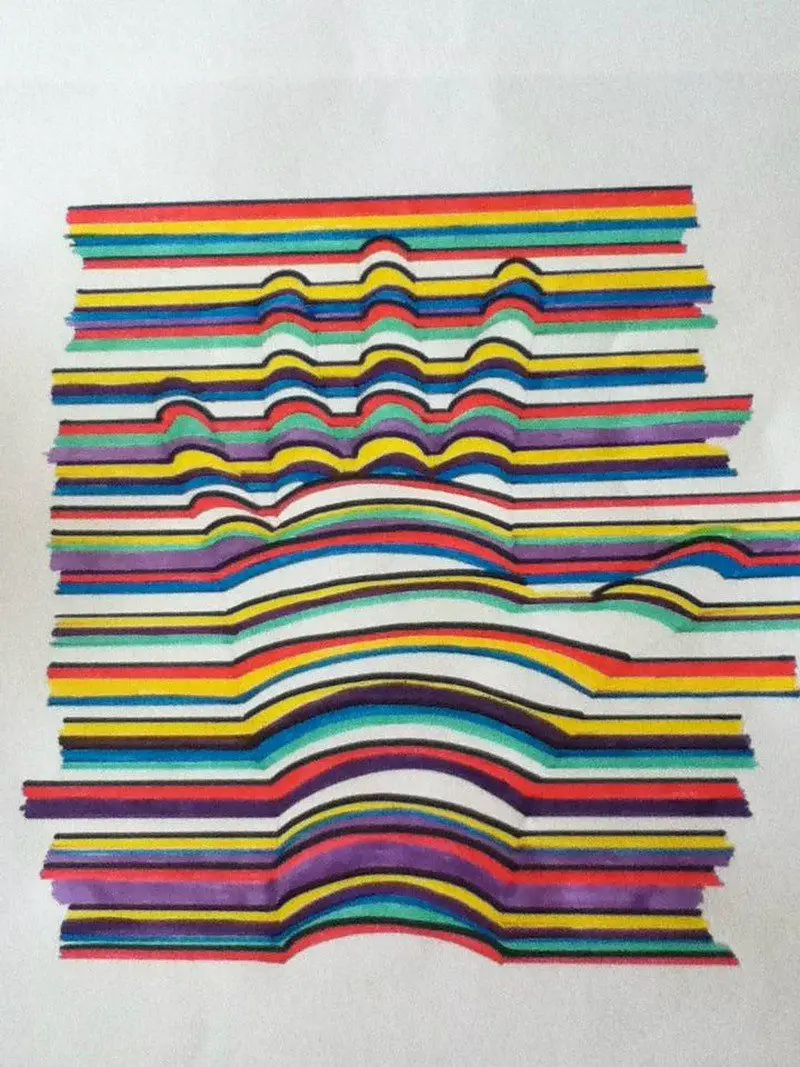
I like to use bright colours that match. The colours I used were random to fill in space. It’s that easy!
It would be great to do this from time to time (every year, for instance) that would show how much you’ve grown over the past years. What do you think? :)
Thanks to Savvyz for this great tutorial!
Advanced Techniques in 3D Hand Art
While the basic 3D hand art project is fun and accessible, incorporating advanced techniques can significantly enhance the illusion and make your artwork truly stand out. By focusing on shading, lighting, and perspective, you can create a drawing that looks like your hand is emerging from the paper.
Mastering Shading and Lighting
Understanding how light interacts with objects is key to creating depth in your drawings.
Techniques:
- Identify the Light Source:
- Determine where the light is coming from in your scene.
- Consistently apply shading to match this light direction throughout the drawing.
- Use Gradual Shading:
- Apply smooth transitions between light and dark areas to mimic the natural curves of the hand.
- Blend pencil strokes gently to avoid harsh lines.
- Add Cast Shadows:
- Include a shadow beneath the hand to enhance the 3D effect.
- Darken areas where the hand would naturally block light, such as between fingers.
Applying Perspective and Depth
Perspective can make your hand drawing appear more dynamic and lifelike.
Techniques:
- Foreshortening:
- Draw the hand reaching towards the viewer to create a sense of depth.
- Make closer parts of the hand larger and distant parts smaller.
- Use Vanishing Points:
- Sketch guidelines that converge at a point to maintain consistent perspective.
- Align elements of the hand along these lines to enhance realism.
Utilizing Color Gradients
Color can add vibrancy and realism to your 3D hand art.
Techniques:
- Layer Colors:
- Start with lighter colors and gradually add darker shades to create depth.
- Blend colors smoothly to avoid abrupt transitions.
- Highlighting:
- Use lighter shades or a white pencil to add highlights where light hits the hand.
- Accentuate the highest points on the hand for a more pronounced 3D effect.
Incorporating Textures and Details
Adding fine details can bring your drawing to life.
Techniques:
- Skin Texture:
- Lightly sketch lines to represent wrinkles and folds.
- Shade subtly to indicate muscle and bone structure.
- Nail and Hair Details:
- Define nails with careful shading and highlights.
- Add fine lines to represent hairs on the back of the hand if desired.
Experimenting with Different Mediums
Trying new materials can produce unique effects.
Techniques:
- Use Charcoal or Graphite:
- Charcoal offers deep blacks and rich shadows.
- Graphite pencils allow for precise lines and smooth shading.
- Incorporate Ink or Markers:
- Ink provides sharp contrasts and bold outlines.
- Markers can add vibrant colors and are great for smooth gradients.
- Explore Digital Tools:
- Use graphic design software to experiment with layers and effects.
- Digital brushes can mimic traditional textures or create entirely new ones.
Creating Advanced Optical Illusions
Take your 3D hand art to the next level with optical illusions.
Techniques:
- Anamorphic Drawing:
- Distort your drawing so it appears 3D from a specific angle.
- Use a grid to map out the distortion accurately.
- Interactive Elements:
- Draw the hand interacting with real objects, like gripping a pencil that extends off the page.
- Extend parts of the drawing beyond the paper to enhance the illusion.
By embracing these advanced techniques, you can transform a simple 3D hand drawing into a stunning piece of art that captivates viewers. Experiment with different methods, and don’t be afraid to combine techniques to find your unique artistic style.
Using Digital Tools for 3D Hand Art
In today’s digital age, artists have access to many tools that can elevate their work to new heights. 3D hand art, traditionally done on paper, can be transformed and enhanced using digital platforms. Utilizing graphic design software not only streamlines the creation process but also opens up a world of possibilities with features like layering, undo options, and a vast array of digital brushes and effects.
Benefits of Digital Tools in 3D Hand Art
Embracing digital tools can significantly benefit your 3D hand art projects:
- Flexibility and Control: Easily adjust mistakes with undo commands and refine details without erasing.
- Enhanced Effects: Access to a wide range of brushes, textures, and lighting effects to make your art more realistic.
- Efficiency: Save time with tools that expedite shading, coloring, and blending processes.
- Portability: Work on your art anytime, anywhere with a tablet or laptop.
Choosing the Right Software
Selecting the appropriate software is crucial for creating impressive 3D hand art digitally.
Popular Digital Art Programs
- Adobe Photoshop: A versatile program with powerful tools for painting, shading, and layering.
- Procreate: An iPad app known for its intuitive interface and extensive brush library.
- Krita: A free, open-source program offering professional features suitable for detailed artwork.
- Autodesk SketchBook: Provides a natural drawing experience with a focus on sketching and painting.
Digital Techniques for 3D Hand Art
Harness the capabilities of digital tools to bring depth and realism to your art.
Layers and Masks
- Layering: Organize different elements of your drawing on separate layers (e.g., outline, shading, highlights).
- Masks: Use layer masks to non-destructively edit parts of your image, perfect for refining the edges of your hand drawing.
Brushes and Textures
- Custom Brushes: Create or download brushes that mimic real-world textures like skin or fabric.
- Digital Textures: Apply textured overlays to add realism to the skin surface of the hand.
Using 3D Models as References
- 3D Hand Models: Import or create 3D models to use as a reference for accurate proportions and lighting.
- Adjustable Angles: Rotate and position the 3D model to match the desired perspective in your drawing.
Tips for Creating Realistic 3D Hand Art Digitally
Enhance your 3D hand art with these practical tips:
- Understand Light and Shadow: Use digital lighting tools to simulate how light interacts with the hand, adding depth.
- Color Blending: Utilize gradient tools and blending modes to create smooth transitions between shades.
- Pressure Sensitivity: If using a graphics tablet, take advantage of pressure sensitivity for more dynamic lines and shading.
- Zoom and Detail: Zoom in to work on fine details without losing clarity, something not possible on traditional paper.
- Keep Learning: Explore tutorials and online courses specific to digital 3D hand art to continually improve your skills.
Integrating digital tools into your 3D hand art practice can unlock new creative avenues and refine your artistic expression. Whether you’re a seasoned artist or just starting, digital platforms offer resources that can make your artwork more vibrant, detailed, and realistic. Embrace the fusion of traditional techniques and modern technology to take your 3D hand art to unprecedented levels.
Troubleshooting Issues
Creating 3D hand art can be an enjoyable and rewarding experience, but it’s not uncommon to encounter some hurdles along the way. From wobbly lines to unrealistic shading, these challenges can affect the overall impact of your artwork. This section addresses common problems artists face when working on 3D hand art and offers tips to help you achieve the best results.
Keeping Lines Straight and Even
Straight horizontal lines are crucial for the flat surfaces in your 3D hand art.
Solutions:
- Use a Ruler: Always draw your horizontal lines with a ruler to ensure they are perfectly straight.
- Mark Guidelines: Lightly mark dots along the sides of the paper to guide where your lines should start and end.
- Consistent Spacing: Use the width of the ruler or a measured interval to keep the spacing between lines even.
Drawing Smooth Curved Lines
The curved lines over the hand outline create the illusion of depth.
Solutions:
- Steady Your Hand: Rest the side of your drawing hand on the paper to stabilize it while drawing.
- Practice the Motion: Before drawing, practice the curved motion several times in the air to build muscle memory.
- Use Flexible Tools: Consider using a French curve or a flexible curve ruler to assist with consistent curves.
Maintaining Proportions
Incorrect proportions can make the hand look distorted.
Solutions:
- Accurate Tracing: Ensure your initial hand outline is accurate by holding the pencil perpendicular to the paper while tracing.
- Double-Check Dimensions: Compare lengths of fingers and widths to your actual hand for reference.
- Use Reference Lines: Lightly draw reference lines across the hand to keep features aligned.
Achieving Realistic Shading
Shading adds depth but can be tricky to get right.
Solutions:
- Understand Light Source: Decide where the light is coming from and shade accordingly.
- Gradual Shading: Build up shading slowly using light pencil strokes to avoid harsh transitions.
- Blending Tools: Use blending stumps or tissues to smooth out shading areas for a more realistic look.
Preventing Smudges
Smudging can muddy your drawing and reduce its sharpness.
Solutions:
- Work Top to Bottom: If you’re right-handed, work from the top left to the bottom right; reverse if left-handed.
- Use a Barrier Sheet: Place a clean piece of paper under your drawing hand to prevent oils and smudges.
- Fixative Spray: Lightly spray your finished sections with fixative to set the graphite or ink.
Dealing with Uneven Coloring
Inconsistent color application can distract from the 3D effect.
Solutions:
- Test Colors First: Try out your markers or pencils on scrap paper to check their vibrancy and consistency.
- Layer Colors: Build up color intensity gradually by layering rather than pressing hard initially.
- Consistent Pressure: Apply even pressure to your coloring tool to maintain uniform color depth.
Correcting Mistakes Without Damage
Erasing errors can sometimes leave marks or damage the paper.
Solutions:
- Use the Right Eraser: A kneaded eraser is gentle on paper and can be shaped for precise erasing.
- Eraser Shield: Utilize an eraser shield to isolate the area you need to correct without affecting surrounding work.
- Minimal Pressure: Erase lightly to avoid tearing or creasing the paper.
Encountering challenges is a natural part of the artistic process, but with these troubleshooting tips, you’re well-equipped to address common issues in creating 3D hand art. Remember, patience and practice are key. Don’t be discouraged by setbacks; instead, view them as opportunities to improve your skills and enhance your artwork.
Conclusion
Creating 3D hand art is a fun and creative way to experiment with illusions and depth. With the right materials and techniques, you can produce striking pieces that seem to leap off the page. Keep practicing and refining your skills to make each piece more impressive than the last.
For more creative projects, check out our seashell crafts guide!


