
Last Updated on January 29, 2025 by Team Ideas24
Do you still possess the friendship bracelets you and your companions weaved in middle school? Can you recollect the gratification that arose from weaving your personal friendship bracelets, and the elation that accompanied the sight of your peers donning your innovative creations?
Browsing old photographs can feel a sense of nostalgia, particularly those from your childhood. However, what about the bracelets you crafted during middle or elementary school years? Do you have them still within your home – perhaps hidden away in a box – or were they simply neglected?
Friendship bracelets are the easiest and most popular bracelets you can weave with yarn. These bracelets are very colourful, and there are many ways to weave them.
Friendship bracelets are definitely the most popular bracelet you can weave from yarn. These bracelets are highly sought after, available in a lot of stores ranging from jewellery boutiques to Walmart.
Various techniques are used to create these bracelets, and kits can be purchased from select retailers. (These are probably the easiest kits to make friendship bracelets.)
Weave soda straw bracelets with your child to enjoy quality activity time with each other. Prior to buying any materials, explore the potential of using readily available items in your household, such as yarn, string, a ruler, a pen, scissors, and paper. With all the necessary materials at hand, commence the project together with your child.
There are numerous techniques for creating friendship bracelets. In this tutorial, we will demonstrate how to weave a bracelet using yarn and soda straws.
Relive your childhood and spend quality time with your kids by making this project with them! Before your kids make friendship bracelets with other people, you can make one with them while you’re still their best friend ;)
Contents [show]
How to Weave Soda Straw Bracelets
Weaving a soda straw is a simple and enjoyable method of crafting friendship bracelets with your kids. It fosters bonding and creativity, while also repurposing old straws into beautiful and practical creations.
Weaving a soda straw bracelet is a cost-effective alternative to purchasing pricey jewellery, and it allows you to showcase your individuality and style. Therefore, weaving a soda straw is significant because it offers an enjoyable and imaginative endeavour, which is also a sustainable and inexpensive way to create attractive bracelets.
Materials
Excited to start your soda straw weaving project? Here’s what you need!
To facilitate weaving, obtain a small piece of thin cardboard, such as an empty cereal box.
- Plastic drinking straws
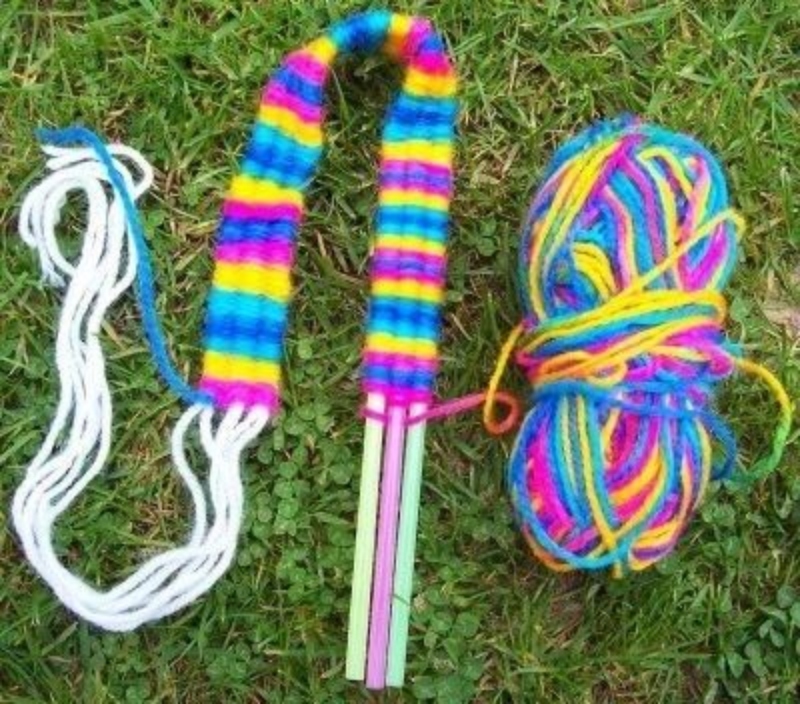
- To create your bracelet base, collect 3-5 plastic straws that are uniform in both size and colour.
- Yarn
- You’ll need some colourful yarn of your choice. You can use different colours to create a unique and personalized bracelet.
- Tape
- Clear tape is the most effective option for holding the straws in place during weaving, as it does not leave any residue.
- Small piece of cardboard
- To facilitate weaving, obtain a small piece of thin cardboard, such as an empty cereal box.
Tools
- Scissors
- You’ll need a pair of scissors to cut the yarn and straws to the desired length.
- Ruler/measuring tape
- You’ll need a pair of scissors to cut the yarn and straws to the desired length.
- Lighter
- A lighter can be used to burn the ends of the yarn to prevent fraying.
Click on any image to start the lightbox display. Use your Esc key to close the lightbox. 😎
Step-by-Step Instructions
Here’s how to weave a soda straw bracelet using these materials.
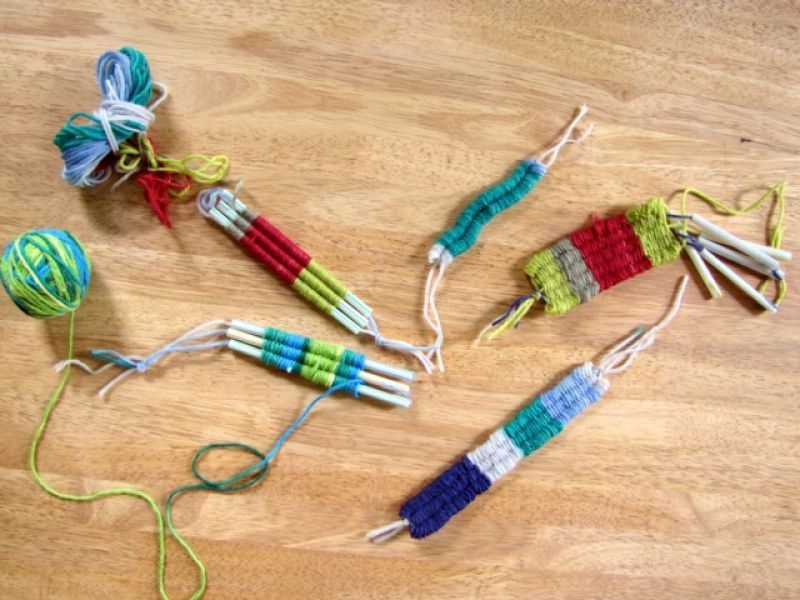
Cut the Straws
To begin crafting a soda straw bracelet, prepare the plastic straws by cutting them into identical lengths. To ensure uniformity in size and appearance of the bracelet, it is important to follow the recommended straw length of 5-6 inches. However, customization is available to suit personal preferences.
For consistent straw lengths, measure and mark each straw with a ruler or measuring tape prior to cutting. This will prevent any errors during the cutting process and guarantee that all straws are identical in length. Once marked, utilise scissors to cut the straws, ensuring that each is cut to avoid any inconsistency in the final result.
After cutting the straws to the desired length, use scissors to remove any sharp or uneven edges to make them neater and prevent scratching your skin while wearing the bracelet. With the trimming done, you can begin weaving your soda straw bracelet.
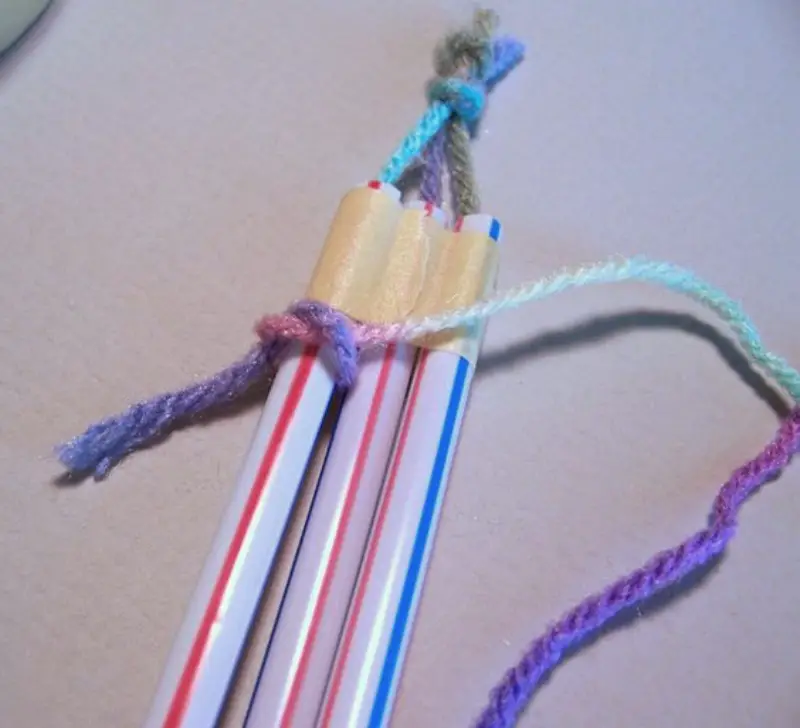
Tape the Straws
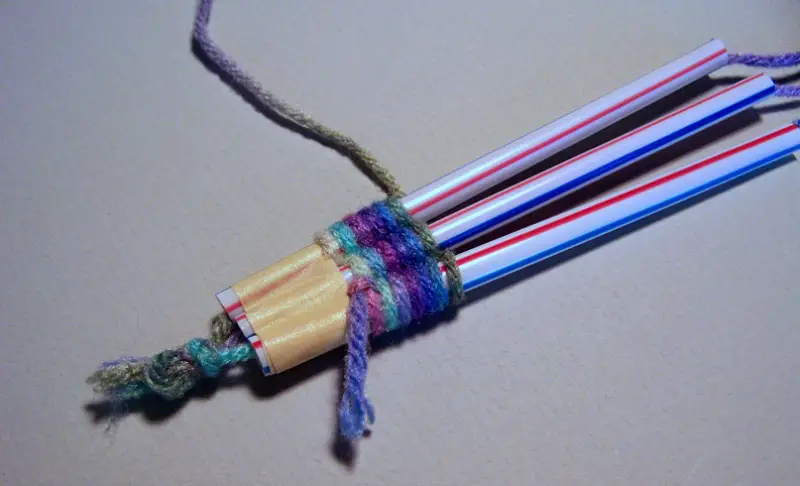
After cutting the plastic straws into equal lengths, the next step to weave a soda straw bracelet is to tape them together in a row. This step is important because it guarantees that the straws stay in place while you weave them into the bracelet.
Begin by attaching a strip of tape to the uppermost section of the initial straw, leaving a small overhang. Next, align the following straw with the first so that their ends meet. Use a separate strip of tape to fasten the second straw to the next one, once more leaving a slight overhang. Continue this pattern until all the straws are joined together in a linear arrangement.
To ensure stable weaving, make sure the straws are evenly aligned and firmly held together with tape according to your choice. It is advisable to use strong tape to avoid any displacement of the straws during weaving.
Ensure the tape secures the straws firmly both on the top and bottom before proceeding to weave the bracelet.
Tie and Weave the Yarn
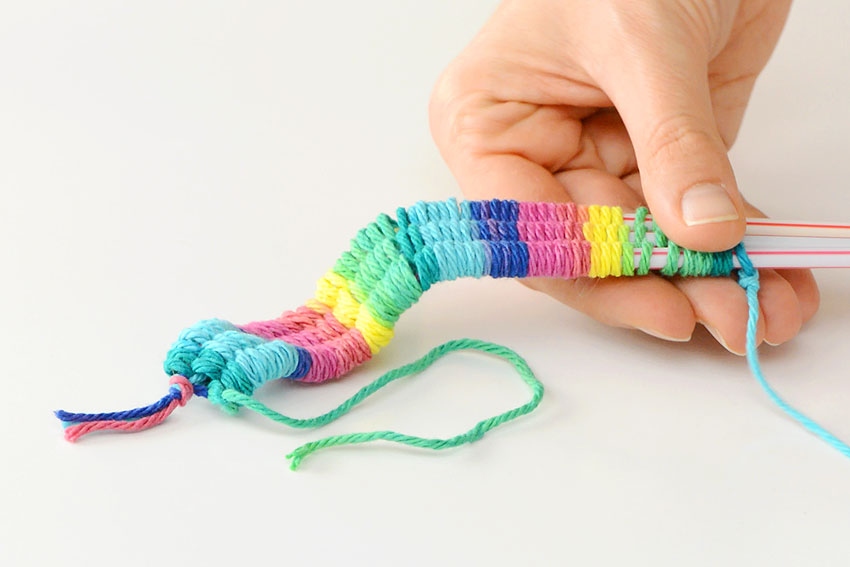
After taping the straws together, the next step to weave a soda straw bracelet is to tie a piece of yarn to one end of the straws. Choose a colour of yarn that you like and tie it in a knot around the first straw. Make sure to leave a long tail of yarn, as you will use this to tie off the bracelet later.
To begin the weaving process, wrap the yarn around the first straw, making sure to pull it tight. Then, bring the yarn over the second straw and wrap it tightly around that straw as well. Continue wrapping the yarn around each straw in turn, making sure to pull the yarn tight each time. As you go, you will begin to see the woven pattern taking shape.
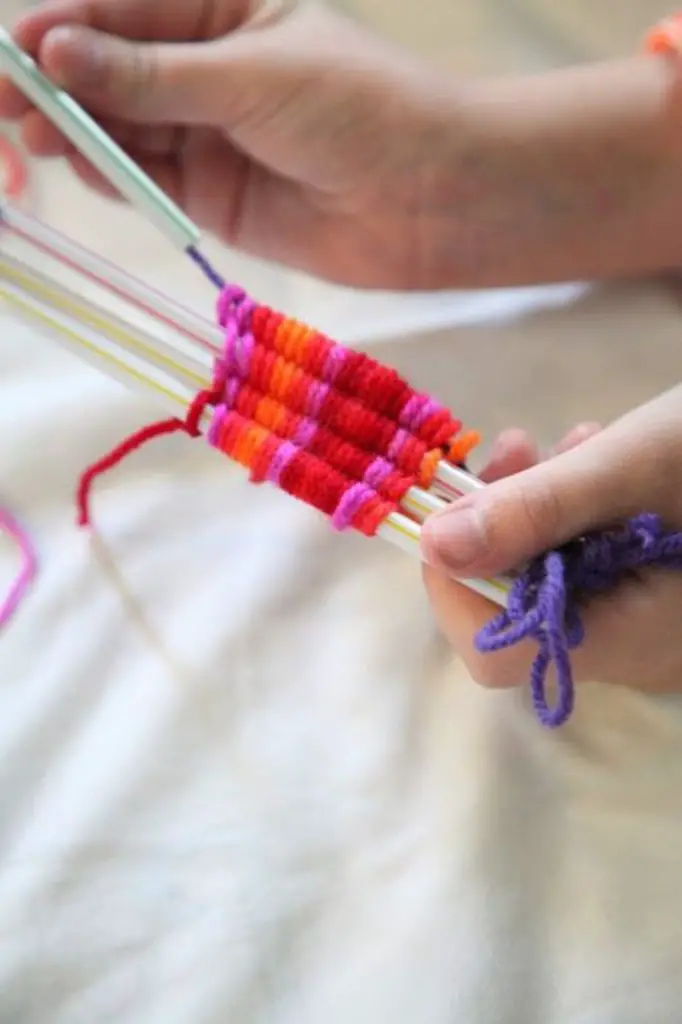
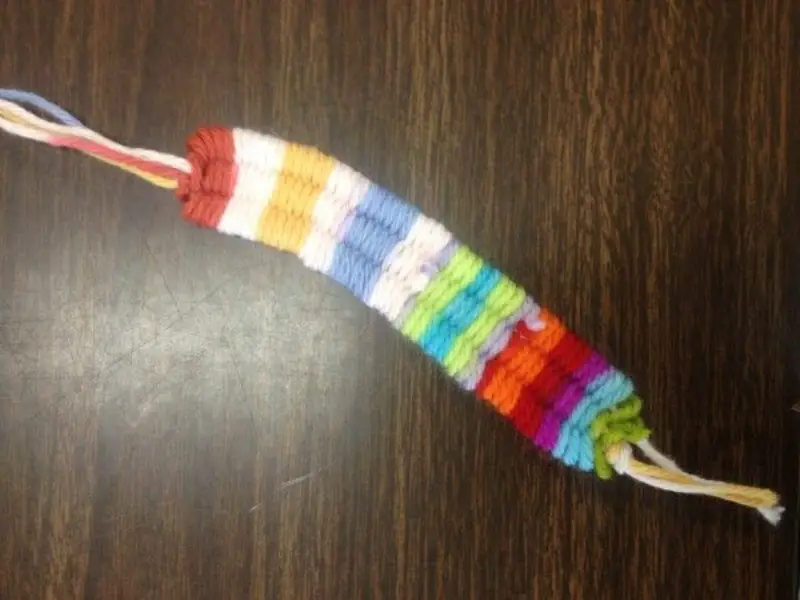
It’s important to keep the yarn tight as you weave to ensure that the bracelet is sturdy and doesn’t come apart. You can choose to use one colour of yarn for the whole bracelet, or you can use a yarn with ombre colours as you go for a more colourful look.
To finish your straw bracelet, continue weaving until it reaches the desired length. Simply repeat the process of interweaving the yarn through the straws, ensuring to tighten the yarn after each wrap. Continue the weaving process until your bracelet is of your preferred length.
Maintaining consistent yarn tension is crucial when weaving to ensure a uniform bracelet width. You can periodically assess the width by comparing it to a ruler or similar measuring tool.
The Final Step
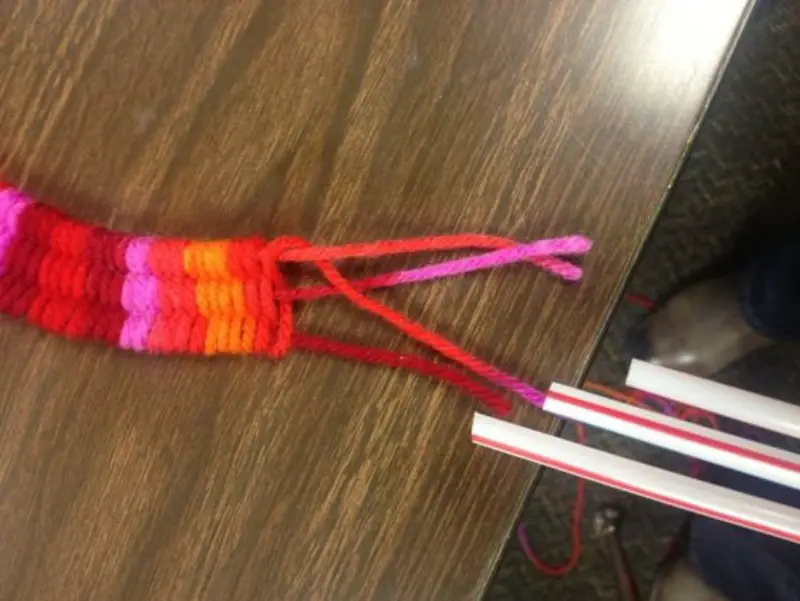
To weave the soda straw bracelet to the desired length, the final step is to finish it by securely tying a knot at the end of the yarn and cutting off any excess yarn with scissors, leaving a one-inch tail. Double-knotting is recommended for added security.
Carefully remove the bracelet from the straws, ensuring the weaving remains intact. Adjust the bracelet to ensure an even and comfortable fit on your wrist. If necessary, make any modifications before trimming the excess yarn.
After ensuring the perfect fit, snip off the excess yarn, leaving a minimal tail of approximately 0.5 inches. You can opt to tie the tail in a knot to complete the bracelet or use a lighter to seal it firmly.
And there you have it – a completed soda straw bracelet that you can wear or give as a gift!
Watch the video below to learn how to weave using soda straws!
It’s fun. It’s free. It’s a craft. It’s recycling. It’s art. It’s a way of learning.
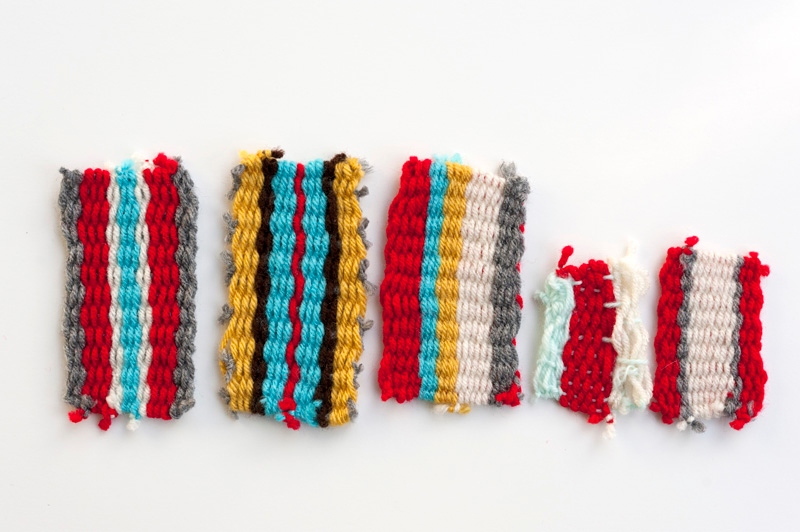
Creative Variations of Soda Straw Bracelets
It is fun to weave soda straw bracelets and is a budget-friendly craft that allows endless creativity. While the basic technique remains the same, there are many ways to make your bracelets stand out. From experimenting with new weaving patterns to incorporating different materials, you can turn a simple soda straw bracelet into a stylish and unique accessory. Here are some creative variations to try.
Experiment with Different Weaving Patterns
The standard over-and-under weaving method creates a classic look, but you can take your soda straw bracelet to the next level with different patterns. Try the following:
- Chevron Weave – This pattern forms a V-shape by alternating yarn colors as you weave.
- Diagonal Weave – Instead of weaving straight across, shift the yarn slightly with each pass to create diagonal lines.
- Double Weave – Use two strands of yarn at once to create a thicker and more intricate bracelet.
Switching up the weaving pattern is a simple way to give your bracelet a completely new look.
Mix and Match Colors
One of the easiest ways to add personality to your bracelet is by using multiple colors. Instead of sticking to one shade, experiment with different combinations. Here are some ideas:
- Ombre Effect – Start with a dark shade and gradually transition to a lighter shade of the same color.
- Rainbow Pattern – Use bright, contrasting colors to create a playful rainbow effect.
- Themed Color Schemes – Choose colors that represent a favorite sports team, school, or holiday.
Changing colors as you weave can make your bracelet more eye-catching and meaningful.
Add Beads and Charms
Incorporate beads and charms into your soda straw bracelet for a more decorative touch. Simply thread small beads onto the yarn before weaving, spacing them evenly throughout the bracelet. You can also attach small charms at the ends for extra flair.
- Letter Beads – Spell out a name or a short word for a personalized touch.
- Glow-in-the-Dark Beads – Great for nighttime accessories.
- Metal Charms – Add small pendants to give your bracelet a stylish finish.
Beads and charms can turn a simple bracelet into a fashionable accessory or even a meaningful gift.
Use Alternative Materials
While yarn is the most common material for weaving soda straw bracelets, you can experiment with other materials for different textures and styles.
- Ribbon – A satin ribbon gives the bracelet a smooth and elegant look.
- Fabric Strips – Cut thin strips from old T-shirts for a soft and eco-friendly alternative.
- Thin Leather Cord – For a more rustic and durable bracelet.
Trying different materials can make your bracelet unique and help you find the perfect style.
Create Themed Bracelets
Themed bracelets are a great way to celebrate holidays, support a cause, or simply express your personality. Here are some fun ideas:
- Holiday Bracelets – Red and green for Christmas, orange and black for Halloween, or pastels for Easter.
- Friendship Bracelets – Create matching designs for you and your best friends.
- Support Bracelets – Use colors that represent a charity or cause, such as pink for breast cancer awareness.
Themed bracelets can make your craft more meaningful and even turn into thoughtful gifts for others.
Weaving soda straw bracelets is a fun and relaxing activity, but with a few creative variations, you can make them even more special. By playing with different weaving patterns, colors, materials, and embellishments, you can create a wide variety of bracelets that match your personal style. Try out these ideas and see how many unique designs you can come up with!
Custom Ideas When You Weave Soda Straw Bracelets
Weaving soda straw bracelets is a fun and simple craft, but adding your personal touch makes them even more special. Whether you’re making them for yourself or as gifts, small customizations can turn a basic bracelet into a unique and stylish accessory. From decorative elements to creative materials, there are many ways to make your weave soda straw bracelets stand out.
Incorporate Unique Color Combinations
Color is one of the easiest ways to personalize your weave soda straw bracelets. Instead of using a single shade, mix different hues to create eye-catching patterns. You can go for a bold contrast, such as black and neon colors, or try a pastel gradient for a softer look. Seasonal themes also work well—think red and green for Christmas or orange and purple for Halloween. A rainbow pattern is another fun way to brighten up your bracelet collection.
Add Beads and Charms
For extra flair, weave beads or charms into your soda straw bracelet as you go. Beads can be threaded onto the yarn before weaving, adding sparkle or texture to the design. Letter beads allow you to spell out names or short words, making the bracelet more personal. Charms, such as tiny metal pendants or wooden cutouts, can be attached at the ends to create a stylish finish. If you want something playful, glow-in-the-dark or metallic beads can give your bracelet a fun twist.
Use Different Materials for Weaving
Yarn is a classic choice for weaving soda straw bracelets, but experimenting with other materials can create a completely different look. Thin ribbons add a sleek and elegant touch, while embroidery floss gives the bracelet a fine, detailed weave. Try using leather cords or fabric strips if you want a more rustic or bohemian feel. Mixing different textures, like pairing satin ribbon with metallic thread, can make your bracelet stand out even more.
Experiment with Unique Weaving Techniques
The basic over-and-under weaving method works well, but there are many ways to get creative with your technique. Try a diagonal weave for a slanted effect or a chevron pattern to create a zigzag look. A multi-strand weave can make the bracelet thicker and more intricate. For an advanced touch, experiment with alternating colors every few rows to create a striped or checkered effect. Small adjustments in weaving can turn a simple bracelet into a detailed and artistic piece.
Attach Decorative Endings
The way you finish your weave soda straw bracelets can make a big difference in their overall look. Instead of just tying a knot, consider adding decorative closures. Clasps, buttons, or snaps can make the bracelet easier to wear and remove. If you prefer a more natural finish, simply braid the ends and secure them with a bead. Tassels made from leftover yarn also create a playful and stylish touch.
Make Every Bracelet Unique
Customizing your weave soda straw bracelets allows you to express your creativity and style. Whether you add beads, play with colors, or experiment with weaving techniques, there’s no limit to how unique your bracelets can be. Try different customizations and discover new ways to make each piece a one-of-a-kind accessory. Weave soda
Final Thoughts
For an enjoyable and effortless craft activity to complete with your child, weaving friendship bracelets is a superb choice. Regardless of whether you use soda straws, a cardboard loom, or use your fingers, crafting exclusive and vivid bracelets that you can wear and distribute amongst your acquaintances is certain to be a pleasurable experience. Therefore, get some yarn and start weaving!
Is weaving a soda straw bracelet fun enough for you? Try checking out making your own beautiful safety pin bracelets for more bracelet crafts!


