Last Updated on November 5, 2024 by Team Ideas24
In China, in the middle period of the Tang dynasty, people developed an enthusiasm for rocks. The trend gradually spread to Japan and Korea and has continued into the modern age. In fact, in these countries, rocks mounted on wooden stands have become prestigious objects of contemplation.
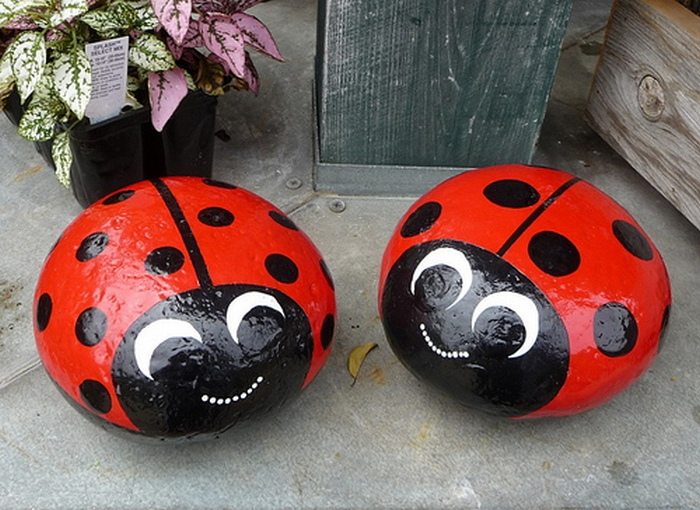
While you may not share the enthusiasm, you can give life to the small rocks sitting all over your garden by turning them into decorative ladybugs!
Very few insects are beloved. Many people hate spiders. Even more, loathe roaches. Ladybugs, however, are an exception. They are practically welcome in people’s homes and gardens! And these ladybugs can also serve as cute paperweights!

Contents [show]
Materials needed to create Ladybug Rocks
You’ll need the following tools and materials to create some ladybug rocks.
- Smooth small light-colored rocks, of different sizes
- Acrylic paints (red, black, orange, brown, white)
- Small paint brushes
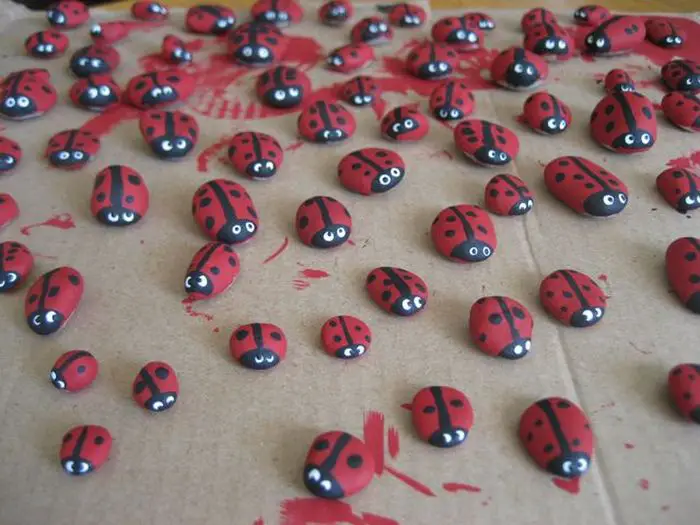
How to create these awesome ladybug rocks?
1. Make the outline of the ladybug’s body as a guide for the children while coloring.

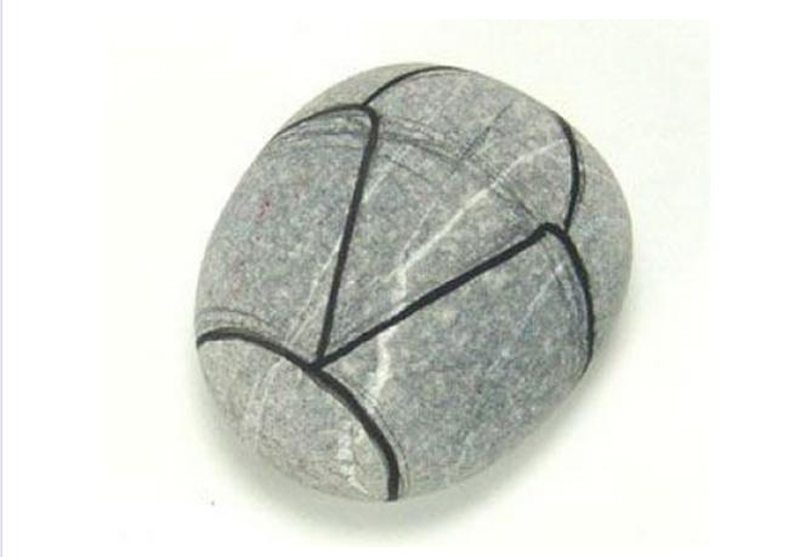
2. Pass the rocks to your kids and guide them in what color to use in each part. These rocks would be just like their coloring books.
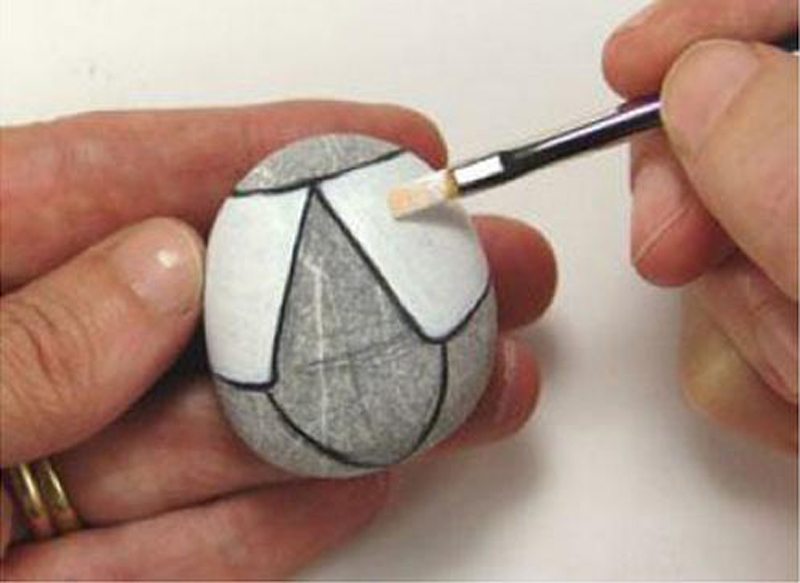
3. You can add the finer details so that it would look more realistic.
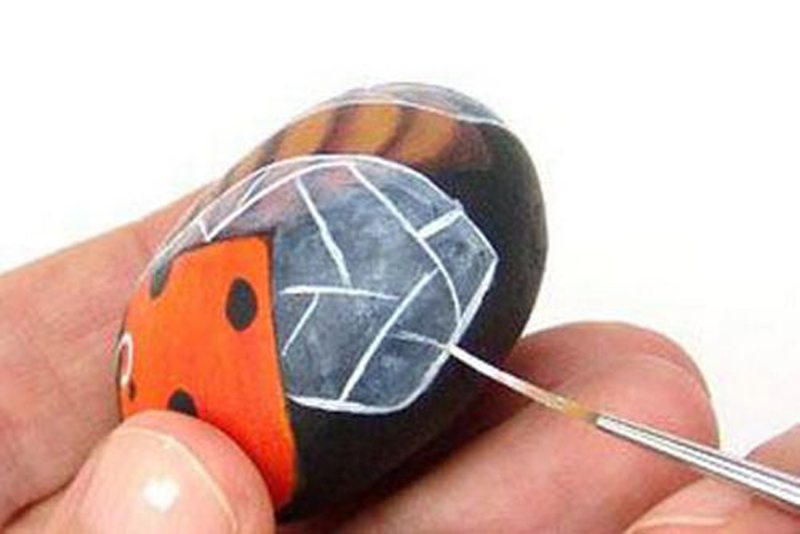
Pretty easy!
Click on any image to start the lightbox display. Use your Esc key to close the lightbox. You can also view the images as a slideshow if you prefer.
Creative Uses for Ladybug Rocks
Ladybug rocks bring a touch of charm and color to any space. These hand-painted creations are not just fun crafts but also versatile additions to gardens, homes, and more. Whether used for decoration or practical purposes, ladybug rocks are sure to capture attention.
Here are some creative ways to use ladybug rocks in your life.
Enhancing Garden Décor
One of the most popular uses for ladybug rocks is to add character to gardens. Place these bright, cheerful rocks around flower beds, garden paths, or even in plant pots. The vibrant red and black patterns stand out among greenery, making them a delightful focal point. You can create a whimsical, natural theme in your outdoor space by scattering ladybug rocks in strategic spots. They can also help visually mark different sections of your garden, serving as cute yet functional markers.
Decorative Accents for Indoor Spaces
Ladybug rocks aren’t limited to outdoor use. They can make charming decorations for indoor spaces as well. Use them as paperweights on your desk, cheerful accents on shelves, or as part of a centerpiece in your living room. Ladybug rocks bring a playful yet elegant touch to home interiors. You can even add them to decorative bowls filled with other painted rocks or natural elements like pebbles and dried flowers for a rustic, nature-inspired look.
Gifts and Party Favors
Handmade gifts hold special meaning, and ladybug rocks are no exception. Consider painting ladybug rocks as personalized gifts for friends and family. They make thoughtful tokens for nature lovers or anyone who appreciates unique crafts. Additionally, ladybug rocks can be used as party favors for garden-themed birthday parties, baby showers, or even as part of wedding décor. Add names or special messages to the underside of each rock for a personal touch that guests can take home as a keepsake.
DIY Projects and Crafts
If you love creative projects, ladybug rocks can be used in a variety of DIY crafts. Combine them with other painted rock animals to create a fun rock garden for your patio or play area. Use hot glue to attach tiny accessories like fabric wings or pipe cleaner legs to the rocks for a 3D effect. You can also turn ladybug rocks into fridge magnets by attaching magnetic strips to the back. This makes for a charming and functional way to brighten up your refrigerator.
Educational Tools for Children
Ladybug rocks are an excellent tool for teaching young children about nature and creativity. Use them to help teach counting, colors, and even storytelling. Create a set of ladybugs with numbers painted on them and use them for fun math games. This hands-on approach to learning makes educational activities engaging and enjoyable for kids. The tactile nature of the rocks can help reinforce concepts better than traditional teaching tools. For craft time, children can paint their own ladybug, sparking their creativity while developing fine motor skills.
Spreading Positivity in the Community
Another heartwarming use for ladybug rocks is as part of a community-building project. Many communities have embraced the trend of painting rocks and leaving them in public places for others to find. By placing painted ladybugs in parks, walking trails, or community gardens, you can spread joy and surprise to those who discover them. Add a small note or uplifting message to the underside of the rock to create a moment of connection and positivity. This simple act of sharing can brighten someone’s day and inspire others to do the same.
Seasonal and Themed Decorations
Ladybug rocks can be adapted for various seasonal and holiday themes. For example, during spring, they can be part of an Easter egg hunt or arranged alongside other spring-themed decorations. In the summer, create a garden display that incorporates ladybugs with sunflowers and bees for a vibrant, nature-inspired setup. Even during fall, painting ladybugs with warm tones or adding a few autumn leaves around them can create a unique seasonal décor piece. Adapt your designs to suit different holidays, making ladybugs a versatile decoration for any time of the year.
Stress Relief and Mindfulness Practices
Painting ladybug rocks isn’t just for decoration—it can also be a calming activity that promotes mindfulness. The process of carefully painting and crafting these rocks helps relieve stress and allows you to focus on the moment. Once completed, your decorative rocks can be used as part of meditation or yoga spaces, serving as a reminder of the peacefulness of nature. Their cheerful appearance can also act as a mood booster, helping create a positive and relaxing atmosphere.
Ladybug rocks are more than just cute crafts; they are versatile decorations that can be used in countless ways. From enhancing garden aesthetics to spreading joy in your community, ladybug offer endless possibilities for creativity and connection. Whether you’re painting them for your home or sharing them with others, these delightful creations bring color, warmth, and charm to every setting they grace.
Advanced Techniques for Painting Realistic Ladybug Rocks
Painting a realistic ladybug takes skill, patience, and the right techniques. While basic painting methods are perfect for beginners, using more advanced methods helps bring depth and lifelike quality to your work.
Here are some expert tips and techniques for painting ladybug rocks that look stunningly real.
Choosing the Right Rocks
The foundation of any great painted rock project starts with choosing the right rock. For realistic ladybug rocks, look for smooth, oval-shaped stones that mimic the body shape of a ladybug. Ensure the surface is clean and free of debris before painting. Opt for rocks with minimal cracks or bumps, as an even surface allows for more precise detailing.
Using High-Quality Acrylic Paints
For lifelike results, invest in high-quality acrylic paints. These paints provide vibrant colors, smooth application, and lasting durability. Choose shades of red, black, and white that can create a realistic appearance. Using acrylic paint with a satin or gloss finish can mimic the natural shine found on ladybugs.
Creating a Smooth Base Layer
Start with a base coat of primer or white acrylic paint to ensure even coverage and better color adhesion. Once the primer is dry, apply the base red coat. Use multiple thin layers rather than one thick layer to achieve a smooth and even base. This helps prevent brush strokes from being visible and allows for a more polished finish.
Adding Shadows and Highlights for Depth
To make your ladybug rock more lifelike, incorporate shading and highlighting techniques. Use a slightly darker red or maroon to create shadow areas, typically at the base of the wings or where the wings meet the body. Apply a lighter shade or a touch of white on areas that would naturally catch the light, such as the center of the wings. This technique adds dimension and creates the illusion of a curved body.
Detailing the Ladybug’s Head and Eyes
For realistic ladybug , attention to detail is crucial. Use black paint to outline and fill in the head area, ensuring that the shape is symmetrical. Add tiny dots of white on the head to represent light reflections for a more three-dimensional effect. When painting the eyes, use a fine-tip brush to create clear, crisp outlines and subtle highlights within the eye to give a lifelike sparkle.
Painting Precise Spots
One of the most recognizable features of a ladybug is its black spots. To create clean and symmetrical spots, use a small, round brush or a fine-point paint pen. Place the spots strategically, ensuring they are balanced on both sides of the body. The placement of the spots can vary depending on the type of ladybug you want to replicate, so refer to images for accuracy. Use a dotting tool or the end of a paintbrush for consistent circular spots.
Blending Techniques for Realism
Achieve a seamless look by blending the colors gently. Use a dry brush technique to blend shadows and highlights into the base coat. This method involves applying paint to a dry brush and lightly sweeping it over the area for a smooth transition. For a more refined blend, dampen the brush slightly to soften the edges between different colors.
Sealing for a Glossy Finish
To replicate the natural glossy shell of a real ladybug, use a clear gloss sealer. A high-quality sealer not only adds shine but also protects your painted rock from fading and chipping. Apply a few thin coats, allowing each layer to dry before adding the next. For added realism, choose a UV-resistant sealer to keep the colors vibrant over time.
Adding Final Touches
To complete the look of your realistic ladybug, pay attention to the small details. Use a fine-tipped brush to outline the edges of the wings and add thin lines to simulate the wing separation. This subtle detail makes a significant difference in making your ladybug appear lifelike. Don’t forget to add tiny legs or antennae using a thin brush or paint pen for a finishing touch.
Painting realistic ladybugs involves more than just basic painting techniques. By selecting the right materials, mastering blending, adding highlights and shadows, and focusing on intricate details, you can create ladybug that are truly eye-catching. These advanced techniques elevate your craft, resulting in a professional and polished appearance that will impress anyone who sees your work.
Conclusion
Creating ladybug rocks is a delightful and versatile craft that can brighten any space. With a mix of basic and advanced painting techniques, you can produce charming, lifelike ladybugs that add character to your home or garden. Whether you make them for decoration, gifts, or community projects, these painted rocks bring joy and a touch of nature wherever they go.
If you liked this project, you might also like to view DIY Golf ball ladybugs…


