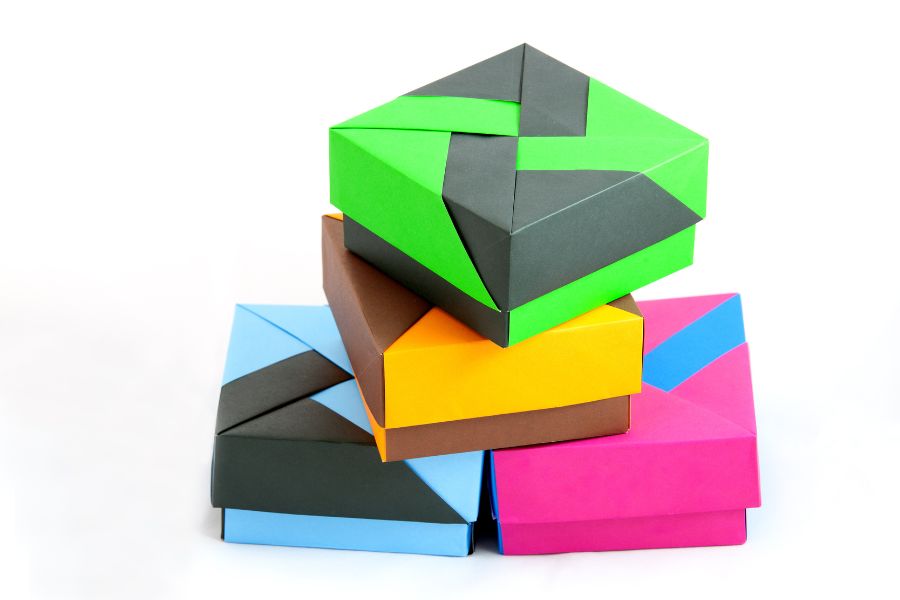
Practical and enjoyable, origami boxes combine Japanese paper-folding methods. The “masu” boxes have been used for ages to hold little goods and decorate. Fold one sheet of square paper to make a strong box for keeping trinkets, gifting, or decorating. Here are step-by-step directions for making a basic origami box, advice for crisp folds, and ideas for adding a lid or decorations.
Contents [show]
Folding an Origami Box
Here’s a complete guide on how to make an origami box, also known as a “masu box.” This simple, traditional origami project is ideal for beginners and can be used for storage, decoration, or gift-giving.
Materials and Tools
- 1 square sheet of paper (origami paper is ideal, but any square paper works)
- Optional tools: ruler or bone folder (for sharper creases)
Step-by-Step Instructions for Folding an Origami Box
- Start with a Square Paper
- Place the paper on a flat surface, with the color side facing down if it’s double-sided.
- Base Folds
- Fold the paper in half vertically and unfold. Then, fold it in half horizontally and unfold. This will leave you with two intersecting creases forming a cross.
- Fold Corners to Center
- Take each corner of the square and fold it toward the center, meeting at the intersection of the creases. This forms a smaller square shape.
- Create Side Folds
- With the folded corners still intact, fold one edge of the square toward the center, aligning it with the central crease, and then unfold. Repeat this with the opposite edge to form creases along the sides. Then, rotate the paper 90 degrees and repeat these steps to create creases along all four edges.
- Form the Walls of the Box
- Unfold two opposite corners, revealing two triangular flaps. Pull up the sides where the creases are, forming the two walls of your box.
- Secure the Corners
- Fold in the remaining triangles on each side to form the other two walls of the box. Adjust and sharpen the creases to ensure the box holds its shape.
- Optional: Create a Lid
- To make a lid, follow the same steps with a slightly larger square of paper (about 1/4 inch larger on each side) to fit over the box securely.

Adding a Lid (Optional)
Start with a Larger Square Paper
- Choose a paper that’s slightly larger than the box base (about 1/4 inch larger on each side).
Fold the Paper in Half
- Fold it vertically, then unfold. Fold it horizontally, then unfold. This should give you creases intersecting in the center.
Bring Corners to the Center
- Fold each corner to meet at the center, creating a smaller square shape.
Fold Edges to Center
- Fold one edge toward the center and unfold. Do the same with the opposite edge. Rotate the paper 90 degrees and repeat for the other two edges.
Unfold Two Opposite Corners
- Lift two opposite flaps up and create the initial side walls of your lid.
Form Remaining Walls
- Fold in the last two corners and adjust to create the remaining two walls of the lid. Sharpen all creases to secure the shape.
Your origami box is now complete! Take time to press down on all creases to reinforce its structure, especially if you plan to use it for storage. Following these simple steps will result in a sturdy, square box perfect for various uses.

Creative Variations and Uses
Creating an origami box offers more than just a straightforward craft project. It opens up creative possibilities for customization and practical use. From decorative accents to functional storage, you can take your origami skills to the next level with these variations and uses.
Use Decorative Paper for a Personalized Touch
Decorative paper brings a unique flair to your origami masu. Using printed or textured origami paper, such as floral designs, abstract patterns, or metallic finishes, allows you to customize the appearance based on the occasion. For example, holiday-themed paper works well for gift boxes, while floral patterns are perfect for springtime decor. When choosing decorative paper, ensure it’s lightweight and square to make folding easier.
Layer Multiple Colors for Added Depth
Layering different colors of paper is a great way to add visual interest and dimension to your origami box. Start by making a smaller box with one color, then make a slightly larger box in a contrasting color to fit over the first. This creates a beautiful layered effect when the boxes are nested together, enhancing their aesthetic appeal. You could also experiment with dual-tone paper or different shades within the same color family to achieve a subtle gradient.
Add Embellishments for Extra Detail
Embellishments such as stickers, ribbons, or tiny charms can transform your origami masu into a charming keepsake. For a delicate touch, try gluing a small bow or attaching beads around the edges. Washi tape in coordinating colors is another simple option to add detail without affecting the structural integrity of the box. Just remember that embellishments should be lightweight to keep the box functional.
Craft a Lid with a Window
To give your box a sophisticated look, try making a lid with a window. Cut a small square or circular section out of the lid and cover it with clear plastic or translucent paper. This allows a sneak peek at the box’s contents and makes it perfect for presenting small gifts or treats. Be careful to cut the window symmetrically to maintain a professional look.

Create an Origami Box Set
Making a set of boxes in varying sizes provides a practical and attractive storage solution. Begin with a small box and incrementally increase the size of each subsequent box, creating a nesting effect. This approach works particularly well for organizing smaller items like jewelry, office supplies, or crafting materials. With matching or complementary paper patterns, the boxes look polished and cohesive when displayed together.
Use Origami Boxes as Gift Packaging
An origami box adds a thoughtful, personal touch to gift packaging. For small items like jewelry, candy, or trinkets, a handmade box adds elegance and reflects the time and care you put into the gift. For birthdays or holidays, decorate the lid with the recipient’s name, a message, or festive embellishments like a ribbon bow. Origami masu boxes are also excellent for party favors, allowing guests to take home a unique memento.
Create a Functional Storage Solution
Origami masu boxes aren’t just for decoration, they’re useful for organizing small items around the home or office. Smaller boxes can hold paper clips, pins, and other office supplies, while larger boxes are ideal for organizing bathroom items like cotton balls or jewelry. Arrange several boxes on a tray or inside a drawer to create a custom organizer. Using color-coordinated paper also helps keep spaces visually organized.
Design a Decorative Display for Events
Origami masu boxes make beautiful centerpieces or table decor for events. For a wedding, you can use them as elegant place card holders by placing a card in each box. At baby showers or birthday parties, brightly colored origami masu boxes can hold small candies or favors for guests. Choose colors and patterns that match the event theme to create a cohesive look that adds a touch of charm to the table setting.
Experiment with Different Shapes and Sizes
While the traditional origami masu is square, you can experiment with other shapes by adjusting folding techniques. Rectangular boxes, triangle boxes, or even hexagonal boxes add variety and serve different purposes. You can also vary the size, making miniature boxes for decor or oversized boxes for gift presentations. The versatility of origami makes it easy to tailor the box to your specific needs.
Use Origami Boxes as Seasonal Decorations
With festive paper or themed colors, origami masu boxes can become seasonal decorations for holidays like Christmas, Easter, or Halloween. Christmas-themed boxes, for instance, can be used to hold small treats and hung on a tree, while Easter-themed boxes make great baskets for small eggs or candies. Change up the colors and embellishments to suit each season or holiday, transforming your origami boxes into versatile decor pieces year-round.

Create a Jewelry or Keepsake Box
By using high-quality, thicker origami paper or cardstock, you can create a sturdy box to hold keepsakes, jewelry, or mementos. These boxes make ideal storage for delicate items while adding a decorative element to your space. A lid with a window can also make it easier to identify the contents of each box if you use multiple boxes for organization.
Try Origami Boxes as Drawer Organizers
In smaller spaces, origami boxes offer a convenient way to create drawer dividers. Make multiple boxes in a variety of sizes to fit neatly inside drawers and separate small items like socks, belts, or accessories. This keeps drawers organized and maximizes the available space while adding a touch of color. Choose paper that complements your decor for a visually appealing setup.
Origami masu boxes are as practical as they are creative, providing a versatile, DIY solution for decor, storage, and gifts. Experiment with different styles, materials, and techniques to make these boxes uniquely yours, transforming a simple square of paper into something both beautiful and functional.

Troubleshooting and Tips
Folding an origami box can sometimes present small challenges, especially if the paper doesn’t sit quite right or the folds seem uneven. Here are common issues and tips to help ensure your origami box looks polished and functions well.
Uneven Folds or Lopsided Box
If your box ends up uneven, it’s often due to inaccuracies in initial folds. Take extra time with the first few folds to make sure they align perfectly with the edges and center. Using a ruler or bone folder to press each crease firmly can help keep lines straight and prevent slipping, especially when working with thinner paper.
Loose Flaps
Loose flaps can make the box seem less secure, especially around the sides. To avoid this, focus on making your folds as sharp as possible by running a fingernail or flat tool along each crease. If necessary, a tiny piece of double-sided tape can keep flaps secure without affecting the look of the box. Alternatively, try folding the sides inward one additional time for added structure.

Box Doesn’t Hold Its Shape
When the walls of the box collapse or refuse to stay upright, the paper’s thickness might be the culprit. The thicker paper provides more stability, but if your box is made with thinner origami paper, reinforcing the base with a small square of cardstock can make it sturdier. Just cut the cardstock slightly smaller than the box base and insert it to keep everything in place.
Paper Tears During Folding
Tears can happen if the paper is too thin or if you’re pressing too hard on each fold. If you notice the paper beginning to tear, switch to a heavier weight of origami paper or handle the folds more gently. If you’re working with textured or specialty paper, be extra cautious with sharp creases, as this paper tends to be more delicate.
Difficulty Fitting the Lid
If the lid doesn’t fit correctly, either being too tight or too loose, double-check the size difference between the box and lid papers. The lid should be made with paper about 1/4 inch larger than the base for a snug fit. If the lid is too tight, try gently stretching out each side to create a little more room. For a loose lid, fold the sides of the box slightly inward to adjust.
Tips for Crisp and Clean Folds
A successful origami box depends on precise, crisp folds. Use a bone folder or ruler to press down on each crease for a sharp, professional look. If you’re aiming for a perfectly square box, consider measuring the paper and marking fold lines lightly in pencil to guide your folds, erasing them after completion.
These troubleshooting tips will help you navigate common issues when making an origami box, ensuring each piece looks neat and holds its shape well. Taking your time with folds and using the right materials will also improve the outcome, giving your origami box both aesthetic appeal and durability.
Conclusion
With just a single sheet of paper, an origami box transforms into both a functional item and a work of art or the Japanese masu box. By experimenting with materials, decorations, and sizes, you can customize each box to suit any occasion or purpose. Mastering these techniques allows you to create beautiful, personalized storage, decor, or gifts with ease.
We have more fun projects with paper. Check out our paper craft ideas!


