
Last Updated on December 4, 2024 by Team Ideas24
No matter what your holiday decorating style is, there are plenty of ways to make your home’s Christmas tree unique and special. You don’t have to go overboard or spend a lot of money, either.
Pine cones are cones found of any species of pine trees (Picea and Abies). They are often an important source of food for animals. Pine cones are green, brown, or gray, often with scales or spines; some have colored husks, while others are naked. Pine cones have 2 pegs, which are connected to the seed.
Pine cones are practically everywhere this time of the year, but most of us usually just ignore them. Now with these adorable pine cone Christmas trees, we’re quite sure you will start gathering all the pine cones that you can get your hands on for this holiday decor project!

Contents [show]
Getting started with your pine cone Christmas tree…
The pine cone christmas tree is a great way to decorate your home for christmas without spending a fortune. There are many benefits to this tree including the fact that you can use it year after year, pine cones are very cheap, pine cones are real and recyclable, pine cones add a rustic or country look and pine cones are eco friendly.
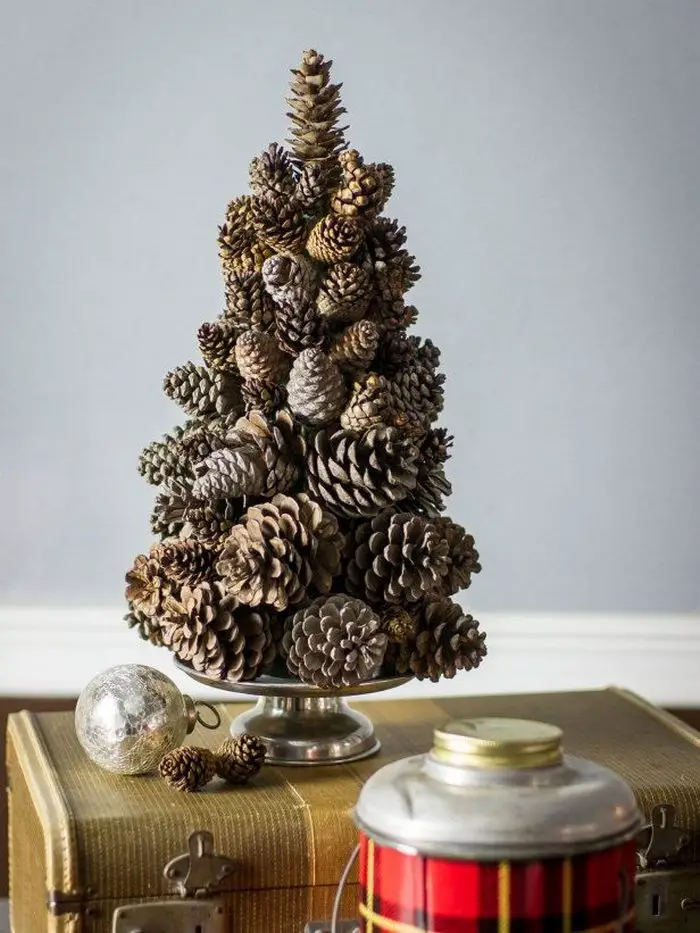
To make a mini christmas tree out of pine cones you need several pine cones, different size and color, styrofoam, glue, knife and paint. First take several pine cones (preferably different size and color) and separate the needles from the cones. Then glue the cones to the styrofoam in any desired pattern. Then cut some stripes of different sizes from colored paper and stick them to the cones. You can use brushes to paint the cones in different colors. You can use glue to stick the cones to the table or stick them through a hole made in a piece of cardboard. You can also glue the cones to the branches of a tree or just stick on to the window.
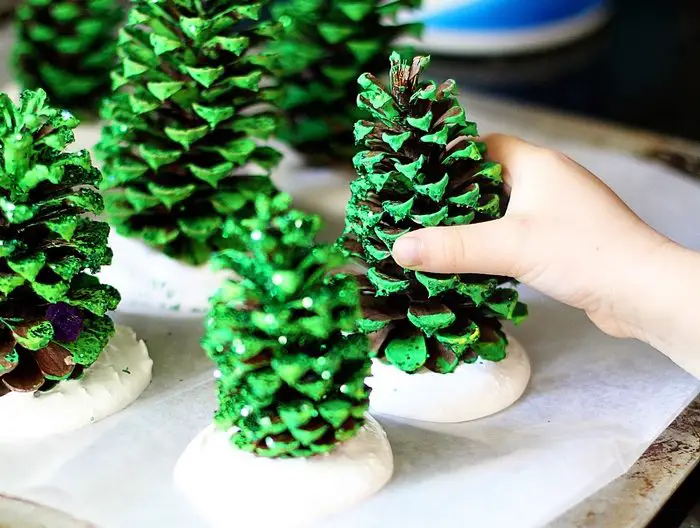
This craft project is very easy, quick and of course very cheap to make. What’s even better is that you can do this as a fun family activity if you have little kids!
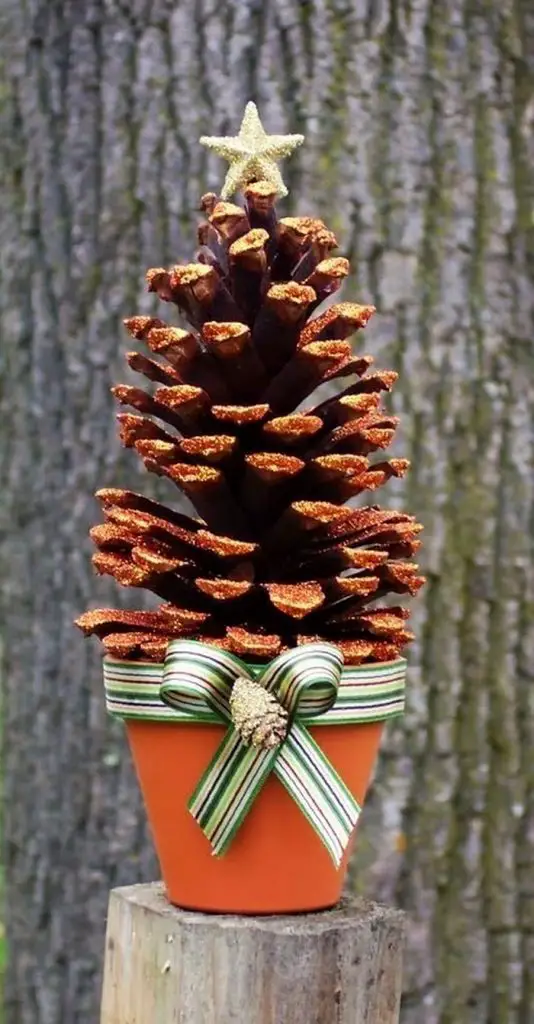
There are lots of creative designs for this project. But the tutorial we are featuring makes use of plaster of paris to serve as a ‘snow’ Christmas tree base.
Do you want to have some cute pine cone Christmas trees in your house? Be inspired to design your own by viewing our gallery below!
You can also head over to the tutorial by clicking on the link provided below the album. :)
Crafting a Pine Cone Christmas Tree
Materials
- Pine Cones
- Green and White Acrylic Paint
- Glitter
- Plaster of Paris
- Disposable Container (for plaster of paris)
- Wax Paper
- Old Necklace Beads (and other small accessories you can use as ornaments)
- Tacky Glue
Tools
- Paintbrush
Steps
Step 1: Prepare Your Work Area
Lay down wax paper on your workspace to protect it from paint and glue. This will also make cleanup easier.
Step 2: Paint the Pine Cones
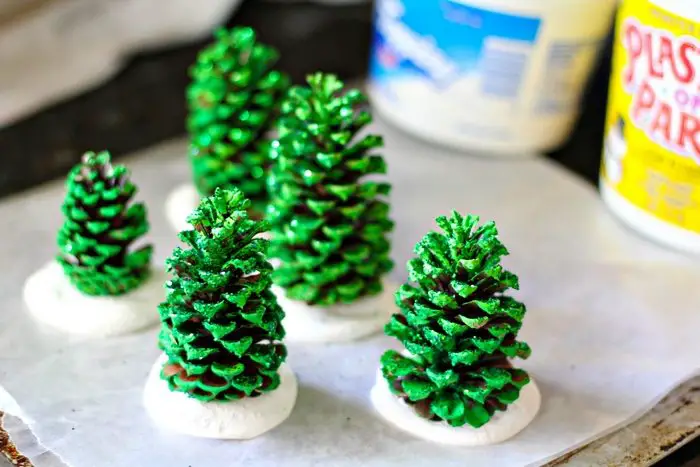
Take your pine cones and paint them with green acrylic paint using a paintbrush. Cover as much of the surface as possible. Allow the paint to dry completely. For a snowy effect, lightly dab the tips of the pine cone scales with white acrylic paint. Let the white paint dry as well.
Step 3: Add Glitter for Sparkle
While the paint is still slightly tacky, sprinkle glitter over the pine cones to add a festive sparkle. If the paint has dried, use a thin layer of tacky glue before applying the glitter. Shake off excess glitter and set the pine cones aside to dry.
Step 4: Create the Base with Plaster of Paris
Mix plaster of Paris in a disposable container according to the package instructions. Pour the mixture into another disposable container or mold that will act as the tree’s base. While the plaster is still wet, press the bottom of the largest pine cone into the center to secure it. Let the plaster dry and harden completely.
Step 5: Stack and Secure the Pine Cones
Once the base is dry, stack smaller pine cones on top of the larger one to create a tree shape. Use tacky glue to secure each layer of pine cones. Let the glue dry between layers to ensure stability.
Step 6: Decorate Your Tree
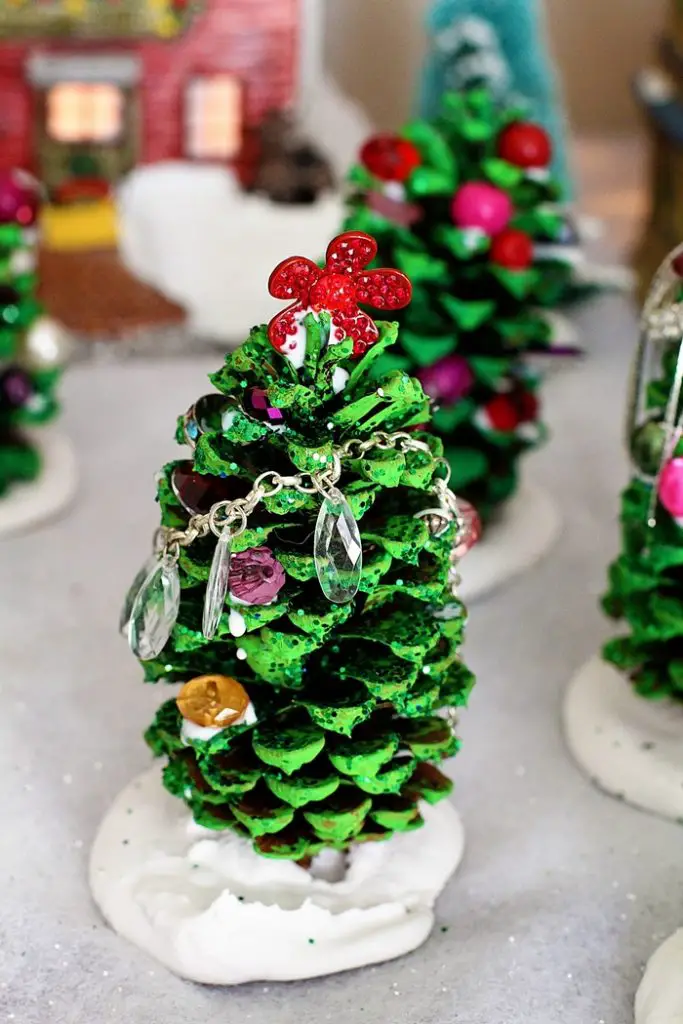
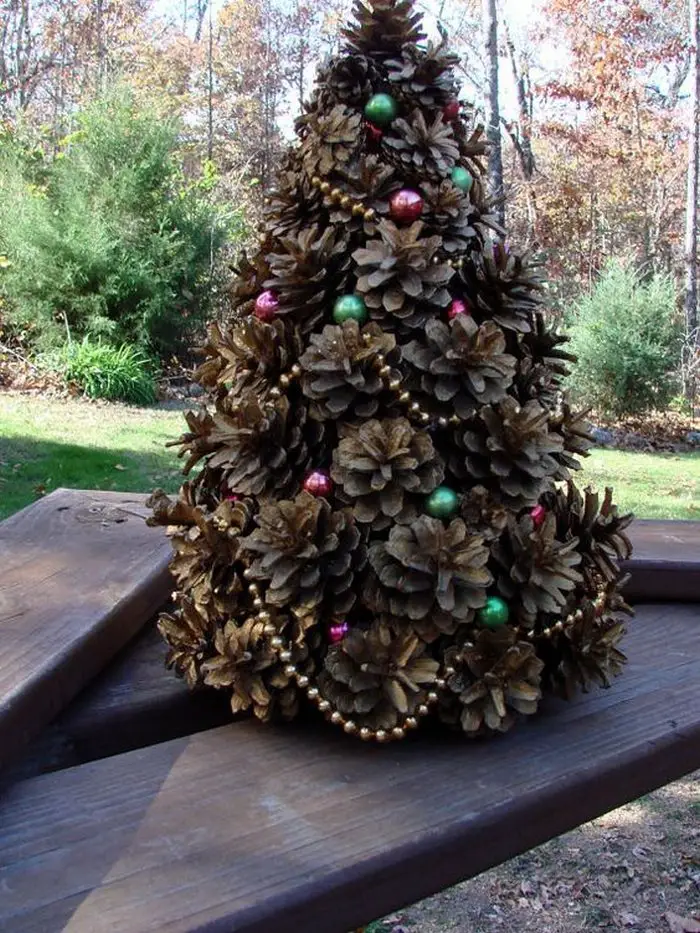
Use old necklace beads and small accessories as ornaments. Attach them to the pine cone scales using tacky glue. Arrange the beads evenly for a balanced look. Let the glue dry completely.
Step 7: Add Final Touches
If desired, lightly dust more glitter over the completed tree for extra shimmer. You can also add a small star or other topper made from beads or paper to finish the tree.
Step 8: Display Your Pine Cone Christmas Tree
Place your completed tree in a prominent spot to spread holiday cheer. The sturdy plaster base will keep it secure, making it perfect for a tabletop decoration or centerpiece.
Click on any image to start lightbox display. Use your Esc key to close the lightbox. ?

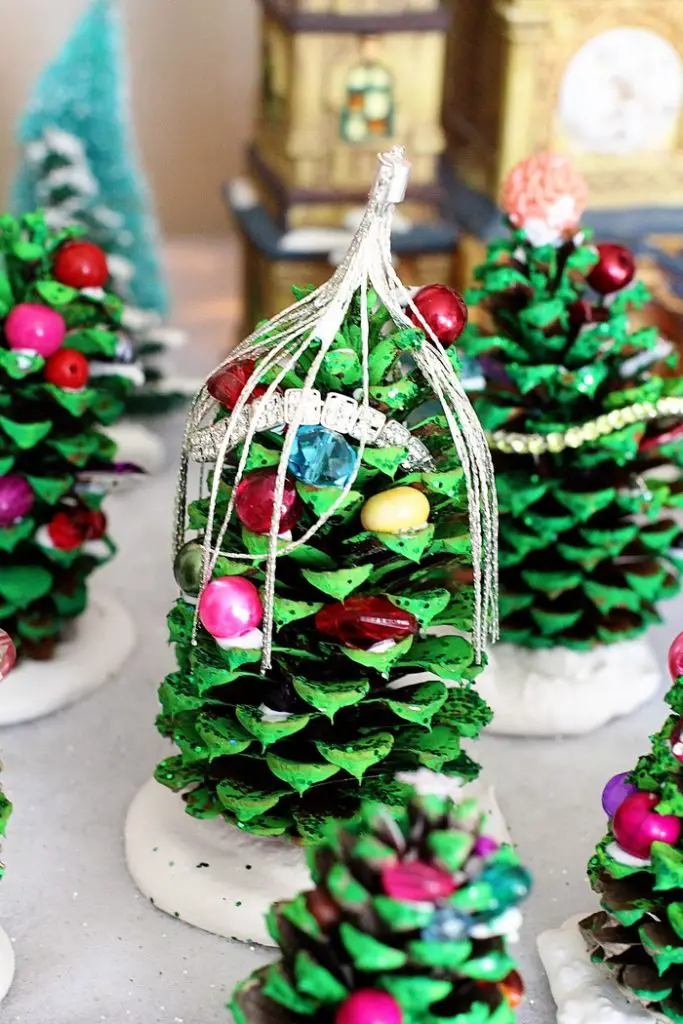
In summary, although Christmas trees are usually made from evergreen trees, you can ‘save a tree’ by using pine cones instead! They are lovely, can be highly personalised and are sustainable :)
Pine Cone Christmas Tree Finishing Touches
To give your mini pine cone Christmas tree a charming finishing touch, secure a medium-sized pine cone at the top. This not only completes the overall look but also ties the design together with a cohesive and natural flair, enhancing the rustic charm of your tree.
Enhancing the Appearance
1. Spray Painting:
Consider using a light coat of rose gold spray paint to infuse your tree with festive elegance. Spray lightly and evenly, ensuring some of the natural pine cone texture and color remain visible. This technique creates a subtle shimmer, balancing sophistication with the rustic beauty of the tree. Avoid heavy spraying to prevent overwhelming the natural charm of the pine cone.
2. Color Touch-Ups:
If your tree base includes green foam and some spots remain exposed, grab a small paintbrush and dark brown paint. Carefully cover these areas to seamlessly blend them into the overall design. This small effort can make a big difference in creating a polished, professional-looking decoration.
3. Add Glitter for Sparkle:
While the paint is still wet, lightly sprinkle glitter over the surface. Choose fine glitter in shades that complement your tree’s color palette, like gold, silver, or clear iridescent glitter. The added sparkle will catch the light, adding depth and interest to your Christmas display.
Additional Tips
- Experiment with Colors: While rose gold offers warmth and sophistication, don’t hesitate to try other colors. Silver can provide a frosty, wintry effect, while frosty white creates a snowy appearance. Choose colors that align with your holiday theme for a personalized touch.
- Incorporate Texture: Beyond glitter, you can add texture by lightly brushing the edges of the pine cone scales with metallic or pearlescent paint. This creates depth and visual interest without overpowering the natural look of the pine cones.
- Top It Off Creatively: For an extra festive flourish, add a small star, bead, or even a handmade topper to the very top pine cone. Secure it with tacky glue or a drop of hot glue for stability.
These thoughtful enhancements will elevate your DIY pine cone Christmas tree, making it a standout piece in your holiday décor. Whether placed on a mantel, as a centerpiece, or in a cozy corner, your tree will exude a warm and festive charm.
Preventing the Pine Cones From Sliding
To effectively prevent pine cones from sliding while the glue dries, follow these steps:
- Initial Setup: Begin by gluing a few rows of mini pine cones to your foam cone. This establishes a stable base.
- Inverting the Structure: Flip the foam cone upside down while securing the pine cones. This position leverages gravity, naturally helping the pine cones stay in place as the glue sets.
- Hold for Stability: Keep a firm grip on the cone, or use a supportive object to stabilize it during the drying process. This ensures that any pine cones inclined to shift will remain stationary.
- Trial and Adjustment: Recognize that some pine cones may adhere immediately, while others might need a bit more attention. Adjust as necessary to guarantee even adhesion.
By utilizing these techniques, you can create a stable and visually appealing arrangement without the hassle of pine cones shifting out of place.
Painting Technique Tips for Pine Cone Christmas Trees
To craft stunning pine cone trees that perfectly complement a Christmas village, a subtle spray painting technique can make all the difference. This method allows you to enhance the pine cones’ natural charm while adding a festive touch. Follow these steps to achieve a beautifully balanced look:
1. Choose a Metallic Spray Paint:
Select a metallic shade, like rose gold, that embodies the holiday spirit. Rose gold is an excellent choice for its ability to introduce warmth and shimmer without overpowering the pine cones’ rustic appeal. If rose gold doesn’t align with your theme, consider other festive options such as silver, bronze, or a soft gold.
2. Prepare Your Workspace:
Lay down wax paper, newspaper, or an old sheet to protect your workspace. Ensure you have adequate ventilation, as spray paint fumes can be strong. Arrange your pine cones so they’re standing upright or lying flat, depending on the coverage you want.
3. Apply a Light Coat:
Hold the spray can about 8–12 inches away from the pine cones and apply a very thin, even layer of paint. Move the can in smooth, sweeping motions to avoid buildup in any single spot. This technique ensures that the paint accentuates the natural texture of the pine cones rather than obscuring it.
4. Allow Drying Time Between Layers:
If you want a more prominent metallic finish, allow the first layer to dry completely before applying additional coats. Gradually build up the coverage, keeping control over how much of the pine cone’s natural color remains visible. The key is to strike a balance that highlights both the painted finish and the organic beauty of the pine cone.
5. Add Depth and Dimension:
For extra depth, lightly mist the edges of the pine cone scales with a second metallic shade, like a soft silver or frosted white. This subtle contrast creates an eye-catching effect that elevates the design.
6. Optional Glitter Accent:
Before the final coat dries, sprinkle a touch of fine glitter over the pine cone. This adds a festive sparkle that catches the light beautifully, enhancing the whimsical feel of your Christmas village.
7. Seal for Longevity (Optional):
If your pine cone trees will be displayed in a high-traffic area or used year after year, consider sealing them with a clear matte spray finish. This protects the paint and glitter while preserving the subtle shimmer.
By incorporating this method, your pine cone trees will exude elegance and blend effortlessly into the magical atmosphere of your Christmas village. Their metallic sheen and natural texture will complement miniature houses, figurines, and snow-covered landscapes, creating a cohesive and enchanting holiday display.
Conclusion
Creating a pine cone Christmas tree is a simple yet rewarding way to add a handmade touch to your holiday decor. The natural textures and festive details make it a unique centerpiece or charming addition to any Christmas display. With a little creativity and care, your pine cone tree will bring warmth and beauty to the season.
FAQ: Pine Cone Christmas Tree Craft
- How does creating DIY Christmas projects help get into the holiday spirit?
- Creating DIY Christmas projects is a fantastic way to immerse yourself in the festive spirit. Engaging in these hands-on activities allows you to express creativity while also personalizing your holiday celebrations. Here’s how it helps boost your holiday cheer:
- What are some other DIY Christmas projects that can be made quickly?
- Craft charming miniature villages, elegant plaster or gold tabletop trees, and personalized ornaments filled with colorful confetti or festive messages. Add natural beauty to your decor with a dried fruit garland featuring orange slices, cinnamon sticks, and cranberries, perfect for a rustic touch. For a whimsical centerpiece, transform mason jars into enchanting snow globes with faux snow and miniature figurines, bringing magic to your holiday display.
- What should you do if some of the foam cone is visible when leaving the pine cones in their natural color?
- If you notice any foam cone peeking through when using pine cones in their natural color, there’s a simple fix. Grab a small paintbrush and some dark brown paint. Gently apply the paint to the visible areas of the foam. This quick touch-up will blend the foam seamlessly with the pine cones, maintaining a natural look.
- Where can materials be sourced from, especially the top pine cone?
- The top pine cone can be sourced from a decorative pick, which can often be purchased affordably at craft stores like Hobby Lobby.
- What should be done with the top of the foam cone?
- Initially, leave the flat top of the foam cone empty. Once the rest of the tree is completed, finish by attaching a medium-sized pine cone on top.
- How can you prevent the pine cones from sliding while the glue dries?
- To prevent sliding, turn the foam cone upside down while gluing the pine cones in place. This helps them stay put as the glue dries.
- How should the pine cones be positioned on the foam cone?
- Attach the mini pine cones around the perimeter of the foam cone, varying their angles and occasionally placing them on their sides for added texture and visual interest.
- What size of foam cone should be used?
- For this project, use foam cones that measure 2.75 inches in diameter and 6 inches in height.
While you’re here, why not learn how to make gorgeous Christmas decorations from seashells?


