I have an adorable five-year-old niece who loves all things girly. She’s absolutely in love with tutu skirts, and she loves to dress up. She loves to play matchy-matchy, from head to foot – headbands, bags, and shoes. I realized that her closet needed organization when they were late to a family party because she couldn’t find a matching headband.
One rainy weekend, I was forced to stay at home with nothing to do. Remembering my niece’s need for a headband organizer, I fired up my laptop and searched for an easy DIY project. Lo and behold, I found a YouTube video that was very easy to follow. It’s a good thing I had leftover supplies for me to complete the project.

The finished product was not only functional, but it was also too adorable for words. Staying true to my niece’s love for all things girly, I used pink! You could easily make this for your daughter or nieces, or to whoever you think needs one. It’ll make a great present!
Contents
Crafting a Headband Organizer
Materials
- Empty oatmeal container
- Candle stick holder (optional)
- E6000 glue
- Scrapbook paper
- Mod Podge
- Decorative knob
Tools
- Scissors
- Brush (for the mod podge)
- Ruler
Instructions
1. Prepare the Oatmeal Container
Start by removing any labels from the oatmeal container. Clean the surface to ensure it’s free from dust and grease. This preparation is crucial for the smooth application of materials.
2. Measure and Cut Scrapbook Paper
Using the ruler, measure the height and circumference of the oatmeal container. Cut a piece of scrapbook paper to these dimensions. It’s essential to be precise, so the paper fits perfectly around the container.
3. Apply Mod Podge
With the brush, apply a thin, even layer of Mod Podge to the outer surface of the oatmeal container. Work quickly to prevent the Mod Podge from drying before the next step.
4. Attach the Scrapbook Paper
Carefully wrap the cut piece of scrapbook paper around the container, smoothing out any bubbles or wrinkles as you go. Ensure the edges are aligned neatly for a professional finish.
5. Seal the Paper
Apply another thin layer of Mod Podge over the scrapbook paper. This layer acts as a sealant, protecting the paper and giving the organizer a glossy finish. Allow it to dry completely.
6. Attach the Candlestick Holder (Optional)
If you’re using a candlestick holder as a base for added stability and style, apply E6000 glue to the top edge of the holder. Then, press the oatmeal container onto the candlestick holder firmly. Allow the glue to cure according to the manufacturer’s instructions, ensuring a strong bond.
7. Add a Decorative Knob
For a functional and decorative touch, add a decorative knob to the container’s lid. Apply a small amount of E6000 glue to the bottom of the knob, then press it onto the center of the lid. Allow it to dry thoroughly.
8. Final Touches
Once all components are securely attached and the glue has dried, your DIY headband organizer is ready to use. Place headbands around the container for a neat display and easy access.
Matching Accessory Sets
Matching accessory sets are about more than just aesthetic appeal; they create a sense of order and harmony. When you start with a headband organizer as your focal point, you can extend its design elements to other organizational solutions, making your space both stylish and functional. This approach beautifies your space and makes finding and storing accessories effortless.
Jewelry Holder
Craft a jewelry holder that complements your headband organizer using similar materials. For instance, if your organizer features pastel-colored scrapbook paper and a decorative knob, incorporate these elements into your jewelry holder design. A simple frame with mesh wire, adorned with the same scrapbook paper as a background, creates a cohesive look and offers a perfect place for earrings, necklaces, and bracelets.
Hair Accessory Drawer Dividers
Continue the theme inside your drawers with custom drawer dividers for other hair accessories like clips, bows, and hair ties. Use the same scrapbook paper to line the bottom of the drawer or to decorate the sides of handmade cardboard dividers. This keeps your accessories organized and ensures a consistent look and feel with your headband organizer.
Scarf Hanger
Extend the organizational theme to your scarves by creating a matching scarf hanger. Use a wooden hanger as the base and decorate it with the same theme as your headband organizer. Adding small hooks or rings covered in the chosen scrapbook paper provides a visually appealing and practical way to hang scarves, keeping them wrinkle-free and accessible.
Mirror Frame Decoration
A mirror in your dressing area isn’t just functional; it can also serve as a decorative element that ties your accessory set together. Decorate the mirror frame with the same materials or colors used in your headband organizer. This could involve wrapping the frame in scrapbook paper or painting it in a complementary color, enhancing the visual connection between all elements of your accessory set.
Creating matching accessory sets around your headband organizer is not just about achieving a certain look; it’s about infusing your space with personality, harmony, and order. Whether it’s through a jewelry holder, drawer dividers, a scarf hanger, or a decorated mirror, each piece contributes to a cohesive and charming environment. With each addition, you enhance the functionality of your space while keeping your personal style at the forefront.
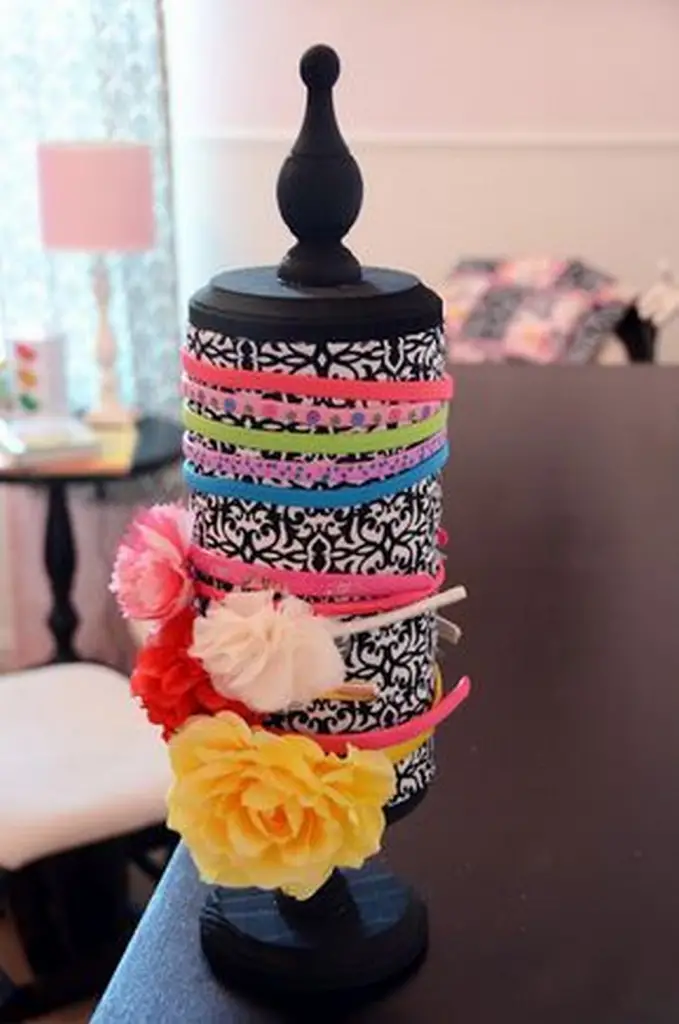
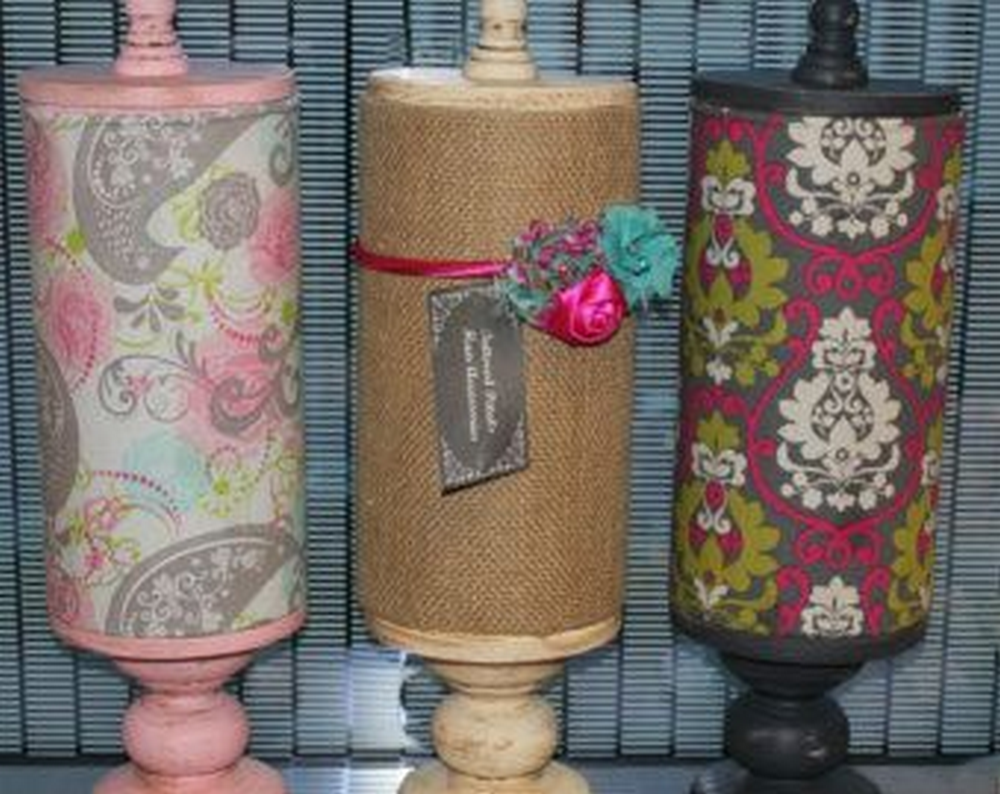
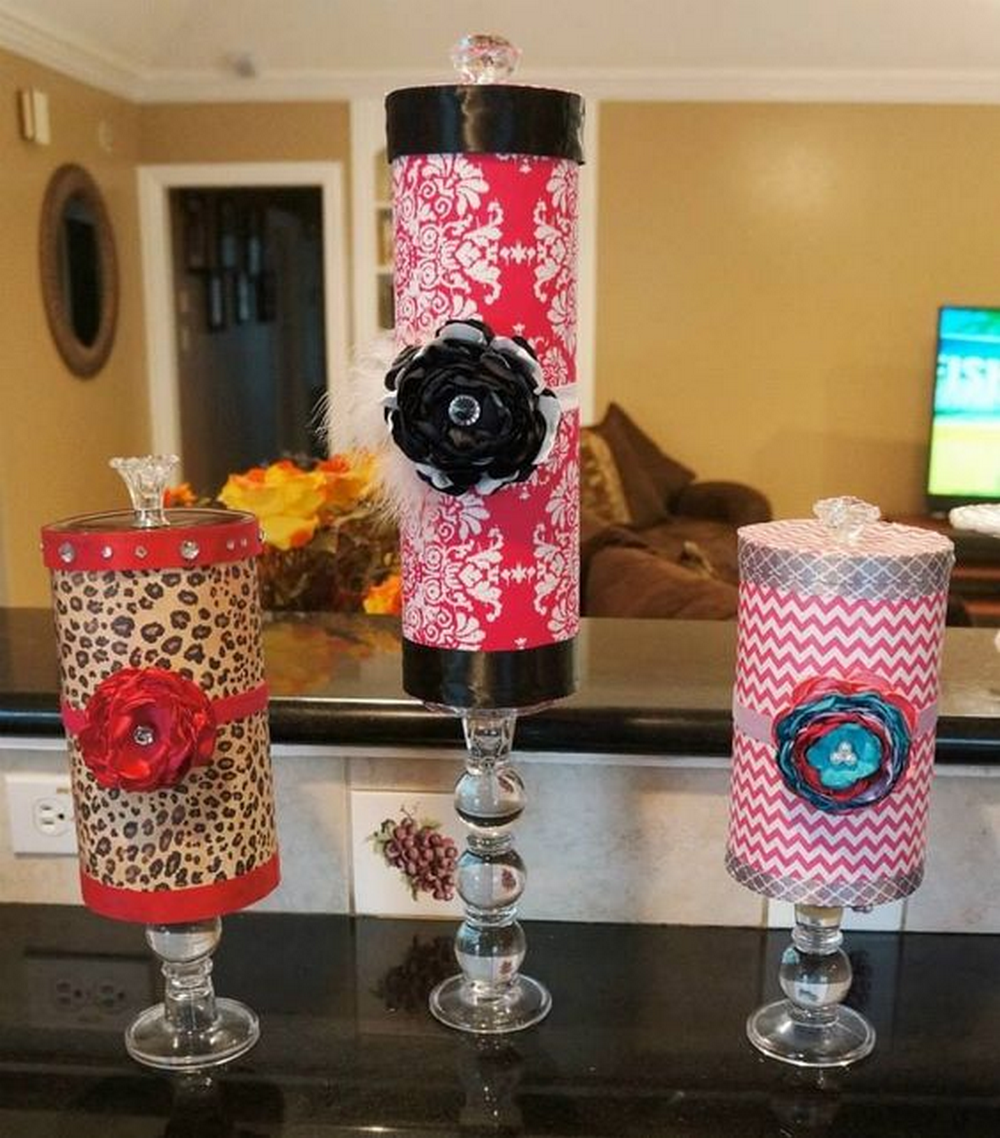
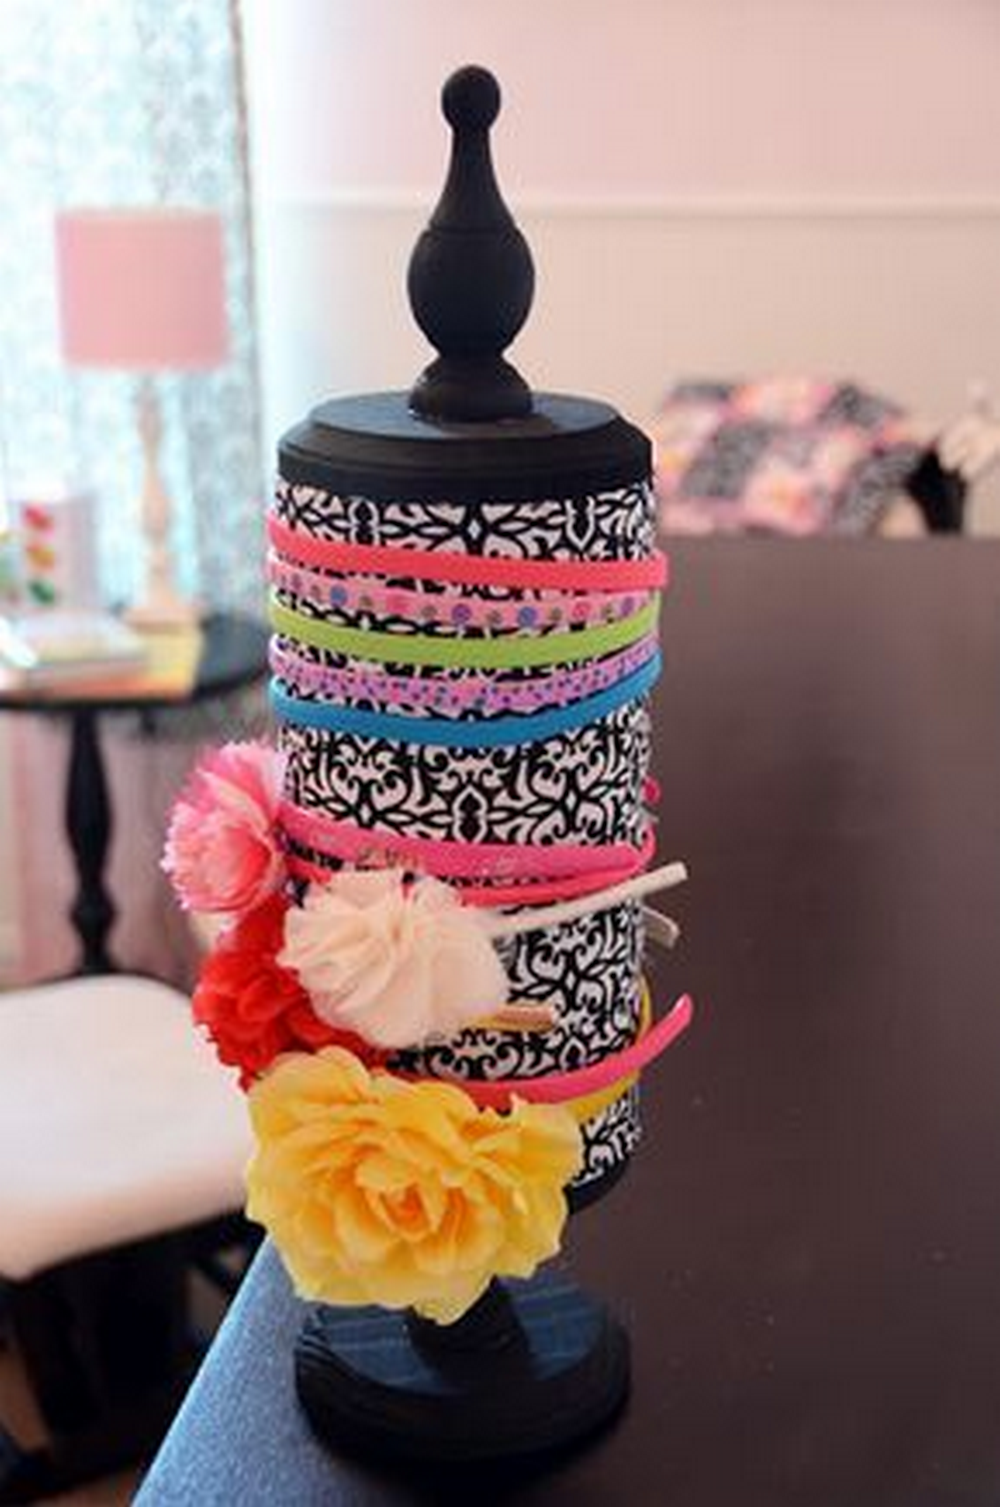
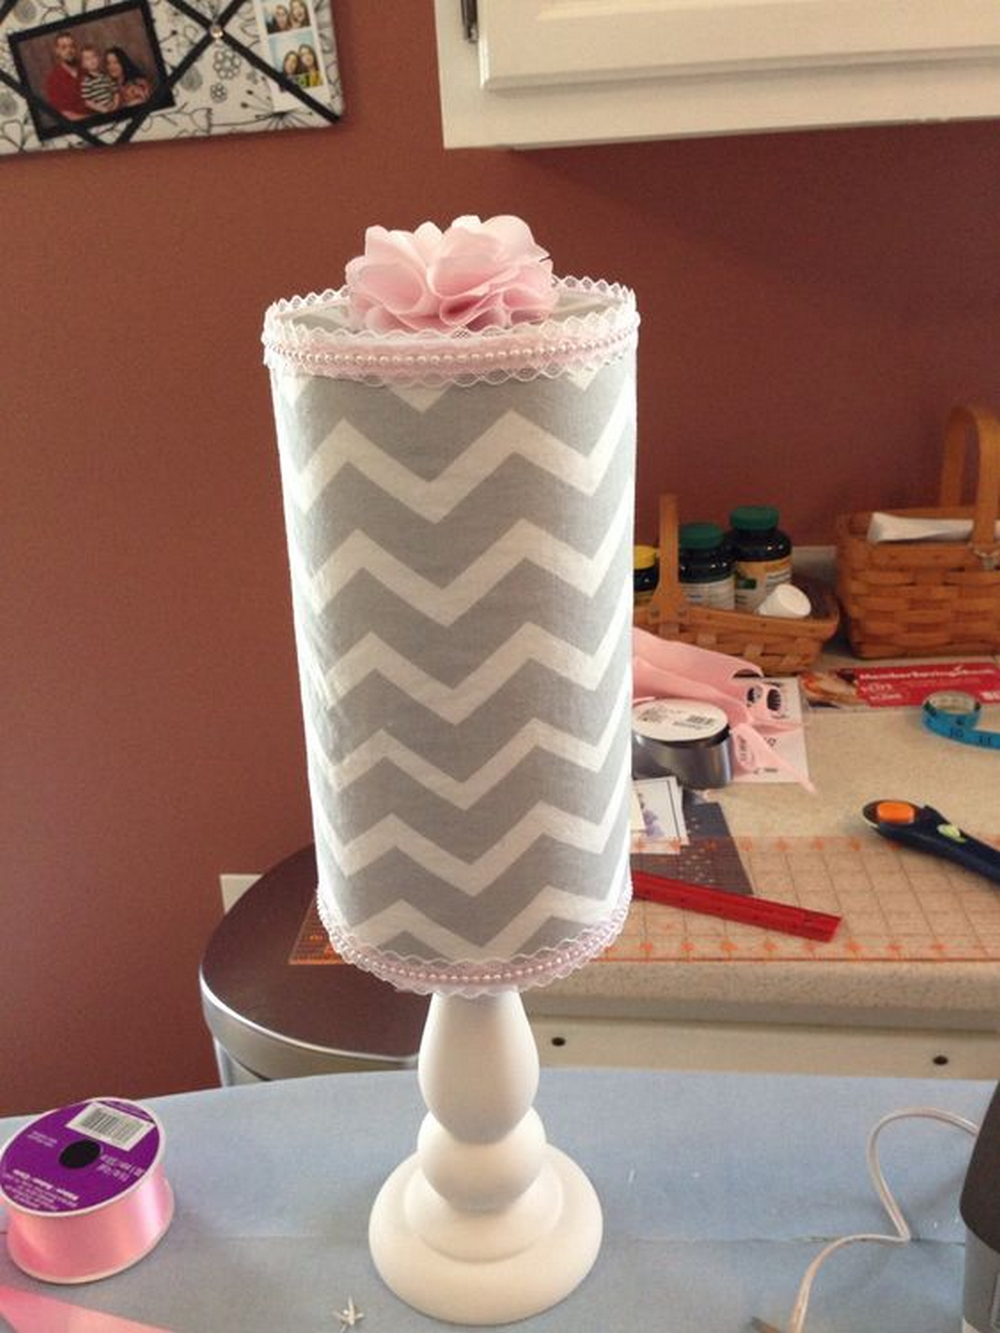
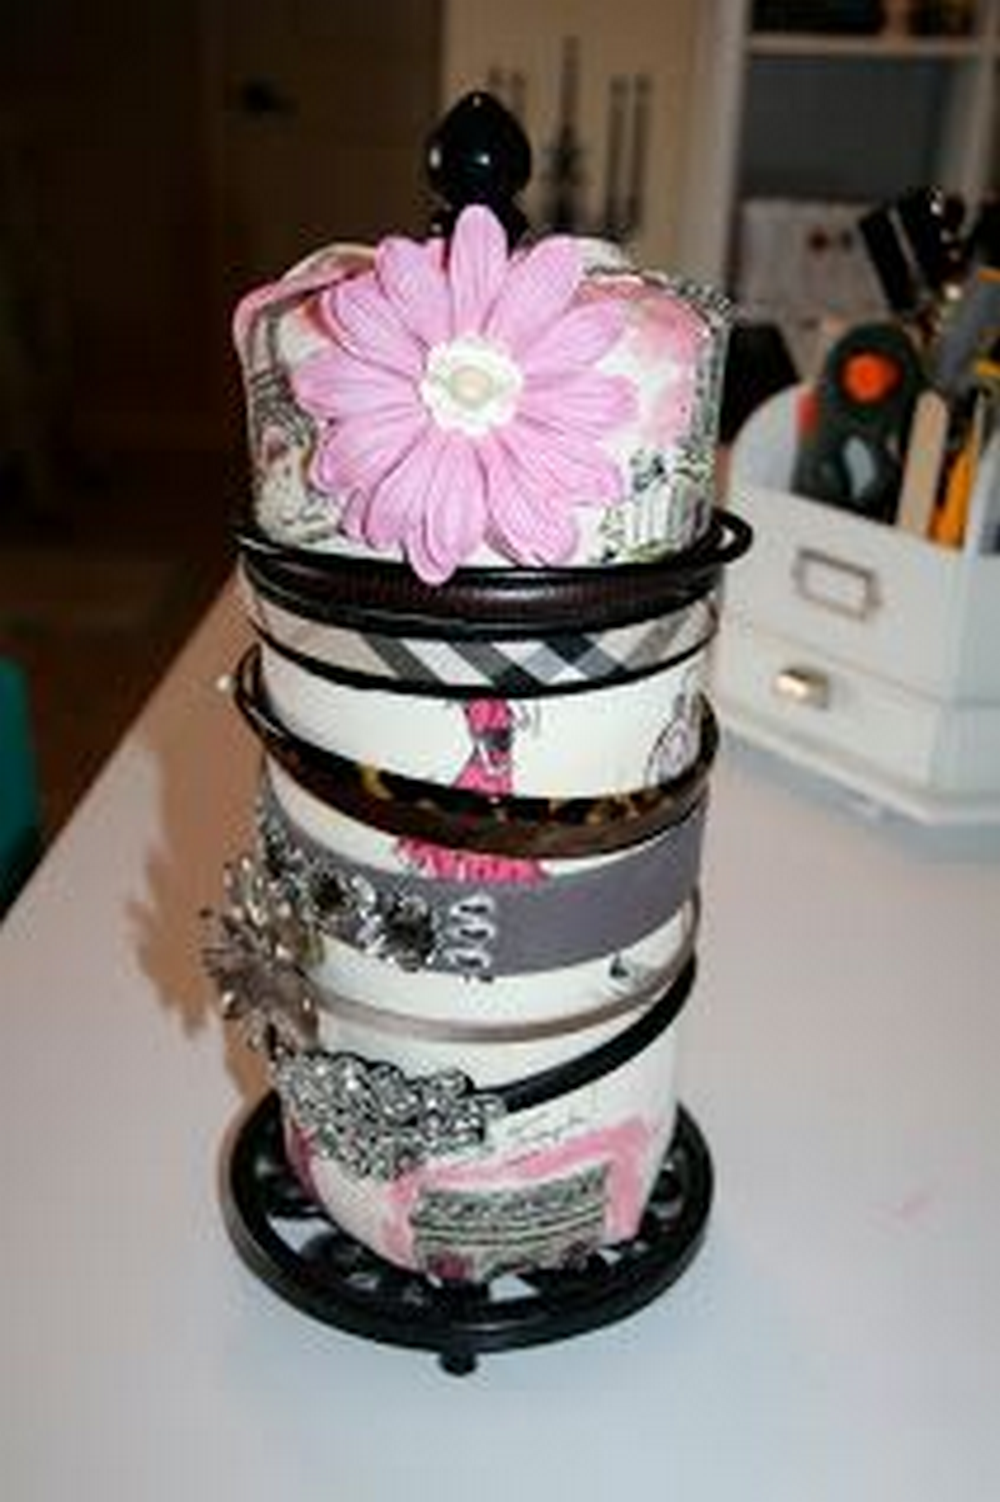
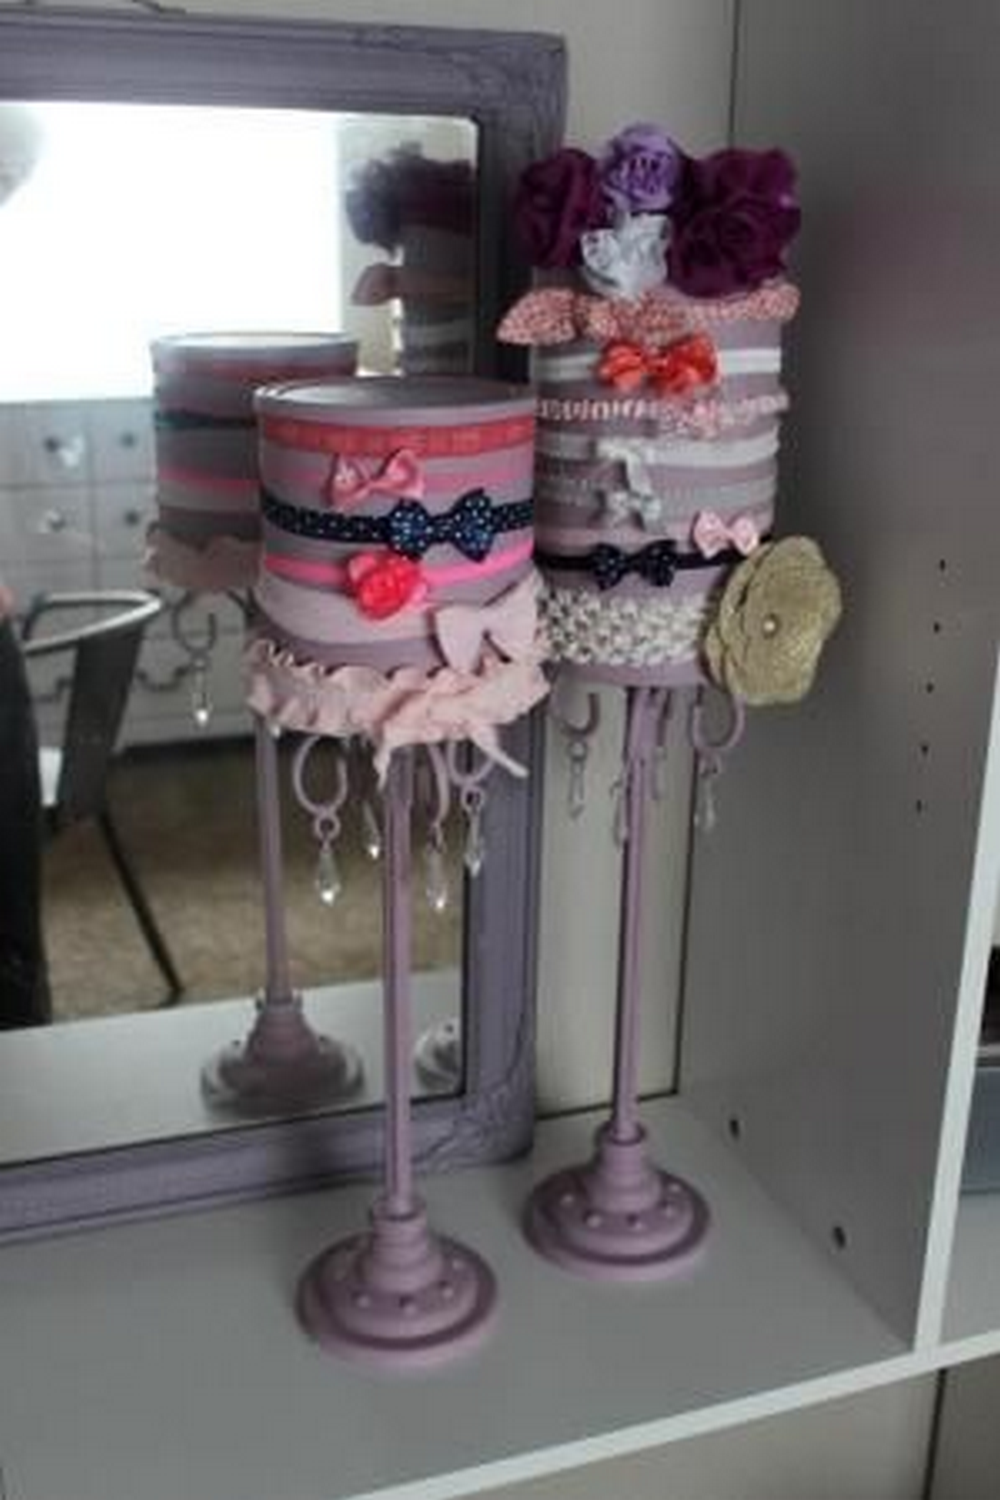
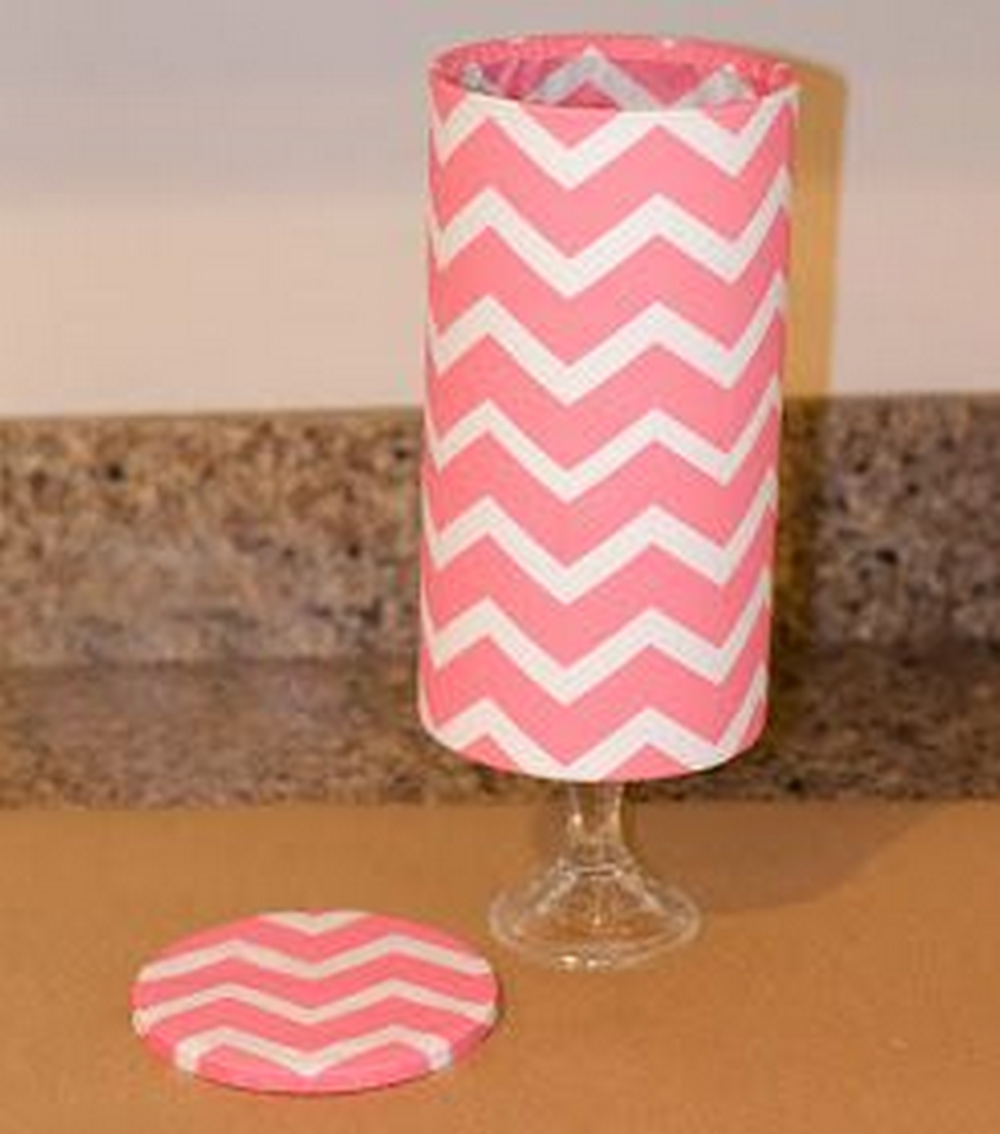
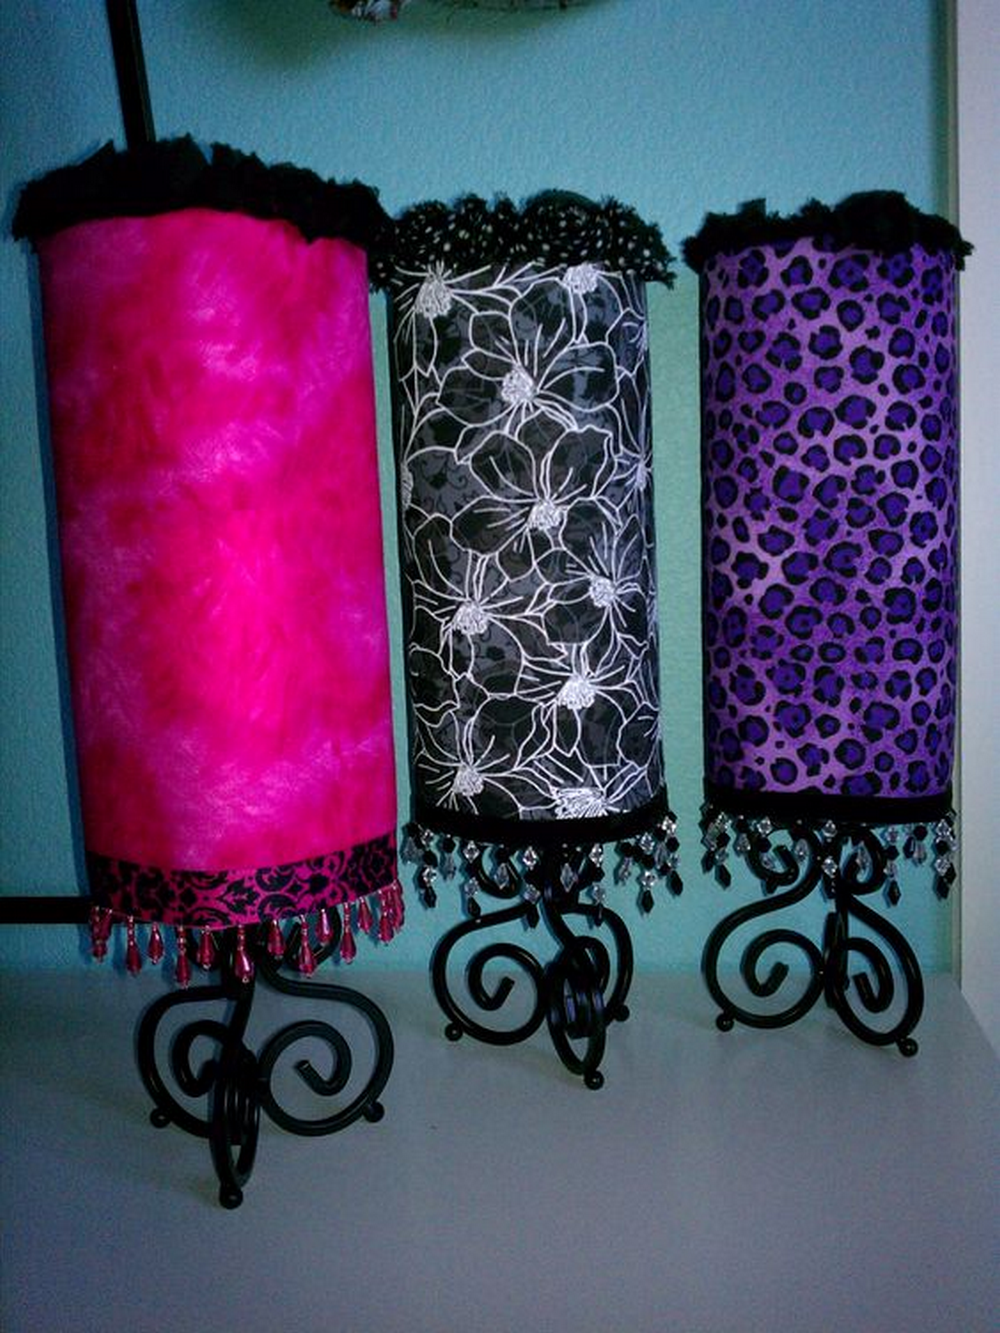
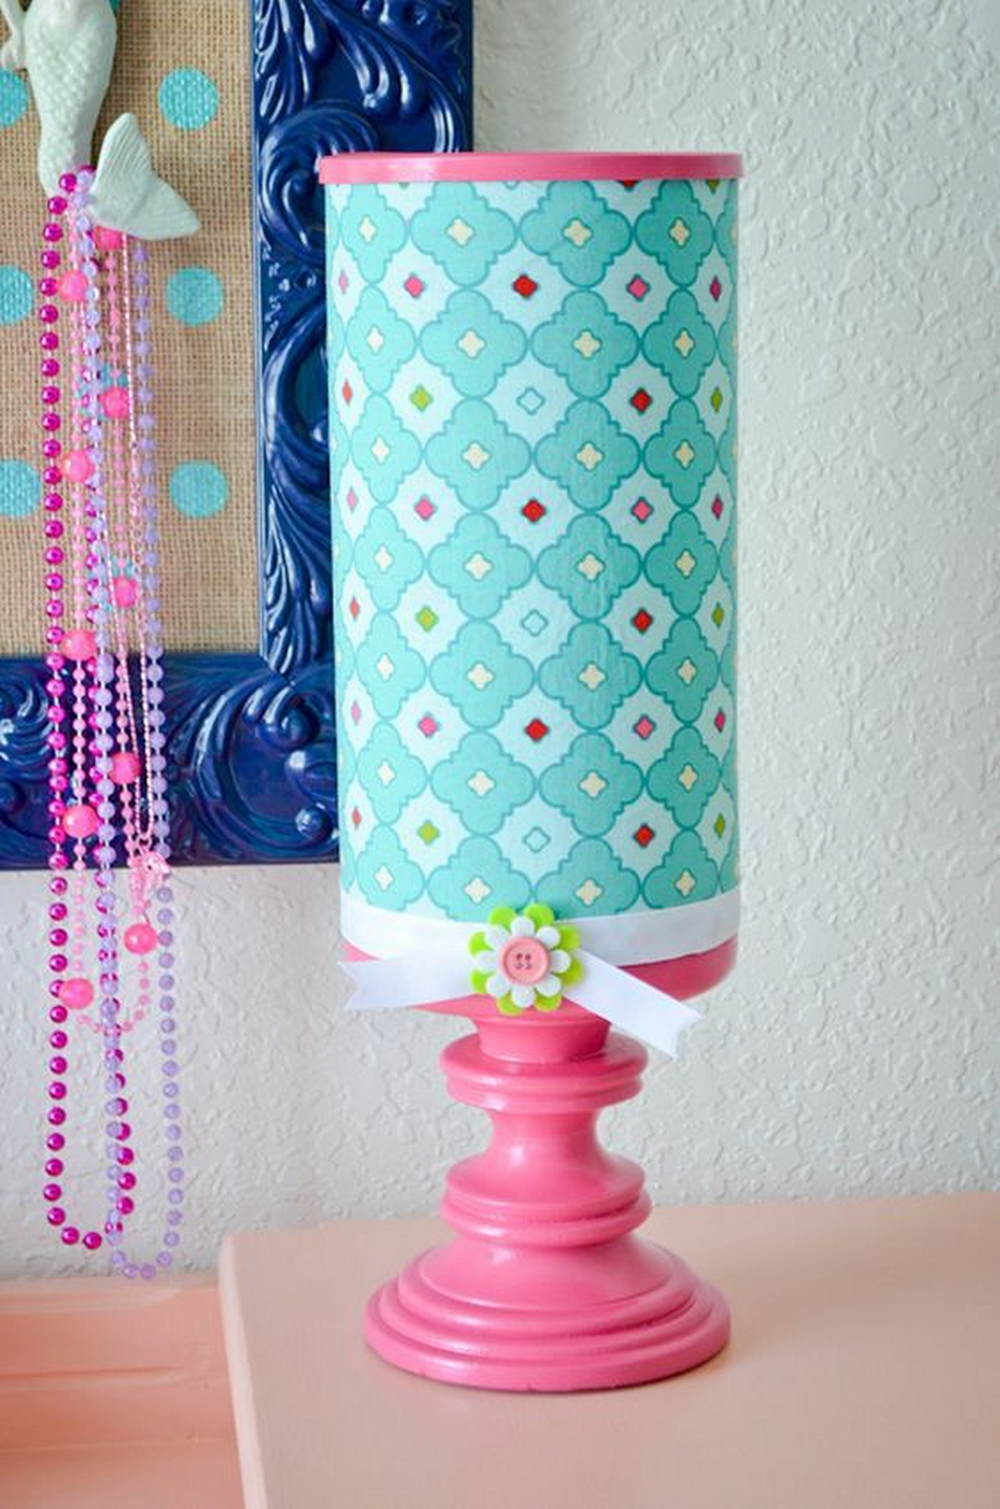
Cute Headband Organizer Design Ideas
Click on any image to start the lightbox display. Use your Esc key to close the lightbox.
For a visual guide, below is a video instruction making your own headband organizer.
Alternative Materials and Upcycling Ideas
Creating a headband organizer from scratch is not just about organization; it’s also an opportunity to embrace creativity and sustainability. By exploring alternative materials and upcycling ideas, you can craft a unique piece that reflects your style while being kind to the environment. This approach encourages reusing items that might otherwise be discarded, giving them a new purpose and reducing waste.
Let’s delve into some inventive ways to build your headband organizer using alternative materials and upcycling techniques.
Upcycling Household Items
Pringles Cans: The Tall and Slim Organizer
Pringles cans offer a perfect form for creating tall, slim headband organizers. Their height is ideal for stacking elastic headbands, making them easily accessible and visually appealing. To transform a Pringles can, cover it with scrapbook paper or fabric that matches your room’s decor. You can also paint it for a more uniform appearance.
Cardboard Rolls: Versatile and Customizable
Cardboard rolls from kitchen towels or wrapping paper are incredibly versatile. They can be cut to any height, offering flexibility in size and design. These rolls can be covered with paint, fabric, or decorative paper. For a more durable organizer, consider reinforcing the cardboard with a layer of mod podge or using thicker rolls from wrapping paper.
Coffee Cans and Large Yogurt Containers: The Wider Options
Coffee cans and large yogurt containers provide a wider alternative for those needing to store larger headbands or more items. These containers can accommodate bulkier headbands or larger quantities, keeping them neatly organized in one place. Similar to the methods mentioned above, these can be decorated with various materials to fit your personal style.
Personalization and Decoration
Personalization plays a key role in integrating these pieces into your living space regardless of the base item chosen for your headband organizer. Use a combination of paints, fabrics, and decorative papers to match your interior design. Embellishments such as ribbons, lace, and stickers can add a unique touch, making each organizer functional and a piece of decor.
Fabric and Textile Options
Fabric and textiles offer a versatile palette for decorating and personalizing headband organizers. Unlike paper, fabric can add texture, depth, and durability to your creation. From the soft elegance of velvet to the rugged charm of denim, the choice of material can transform the look and feel of your organizer, making it a statement piece in your decor.
Repurposing Old Clothes and Fabric Scraps
- Old Clothes: Look through your wardrobe for clothes that are no longer in use but feature interesting patterns, colors, or textures. Materials like cotton, linen, or even silk can wrap around the organizer smoothly and can be adhered with fabric glue or mod podge.
- Fabric Scraps: Don’t discard those leftover fabric pieces from other projects. Mix and match different textures and patterns to create a patchwork effect. This adds visual interest and tells a story through the fabrics used.
Old Jeans for a Durable Covering
- Denim: Denim provides a durable and stylish option for covering headband organizers. The material’s thickness adds structure to the organizer, while its iconic look brings a casual, chic vibe. You can enhance the denim with sewn-on patches, embroidery, or pockets repurposed from the jeans for additional storage.
Attaching the Materials
- Glue: Fabric glue is an excellent choice for attaching textiles to your organizer. It’s strong, dries clear, and is suitable for various fabrics. Apply it evenly across the surface for a smooth finish.
- Sewing: For those who prefer a more hands-on approach or are working with thicker materials like denim, sewing the fabric onto the organizer can provide extra durability. This method also allows for easy removal if you wish to wash or change the covering in the future.
Additional Decorative Elements
Beyond the base material, consider adding embellishments to your fabric-covered headband organizer. Lace trims, buttons, beads, or embroidery can further personalize the piece. Incorporate pockets or loops from old garments to hold hair clips, bobby pins, or other small accessories for a fun and functional twist.
Natural and Eco-Friendly Coverings
In a world increasingly conscious of sustainability, choosing natural and eco-friendly materials for DIY projects like a headband organizer is both a responsible and rewarding approach. These materials minimize environmental impact and bring a unique, organic aesthetic to your creations.
The Rustic Charm of Twine
- Visual Appeal: Twine, with its rough texture and natural color, can give your headband organizer a rustic charm. Wrapping twine around the container creates a visually interesting piece that blends with earthy, bohemian, or country-themed decor.
- Durability: Beyond its aesthetic appeal, twine is exceptionally durable. It can withstand the wear and tear of daily use, ensuring your headband organizer remains both beautiful and functional for years to come.
Creative Uses of Rope
- Variety: Rope comes in various thicknesses and materials, such as hemp, sisal, or jute. Each type offers a different look and feel, allowing you to customize your organizer to your liking.
- Technique: Wrapping rope around your container can be done in patterns, such as spirals or in bands, to add an extra layer of texture and interest. You might also consider incorporating knots or braids for additional decorative touches.
Repurposing with Purpose
- Recycled Paper: Using recycled paper not only is an eco-friendly choice but also offers a canvas for creativity. You can paint, print, or draw on the paper before applying it to the organizer, giving it a personal touch.
- Newspapers: Newspapers provide a unique aesthetic with their text and images. Selecting pages with interesting prints or headlines can turn your headband organizer into a conversation piece. Additionally, the black and white palette offers a modern, minimalist look that can complement various interior styles.
Creative Toppers and Bases
- Brooches and Beads: Transform old jewelry pieces into captivating toppers for your headband organizer’s lid. Brooches or large beads can serve as elegant, eye-catching elements that add a touch of glamour. This approach recycles unused jewelry and creates a unique decorative feature.
- Reflective Bases: Old CDs or DVDs can be used as bases for the headband organizer, providing modern flair and additional stability. The reflective surface of these discs adds an unexpected, contemporary touch while ensuring the organizer stands firmly.
Integrating Nature
- Branches and Driftwood: For those who appreciate a rustic aesthetic, using small branches or pieces of driftwood as the organizer’s base offers a direct connection to nature. This choice grounds the piece in natural beauty and ensures each organizer is truly one-of-a-kind.
- Dried Flowers and Leaves: Incorporating dried flowers or leaves can transform the appearance of your headband organizer. These elements can be glued directly onto the container or embedded within layers of Mod Podge for a floral, nature-inspired design. This method adds visual appeal and brings a bit of the outdoors inside.
By exploring alternative materials and upcycling ideas, you craft a unique and personal headband organizer and contribute to a more sustainable lifestyle. Each organizer tells a story, showcasing creativity and the beauty of giving old items new life.
Maintenance and Cleaning Tips
Regular maintenance not only prolongs the life of your headband organizer but also keeps your accessories in top condition. Whether your organizer is made from upcycled materials, fabric, natural elements, or more traditional crafting materials, these tips will help you keep it clean and in excellent shape.
Dusting and Light Cleaning
- Regular Dusting: Use a soft, dry cloth or a duster to gently remove dust from the surface of your headband organizer. Consider using a small, soft-bristled brush to get into the crevices for organizers wrapped in fabric or textured materials like twine.
- Wipe Down: For organizers made with hard surfaces, such as those covered in scrapbook paper or repurposed CDs, lightly dampen a cloth with water or a mild cleaner and wipe the surface gently. Be sure to dry the surface thoroughly afterward to prevent any water damage.
Deep Cleaning Fabric-Covered Organizers
- Spot Cleaning: If your headband organizer is covered in fabric and gets a stain, spot clean it using a mild detergent mixed with water. Apply the solution directly to the stain and gently dab with a cloth until the stain lifts. Avoid rubbing to prevent the fabric from pilling or damaging.
- Washing: Some fabric-covered organizers, especially those constructed with removable covers, can be hand-washed or even machine-washed on a gentle cycle. Always check the durability of the fabric and any attached decorations before washing.
Caring for Organizers with Natural or Eco-Friendly Coverings
- Natural Materials: For organizers adorned with natural materials like dried flowers, branches, or twine, use a blow dryer on a cool, low setting to blow away dust. Avoid using water or liquids that could damage these materials.
- Recycled Paper and Eco-Friendly Materials: Lightly dusting surfaces covered with recycled paper or similar materials. Avoid moisture to prevent warping or damage to the paper.
Maintenance Tips for Durability
- Regular Checks: Inspect your headband organizer for any loose elements or wear and tear. If you’ve used glue or other adhesives, check their hold and reapply if necessary to prevent decorations or fabric from peeling off.
- Avoid Direct Sunlight: Place your headband organizer away from direct sunlight to prevent fading of the materials used, especially if it’s covered in fabric, paper, or has natural elements that could be affected by UV exposure.
By following these maintenance and cleaning tips, your headband organizer will continue to serve as a stylish and practical storage solution for your accessories. Regular care ensures that your organizer remains visually appealing and durable for long-term use.
Conclusion
Crafting a headband organizer offers a creative and sustainable way to keep accessories neatly arranged and adds a personal touch to your decor. Through the use of upcycled materials and customizable designs, anyone can create a functional piece that reflects their style and meets their organizational needs. This DIY project enhances your space’s aesthetics and promotes eco-friendly practices by repurposing household items.
For more fashion organization methods, check out our DIY jewelry organizer project!


