Concrete sculptures add a touch of whimsical charm to your garden. However, they can get pretty expensive. Fortunately for DIYers, you can make your own custom garden sculptures at a fraction of the store-bought ones. But working with concrete can sometimes get too heavy. Well, that was until someone discovered the wonders of papercrete garden sculpture.
Papercrete is basically combining paper and concrete. Because paper is lightweight by nature, it doesn’t get as heavy as when working with concrete alone.

This is actually a fun project that you can do with your kids. It’s getting down and dirty for a good cause. They’ll be thrilled to see the finished product sitting right in your garden.
Get started on your DIY papercrete garden sculptures today!
Contents
Making a Papercrete Garden Sculpture
You’ll need some basic supplies to get started on your papercrete garden sculpture. Here’s a list of what you’ll need:
Materials
- Paper (newspaper, egg cartons, any paper)
- Water
- String
- Plastic bag
- Chicken wire (or any mesh material)
- Stiff wire
- Portland cement
- Sand
Tools
- Strainer/sieve
- Tin snips/pliers
- Agitation device (paint mixer, blender, strong arms)
- Gloves
- Dust mask
- Stir Sticks (wood or plastic)
- Bucket
Instructions
Making papercrete garden sculptures is a fun and easy way to get creative with your paper recycling.
Just follow these simple steps and you’ll be on your way to creating a one-of-a-kind piece for your garden.
1. Shred the recycled papers
Shred the recycled papers into small pieces, the smaller the better. The time it will consume, will depend on the type of recycled paper you are using. Egg cartons are already recycled paper so they will break down quite quickly. If you have old newspapers, this will be good, shred and use them.
Use some hot water to help soften it. Add enough water to fully soak them.
Mix thoroughly to help break down fibers. You can use an old blender, or a paint mixer will help you with this process. You will see the fibers get ‘fuzzier’ and softer and may even need additional water. It should resemble ‘mush’ when totally broken down.
2. Create your desired shape
For ease of forming, the sculpture is in the shape of a ball. We prefer things that are free or affordable.
To create a ball shape, crumple an old newspaper to your preferred size. It should turn out to be a little dense or solid.
To keep it together, cover it with string. You can use a mesh material (like chicken wires) to wrap the ball shape. This will make it more stiff and sturdy.
If you don’t prefer the paper ball to absorb the moisture from the concrete, you can wrap it with plastic instead.
3. Make the concrete mixture
Gather your materials for mixing, here’s your list:
- Sand & Cement
- Recycled paper fibers
- Agitation devise for mixing
- Wood stick for stirring
- Gloves & Dust mask
- Water in a bucket
And here are the steps:
Strain the paper fibers from the water and squeeze them if necessary.
Mix thoroughly with cement, sand, and water.
When squeezed in your gloved hand, the consistency should be stiff, holding its shape like clay
4. Let’s start sculpting
Once you have your papercrete mixture, you can start to sculpt!
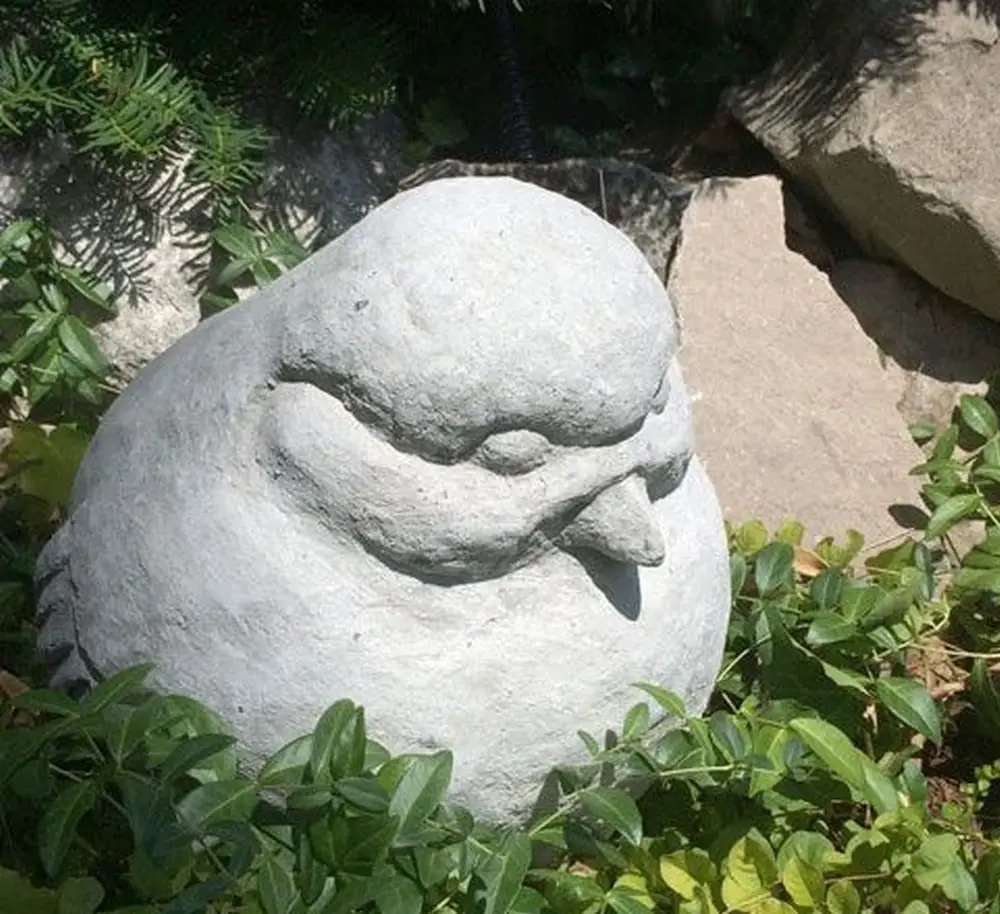
Since we have a ball-shaped figure. We can think of round, chubby animals. How about a chubby frog? 🐸
Here’s how:
Place the ball shape figure on any solid object that you can turn
Wrap the ball with the cement mixture. make sure it’s even and smooth. Approximately 1/4″ to 3/4″ by spreading it with your hands
Turn around the object and assess the shape
5. Add the details of your frog
Use some utensils to carve the eyes and warts on top.
You can create some strips for the mouth and just stretch the edges.
To make the legs, simply stretch the cement out from the sides.
Turn around the frog, to make sure to see that all sides are good and make it proportional as much as possible.
Since there’s the fiber content, the drying process will be slower. You can place it in the sun but cover it with a thin cloth since concrete prefers a slow damp setting cycle to preserve its strength. You can also mist it with a small amount of water if necessary. The color will change once it’s totally dry.
6. Remove the ball shape figure
If you want to remove the ball shape figure inside your frog, simply turn the frog upside down. Just be careful not to break it and make sure it’s totally dry. remove the strings and old newspaper using your pliers.
7. Display your sculpture in your garden
Finally, you have completed your DIY papercrete garden sculpture. you can also paint it if you want.
Now you can place your papercrete garden sculpture in your garden as a display beside your plants and flowers! By adding a sculpture to your garden, you can create a unique and personal space that is truly your own. Plus, it’s a great way to show off your creative side!
Thanks to MadeByBarb for this great project. You can get step-by-step instructions here…
Decorating and Finishing Touches
Crafting a papercrete garden sculpture is the beginning of a creative adventure that adds a unique charm to your garden. After sculpting your piece into its desired form, the exciting part comes next: bringing it to life with color and ensuring it stands the test of time against outdoor conditions.
This segment delves into the art of decorating and finishing your papercrete sculptures, ensuring they capture the eye and withstand the elements gracefully.
Selecting the Perfect Paint
The choice of paint can dramatically transform your papercrete garden sculpture, infusing it with vibrancy or a subtle natural elegance. Acrylic paint stands out as the best choice for its adaptability and resilience.
It comes in an extensive palette of colors, offering endless possibilities to animate your sculpture. To prepare the surface and enhance the durability of your artwork, applying an outdoor-grade primer is essential. This step ensures that the paint adheres properly and your sculpture’s colors remain vivid under the sun and rain.
Ensuring Durability with Sealant
Your sculpture’s longevity is significantly improved with the application of a suitable sealant. Opt for a clear, outdoor-specific sealant to envelop your piece in a protective layer that doesn’t alter the vibrancy of your painting efforts. It’s advisable to apply several thin coats, letting each dry completely before adding the next.
A proper sealant will increase the lifespan of your sculpture. In addition, the added finish gives your papercrete garden sculpture that slick gloss look.
Weatherproofing Your Creation
To guarantee your papercrete garden sculpture endures through seasons, weatherproofing is key. Beyond sealing, incorporating a waterproofing treatment prior to painting can offer additional defense against moisture.
For sculptures that will be placed directly on soil or used as planters, fortifying the base with an enhanced papercrete mix containing a waterproof additive is a smart move. This step is crucial for preventing water absorption from the ground up.
Adding Personal Touches
The final flourishes on your papercrete garden sculpture make it truly yours. Consider adorning your piece with mosaic tiles or shards of colored glass for a touch of sophistication. Integrating solar-powered lighting can transform your sculpture into an enchanting feature after dusk.
For a sculpture that tells a story of time, aging techniques can be employed to achieve a beautifully weathered look. These personalized touches not only elevate the aesthetic appeal of your sculpture but also harmonize it with the overall narrative of your garden space.
In dedicating attention to the decoration and finishing of your papercrete garden sculptures, you not only elevate their visual appeal but also ensure their resilience and longevity. This journey of creativity allows you to express your artistic vision while crafting a garden feature that will be treasured for years to come.
Awesome DIY papercrete garden sculpture design ideas
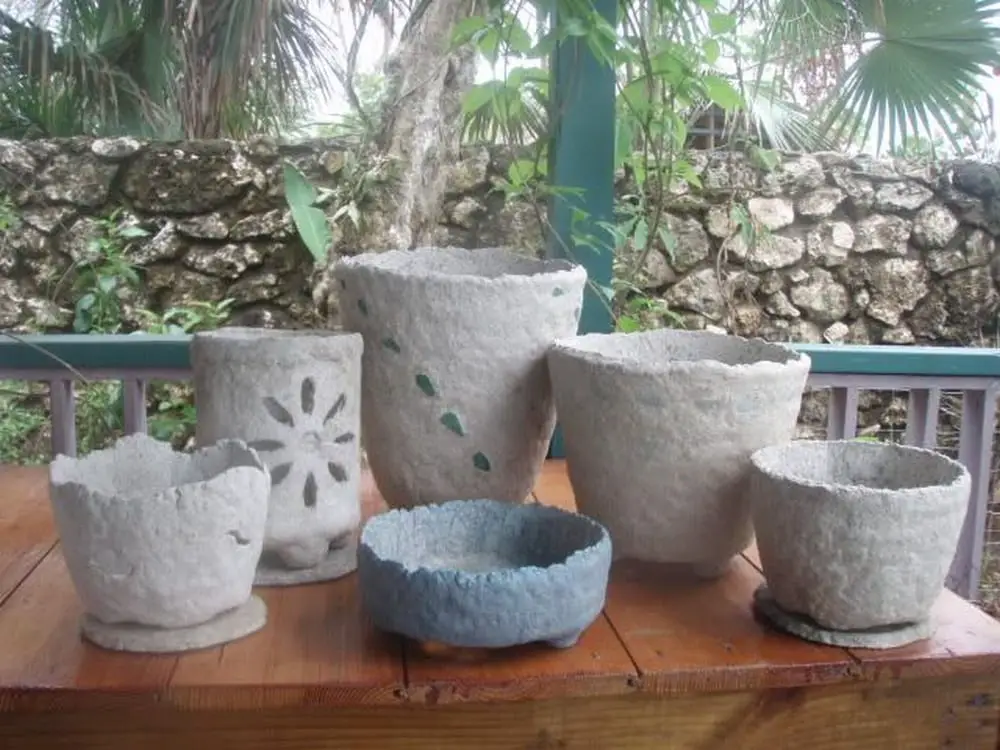
The possibilities for creative expression with this medium are endless. Take a look at some of the papercrete garden sculptures below. Hopefully, you’ll be inspired to make one of your own.
Click on any image to start the lightbox display. Use your Esc key to close the lightbox.


Themed Garden Sculpture Ideas
Transforming your garden into a narrative landscape is an art form, and themed papercrete garden sculptures are the perfect medium for storytelling.
This section will guide you through various themed sculpture ideas, helping you choose or inspire a theme that resonates with your personal style and garden’s aesthetic.
Wildlife Oasis
Bring the essence of the wild into your garden with papercrete sculptures of animals. From majestic deer to playful squirrels, creating a wildlife theme can turn your garden into a serene oasis. Papercrete’s lightweight nature makes it ideal for crafting detailed animals of all sizes. You can even paint and finish them to mimic real fur and features, adding a wilderness charm to your outdoor space.
Mythical Garden
Unleash the magic within your garden by incorporating mythical creatures made from papercrete. Dragons, fairies, and mythical beasts can all be sculpted to stand guard over your flowers or hide amongst the foliage. Use vibrant colors and metallic finishes to bring these fantastical beings to life. A mythical garden theme creates an enchanting space that sparks the imagination of all who enter.
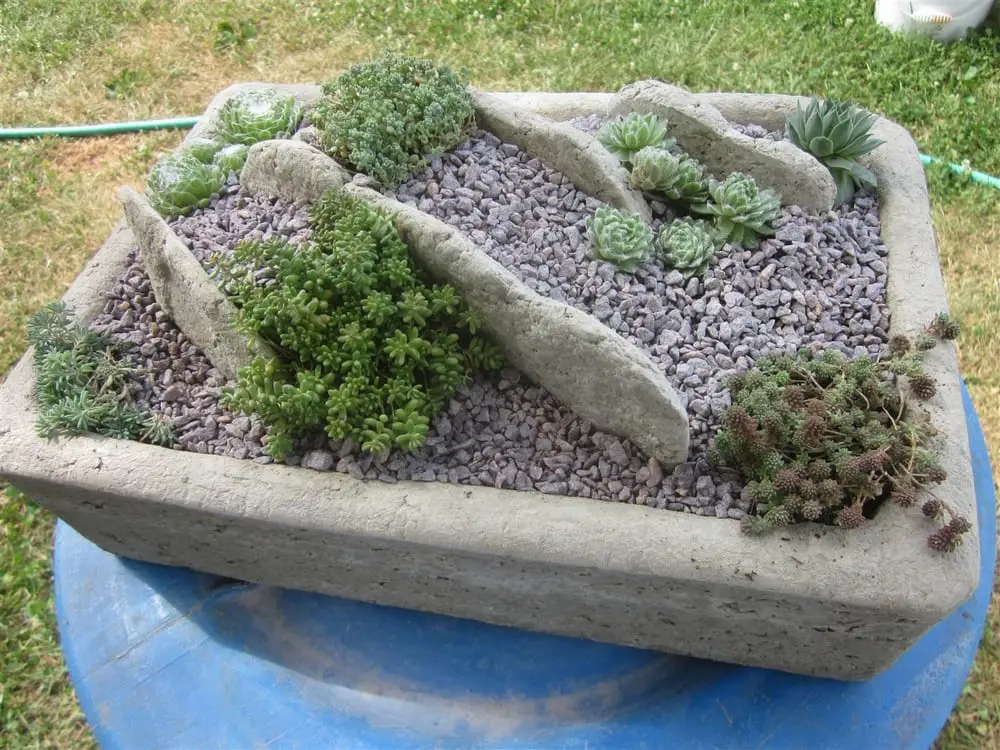
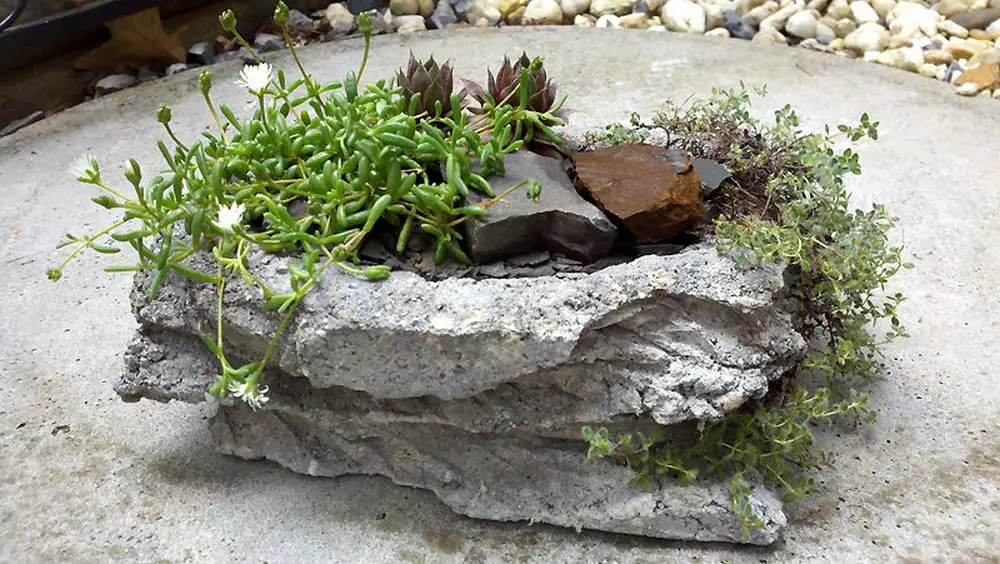
Abstract Art Forms
For a modern twist, consider adding abstract papercrete sculptures to your garden. Abstract art can complement the natural beauty of your garden with its unexpected shapes and forms, creating a striking contrast. Papercrete allows for experimentation with textures and shapes, making it perfect for abstract sculptures. Depending on their size and placement, these pieces can serve as focal points or subtle complements to the surrounding greenery.
Seasonal Celebrations
Celebrate the changing seasons with papercrete sculptures that reflect the time of year. From winter snowmen and reindeer to summer sunflowers and butterflies, your garden can evolve with the seasons. Papercrete’s adaptability means you can easily create and swap out sculptures to match seasonal themes, keeping your garden fresh and engaging throughout the year.
Cultural Heritage
Honor your cultural heritage or celebrate the world’s diversity with papercrete sculptures that reflect traditional symbols, artifacts, and architectural styles. Whether it’s a sculpture inspired by ancient civilizations, traditional folk art, or modern cultural icons, these pieces add depth and personal significance to your garden. Painting and finishing techniques can be used to achieve authentic looks, connecting your outdoor space to the rich tapestry of human history.
Incorporating themed papercrete garden sculptures into your outdoor space is a testament to creativity and an invitation to embark on a journey of exploration. Each theme offers a unique way to personalize your garden, reflecting your interests, inspirations, and aspirations. Papercrete’s possibilities are as limitless as your imagination, allowing you to craft a garden that truly stands out.
Troubleshooting Common Papercrete Issues
Papercrete is an innovative and versatile material for creating garden sculptures, merging the sustainability of recycled paper with the durability of concrete. While crafting with papercrete opens up a world of creative possibilities, it’s not without its challenges.
This section addresses common issues encountered when working with papercrete for garden sculptures, offering practical solutions to ensure your creations are both beautiful and enduring.
Cracking During Drying
One of the most frequent problems with papercrete is cracking as it dries. This usually occurs due to rapid drying or uneven moisture content.
Solution: Ensure even drying by keeping your sculpture in a shaded, well-ventilated area away from direct sunlight. Covering the sculpture with a damp cloth can also help maintain moisture levels evenly throughout the drying process. For larger sculptures, consider constructing them in parts to reduce stress on the material.
Uneven Surfaces and Bubbles
Uneven surfaces and bubbles can mar the smoothness of your papercrete garden sculpture, detracting from its final appearance.
Solution: To minimize surface irregularities, thoroughly mix your papercrete to achieve a consistent texture before molding. Applying a thin layer of a papercrete slurry (a more liquid mix) over the surface can fill in bubbles and uneven spots. Sanding the dried sculpture with fine-grit sandpaper can also smooth out minor imperfections.
Mold and Mildew Growth
Due to its organic components, papercrete is susceptible to mold and mildew growth, especially in humid environments.
Solution: Incorporating a mold inhibitor into your papercrete mix can help prevent growth. Ensure your sculpture is properly sealed with a waterproof sealant for added protection. Regularly inspect your sculptures for signs of mold and clean them with a mildewcide solution if necessary.
Color Fading
The vibrant colors of your painted papercrete garden sculpture may fade over time, especially when exposed to the elements.
Solution: Use UV-resistant outdoor paints and sealants to protect against fading. Applying a UV-protective finish as the final layer can also extend the life of your sculpture’s colors. Positioning sculptures in areas that receive partial shade during the day can further reduce the risk of fading.
Weight Concerns for Large Sculptures
While papercrete is lighter than traditional concrete, large sculptures can still become too heavy to move or may exert too much pressure on themselves.
Solution: Design large sculptures with a hollow interior to reduce weight. Reinforcing the internal structure with lightweight materials such as foam or plastic mesh can provide stability without adding significant weight. Consider assembling large sculptures in situ to avoid the need to move them once completed.
By anticipating and addressing these common issues, you can ensure your papercrete garden sculptures remain attractive and durable features in your garden. Each solution solves a problem and enhances the overall quality and longevity of your creative endeavors with papercrete.
FAQ on Making Papercrete Garden Sculpture
What is papercrete?
Papercrete is an eco-friendly building material made by mixing shredded paper, Portland cement, sand, and water. It’s lightweight, durable, and perfect for crafting unique papercrete garden sculptures.
How do I make the papercrete mix for garden sculptures?
To create papercrete garden sculptures, start by shredding recycled paper into small pieces and soaking it in water until it forms a pulp. Then, mix this pulp with Portland cement — and sand, if desired — in a ratio that ensures the mixture is malleable but holds its shape. A common starting point is 2 parts paper pulp, 2 parts Portland cement, and 1 part sand. Adjust the components based on the desired texture and strength.
Can I add color to my papercrete garden sculpture?
You can add color to your papercrete garden sculpture by mixing pigment directly into the papercrete mix before sculpting. Alternatively, paint your sculpture with outdoor acrylic paints after it has dried and hardened. This second method provides more flexibility to adjust and add details to your sculpture’s appearance.
How do I prevent my papercrete garden sculpture from cracking?
To minimize the risk of cracking, ensure your papercrete mix is not too dry when molding your sculpture. Keep the sculpture moist and covered with a plastic sheet or damp cloth during the initial drying stage. Slow, even drying is key to preventing cracks. If your sculpture is large, consider constructing it in parts to reduce stress.
Are papercrete garden sculptures weatherproof?
Papercrete garden sculptures are inherently durable but require sealing to become fully weatherproof. After your sculpture dries, apply a waterproof sealant to protect it from moisture and weather conditions. For extra protection against mold and mildew, incorporate a mold inhibitor into your mix or apply a mildew-resistant finish.
Conclusion
Crafting papercrete garden sculptures offers a unique blend of creativity, sustainability, and personal expression for enhancing outdoor spaces. Through mastering the mix, molding, and finishing techniques, enthusiasts can transform recycled materials into enduring art pieces. This eco-friendly endeavor beautifies gardens and fosters a deeper connection with the environment.


